
California emissions test results come back as a certificate with a pass or fail status, OBD-II diagnostic data, and any flagged trouble codes. The most common reason a test never reaches the tailpipe stage is incomplete readiness monitors, not a real emissions defect.
You may be standing at the counter with a Vehicle Inspection Report in your hand, trying to decide whether “failed,” “not ready,” or a code such as P0420 means an expensive repair. The wording can feel technical, but the report follows a logical path. It records what the station checked, which part of the inspection stopped the process, and whether the result can be sent to the California Department of Motor Vehicles.
California's statewide results show why these inspections matter. The 2025 Smog Check executive summary recorded 11,275,981 initial tests, with 959,667 failures, an 8.51% initial failure rate, and 12,200,718 total tests with a 9.04% overall failure rate. Emissions-related failures accounted for 83,034 cases, or a 10.20% emissions failure rate, as reported in the California Smog Check benchmark data. A result that doesn't reach the tailpipe stage is therefore worth interpreting carefully, not treating as proof that the engine has a major defect.
Table of Contents
- What Your Emissions Test Results Show
- How OBD-II Readiness Monitors Decide Your Result
- Common Trouble Codes Behind a Failed Emissions Test
- Emissions Failures Versus Visual and Functional Rejections
- Your Retest and Repair Path After a Failure
- Why a STAR Test-Only Station Matters in Antioch
- From Smog Certificate to Renewed Registration in One Stop
- Quick Checklist and Next Steps for Your Vehicle
What Your Emissions Test Results Show
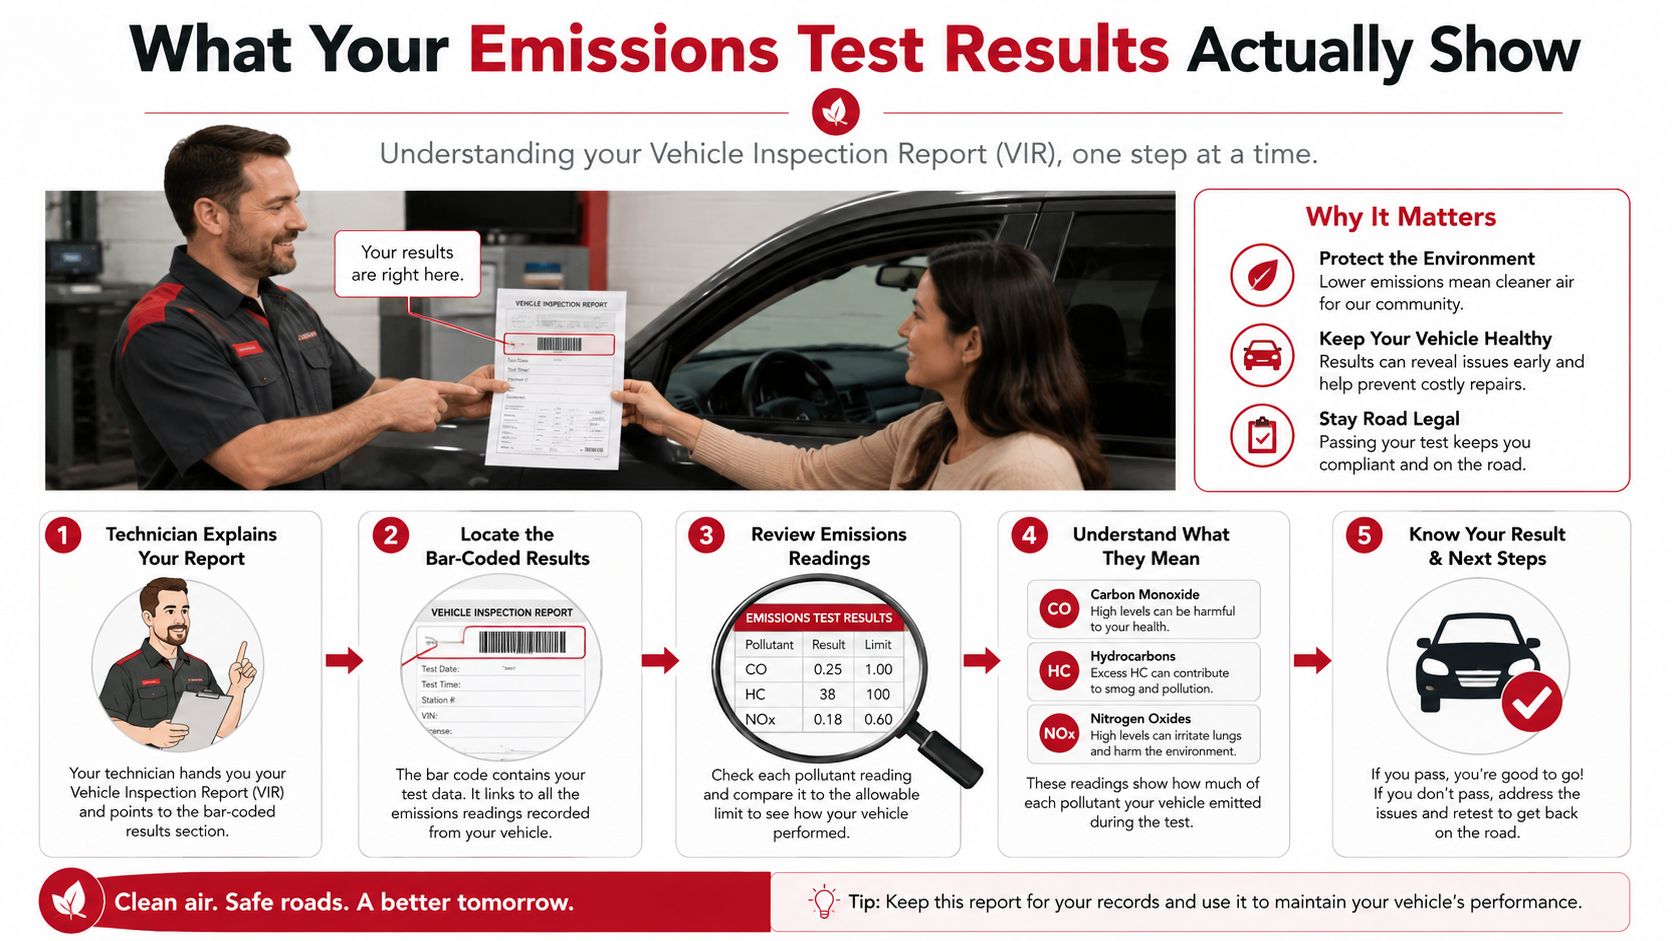
A technician usually hands you a Vehicle Inspection Report, or VIR, after the inspection. Begin with the header before reading the pass or fail box. It normally lists the test date, vehicle identification number, license information, station number, and test type. Confirming these details first can prevent a record problem caused by a mismatch, even when the vehicle itself tested correctly.
The certificate includes a barcode and serves as the inspection record connected to the DMV. It may show the overall outcome, completed inspection portions, OBD-II information, applicable tailpipe readings, and emissions-related diagnostic trouble codes. The applicable measurement rules are summarized in this guide to California emissions standards.
Read the result fields in order
Review these report sections:
- Overall outcome: The final status may be pass, fail, or refusal to test.
- Inspection portions: The VIR can identify visual and functional checks, the OBD scan, and tailpipe testing when required.
- Measured readings: Applicable tailpipe results may include hydrocarbons, or HC, carbon monoxide, or CO, oxides of nitrogen, or NOx, and carbon dioxide, or CO2. The report compares each reading with the applicable cutpoints.
- Diagnostic information: The VIR can list emissions-related trouble codes or show that the vehicle's monitors were not ready.
- Certification statement: A passing certificate provides the DMV with the electronic record needed for the applicable registration transaction.
The certificate is the legal inspection record used by the DMV to clear a registration requirement, not merely a shop receipt. A passing result is generally transmitted electronically. Keep the paper copy in case the online record is delayed or a clerk needs information from the certificate.
Practical rule: A “Not ready” result usually means the inspection was stopped before the tailpipe measurement could happen. Read it as a status of the vehicle's self-checks and inspection progress, then use the VIR to identify what was completed and what prevented certification.
How OBD-II Readiness Monitors Decide Your Result
Think of readiness monitors as a pre-flight checklist. A pilot doesn't take off until the instruments complete their self-checks. Your vehicle's OBD-II system works similarly. It runs self-tests on emissions equipment during particular driving conditions, then stores each monitor as ready or not ready.
Continuous monitors, including misfire detection, fuel-system monitoring, and component checks, operate while the vehicle runs. Non-continuous monitors need specific conditions before they can complete. These include the catalytic converter, oxygen sensor, EVAP system, EGR system, secondary air system, and A/C refrigerant system.
California inspection rules allow only limited incomplete-monitor conditions. EPA and state inspection guidance generally treats 2001-and-newer light-duty vehicles as allowed one unset monitor, while 1996–2000 vehicles are often allowed up to two, as described in the EPA inspection and maintenance policy guidance. If the vehicle exceeds its applicable limit, the test can stop before the tailpipe stage.
Why a monitor becomes not ready
A battery disconnect erases stored monitor status. Clearing a trouble code with a scan tool can do the same thing, even if the repair was appropriate. A recent EVAP-related repair or refueling event may also leave the EVAP monitor waiting for the right conditions, while ordinary short trips may not provide the speed, temperature, and steady driving needed for a complete cycle.
| Monitor | Type | What Can Set It to Not Ready |
|---|---|---|
| Misfire | Continuous | The system hasn't completed its operating checks after memory was cleared |
| Fuel system | Continuous | Recent battery loss, code clearing, or insufficient driving conditions |
| Comprehensive components | Continuous | The vehicle hasn't finished its component self-tests |
| Catalyst | Non-continuous | The required warm-up and steady driving conditions haven't occurred |
| Oxygen sensor | Non-continuous | The sensor monitor is waiting for the proper temperature and operating pattern |
| EVAP | Non-continuous | A recent code clear, refueling event, purge issue, or incomplete drive cycle |
| EGR and secondary air | Non-continuous | The system hasn't encountered the conditions needed to run its test |
| A/C refrigerant | Non-continuous | The vehicle's conditions haven't allowed the monitor to complete |
Before paying for an inspection, ask a technician or qualified shop to check monitor status with a scan tool. If the scan shows too many incomplete monitors, driving the vehicle through the manufacturer-specific cycle may solve the immediate refusal. Guidance on checking this condition is also available in the OBD readiness monitors guide.
A ready vehicle can still fail. Once the monitors are complete, the OBD scan may identify a stored trouble code or a malfunction indicator lamp condition. That code tells you which system needs diagnosis, but it doesn't automatically identify the failed part.
Common Trouble Codes Behind a Failed Emissions Test
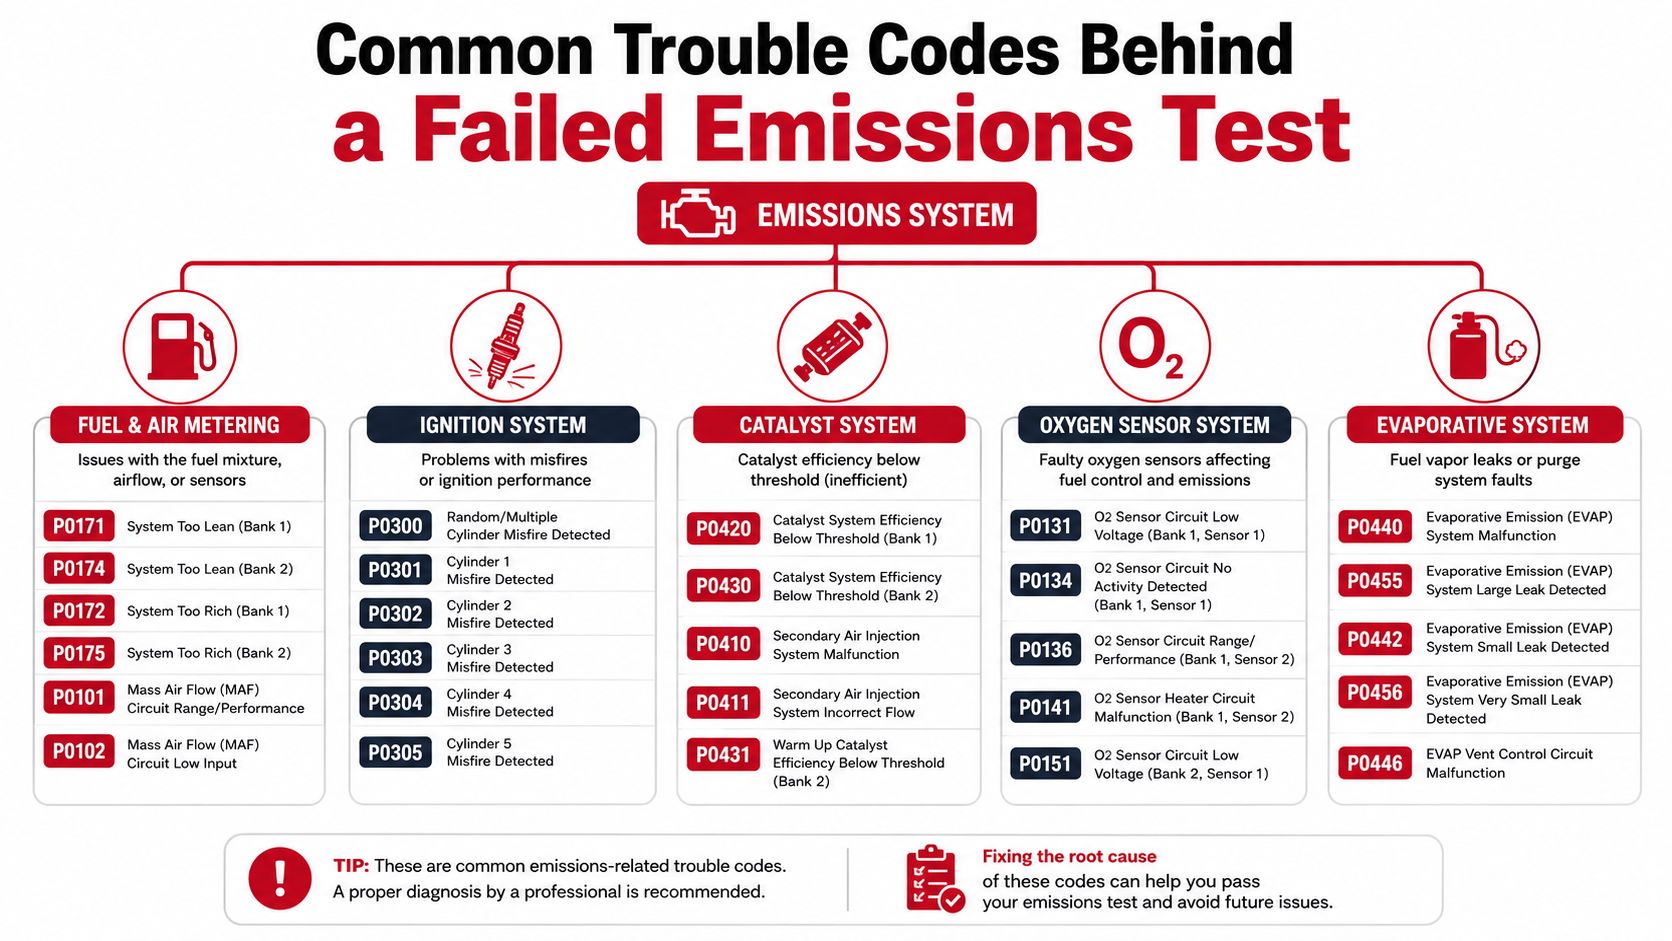
A trouble code is a starting point, not a repair order. The VIR can tell you that the OBD system detected a problem, but it usually can't tell you whether the cause is a hose, sensor, valve, wiring fault, ignition part, or catalytic converter.
Match the code to the system
Fuel and air metering codes, such as P0171, P0172, P0174, and P0175, describe lean or rich operation. A vacuum leak, dirty airflow sensor, fuel-pressure problem, injector issue, or intake leak can produce similar code families. The repair urgency depends on the cause. A lean condition can also contribute to drivability or component damage if it remains unresolved.
Ignition and misfire codes, including P0300 through P0308, indicate random or cylinder-specific misfire detection. Worn spark plugs, ignition coils, injector faults, compression problems, or wiring can be involved. A flashing malfunction indicator lamp deserves prompt attention because continued misfire can send unburned fuel into the exhaust system.
EVAP codes, including P0440, P0442, P0455, and P0456, relate to fuel-vapor leaks or purge-system operation. A loose or damaged fuel cap can be simple, while a split hose, stuck purge valve, or tank-side leak requires more testing. A small leak code isn't the same repair as a large leak code, even though both belong to the EVAP family.
Catalyst efficiency codes, such as P0420 and P0430, mean the monitoring system believes the catalytic converter isn't cleaning the exhaust as expected. An oxygen-sensor problem, exhaust leak, fuel-control issue, or deteriorated converter may be responsible. Replacing the converter before checking those possibilities can waste money.
Oxygen-sensor codes, including P0136 and P0156, can involve the sensor, wiring, exhaust leaks, or a related fuel-control condition. EGR and secondary-air codes, such as P0401, P0411, and P0413, may point to restricted passages, failed valves, pumps, solenoids, or control wiring.
A code names a detected condition. It doesn't name the part you should buy.
EPA documentation explains that OBD systems monitor emissions components for malfunctions or deterioration that could cause emissions thresholds to be exceeded. Field research also identifies catalyst and EVAP monitors as areas where readiness can be less consistent than core monitors, which helps explain why those systems often appear in delayed or failed inspections, as discussed in this OBD emissions monitoring research.
A single code can represent a relatively simple repair or a major emissions-system diagnosis. Ask for the printed code list, the monitor status, and the inspection category before authorizing work. More practical interpretation is available in this guide to common smog check fail reasons.
Emissions Failures Versus Visual and Functional Rejections
Not every failed emissions test is an emissions-reading failure. A technician may record a problem during the visual, functional, or tampering portion before the vehicle reaches an OBD or tailpipe decision.
| Failure Type | Typical Cause | Certificate Marking | Next Step |
|---|---|---|---|
| Emissions-specific | HC, CO, or NOx above the applicable limit, or an emissions-related OBD fault | Failed emissions or OBD portion | Diagnose the system, repair the cause, and retest |
| Visual or functional | Missing converter, altered exhaust, fuel-filler issue, or illuminated malfunction indicator lamp | Failed visual or functional portion | Correct the equipment or diagnose the warning condition |
| Tampering | Removed EGR equipment, altered intake, or exhaust changes before the catalytic converter | Tampering or equipment failure | Restore compliant emissions hardware before retesting |
A tailpipe failure means the measured gases exceeded the applicable cutpoints. An OBD failure means the vehicle's diagnostic system reported a monitored emissions problem or failed to meet the readiness conditions. These are different paths, even though both may appear under the broad heading of emissions compliance.
Visual and tampering findings can bypass tailpipe measurement entirely. For example, a missing catalytic converter is visible hardware evidence, while an altered intake or removed EGR component can create a compliance problem before the analyzer measures exhaust. The station documents the result on the inspection record, while the owner needs to correct the condition and obtain a valid retest.
An illuminated malfunction indicator lamp can create confusion. The lamp is a functional warning, but it usually points toward an OBD diagnosis that may reveal an underlying emissions fault once the vehicle is scanned. A technician shouldn't treat the light itself as the complete diagnosis.
The repair paperwork and the DMV record serve different purposes. The station provides the inspection result and any available failure information. A repair facility may provide diagnostic findings or invoices, but those documents don't substitute for a passing certificate when the DMV requires a completed smog inspection.
Your Retest and Repair Path After a Failure
Antioch drivers should begin with the failure category on the VIR. California's next step depends on whether the result came from OBD-II or tailpipe readings, or from a visual, functional, or tampering finding.
For a failure limited to OBD-II or tailpipe readings, California policy generally allows a free retest within 90 days at the same station when no repairs have been performed, as described in the California retest and inspection guidance. Repair work can change the retest conditions. Clearing a trouble code may also change monitor status, so ask the station about the coupon and its exact terms before doing anything.
Choose the next action from the report
- No repair and eligible failure: Keep the failed VIR, confirm the same-station retest conditions, and return within the allowed period.
- Repair required: Take the code list and inspection findings to a certified smog repair technician. Request diagnosis before approving parts.
- Income-qualified assistance: Check California's Repair Assistance options if you meet the program requirements. The program includes a $500 cap for EVAP repairs, according to the applicable state program terms.
- Directed repair: Follow the repair direction when the inspection or state process sends you to a specific path. An owner's-choice repair means you can select a qualified repair provider.
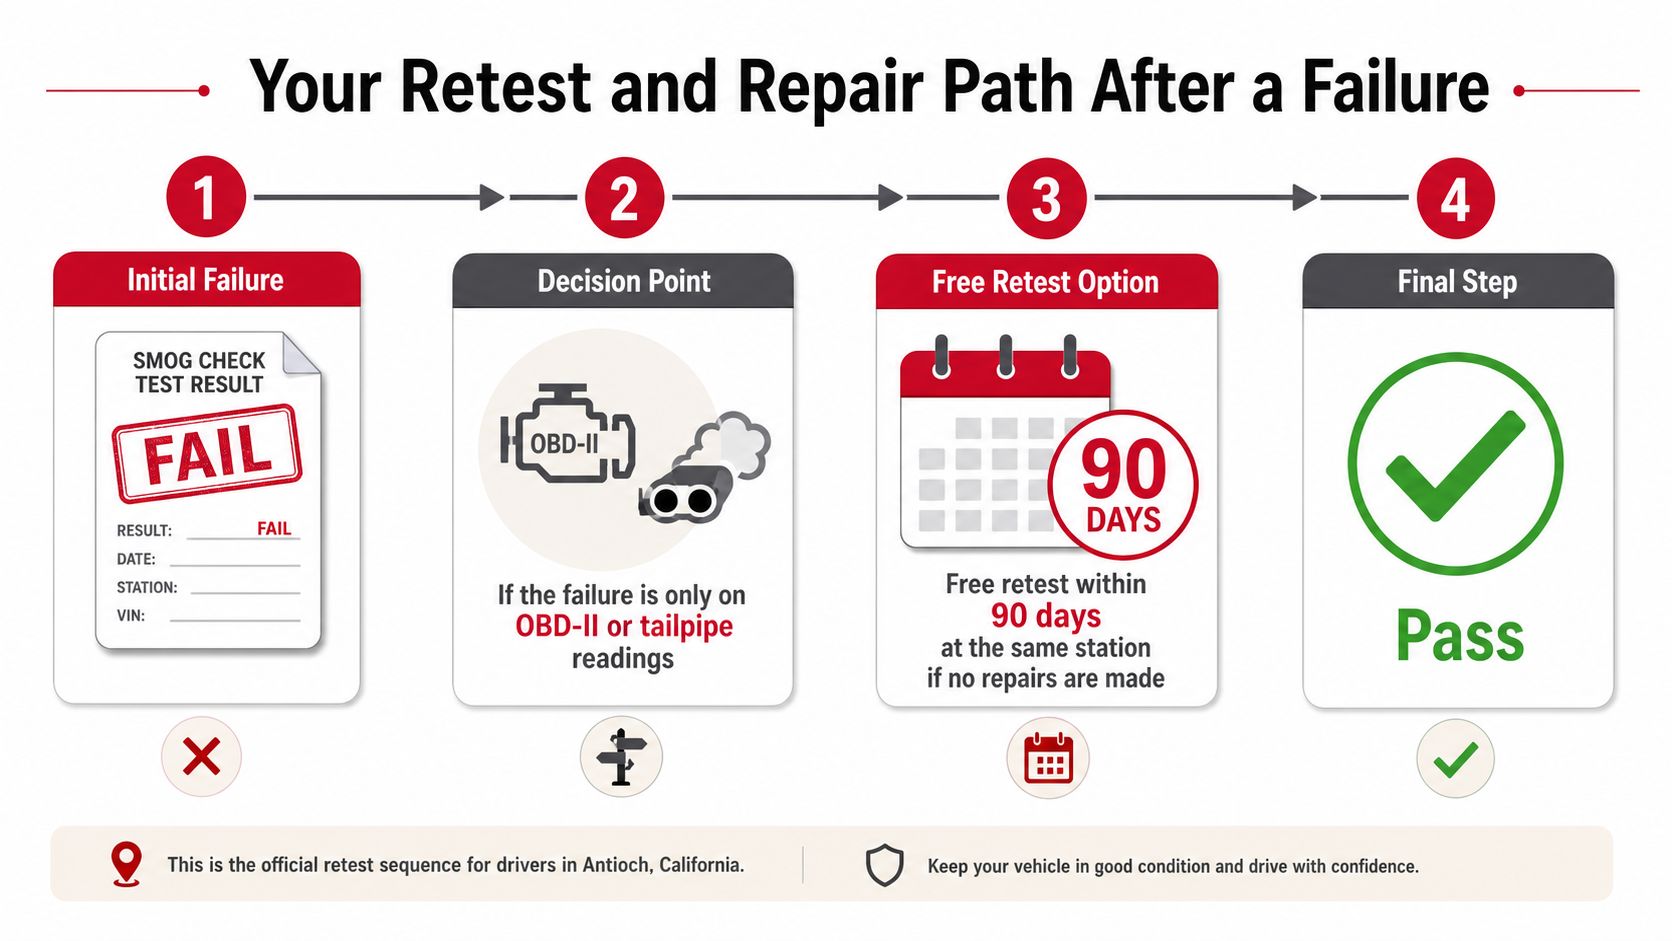
Use the VIR to choose between these paths. A no-repair retest works when the failure was limited to an eligible OBD or tailpipe reading and the vehicle has not been altered. When the report lists a persistent trouble code, visual defect, or tampering, schedule diagnosis and repair before returning for inspection. Fire House Smog offers test-only inspections, retest handling under its site policy and coupon terms, and electronic transmission of completed results to the DMV.
This short video can help you see how the retest decision fits into the broader inspection process.
Bring the original VIR to the follow-up visit.
Why a STAR Test-Only Station Matters in Antioch
A STAR test-only station keeps the inspection separate from repair sales. For a first-time customer, that separation makes the paperwork easier to read. You can focus on whether the vehicle passed, which system caused a failure, and what the report records before discussing repairs.
A test-and-repair shop may inspect the vehicle and sell the work needed afterward. Customers should request clear documentation before approving parts or labor. A test-only station does not perform in-house repairs, so its inspection decision is separate from selling the parts or labor used to correct a failure.
When STAR status affects your appointment
California directs some vehicles to STAR or test-only inspections, including vehicles identified through the state's compliance process. Antioch is part of an enhanced inspection area, so check the registration notice or DMV direction before selecting a station. A vehicle requiring STAR inspection may not be accepted at an ordinary smog location.
Testing also becomes easier to follow when the station concentrates on inspection. The technician can identify whether the result involved readiness monitors, OBD data, tailpipe readings, visual equipment, or tampering. That explanation connects the result to the certificate or failure report without folding a repair estimate into the inspection decision.
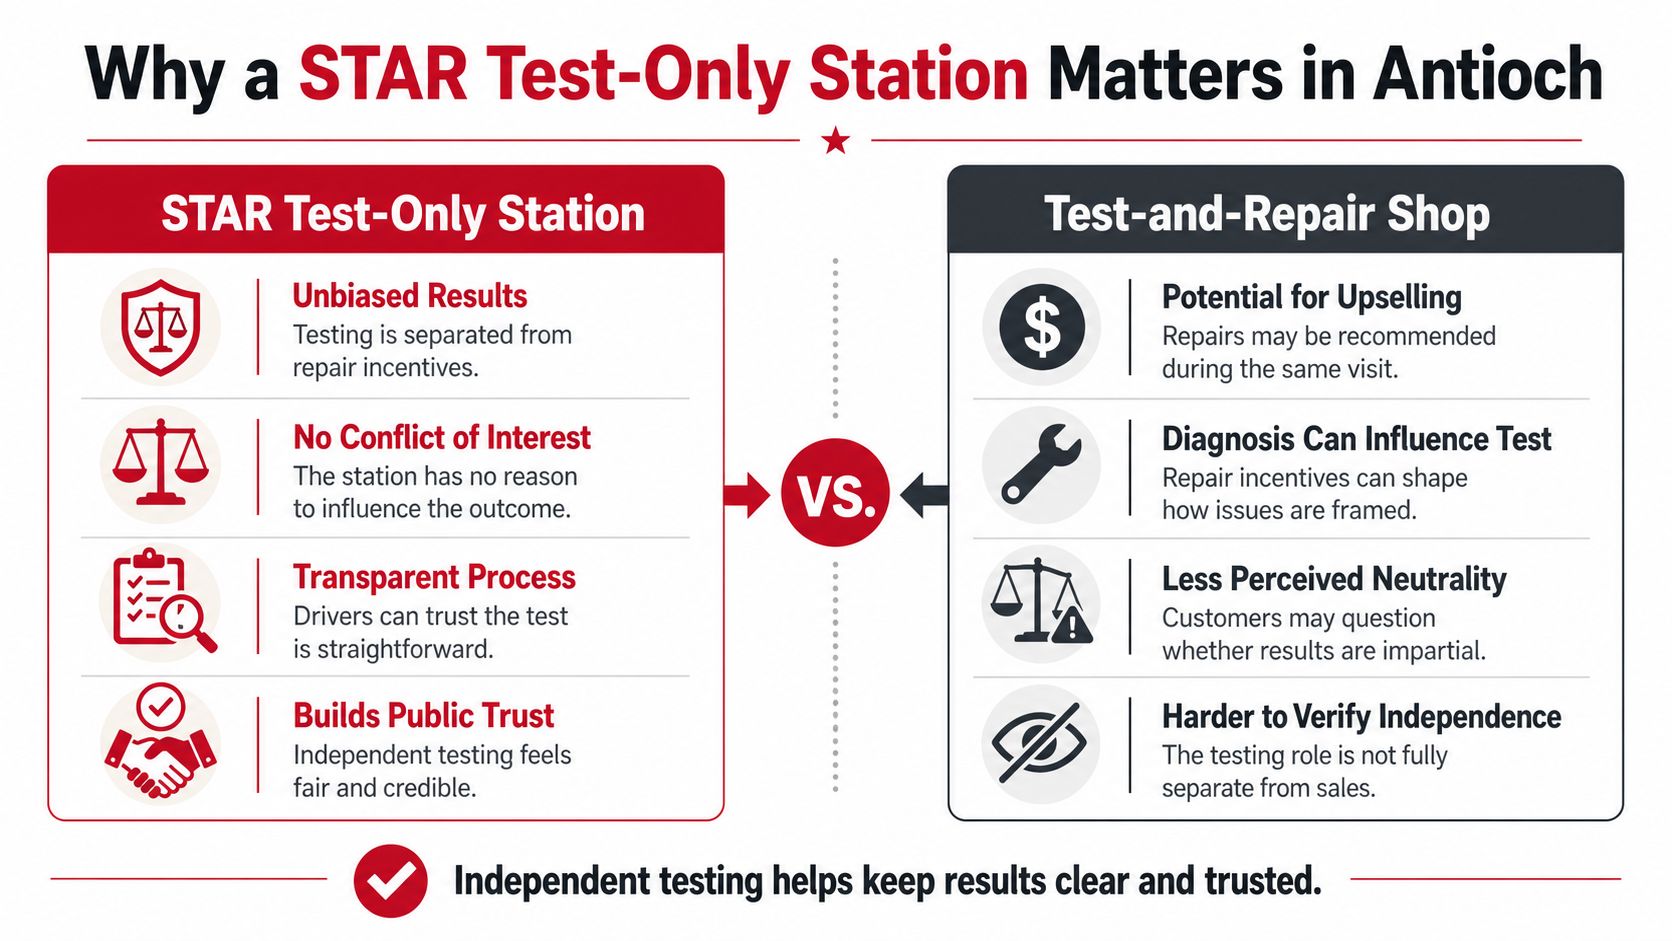
Before driving across Antioch, confirm the required station type for a directed vehicle. For an ordinary renewal, independent testing can provide a neutral result and a clear paper trail. Bring the DMV notice when available. It shows the station which inspection category applies and helps prevent an avoidable appointment mistake.
Test-only operation removes the repair-sales conflict and keeps the inspection decision focused on the vehicle's recorded condition.
From Smog Certificate to Renewed Registration in One Stop
Once the vehicle passes, the technician transmits the result electronically to the DMV. The certificate number may then connect to your renewal record, allowing the registration transaction to move forward without carrying a paper certificate between separate offices.
Start with the renewal notice and confirm that the vehicle's smog requirement has been satisfied. Then complete the registration payment through the available DMV channel. Depending on the vehicle and transaction, renewal may be available online, by mail, or through an authorized on-site DMV service provider.
A practical Antioch sequence
- Bring the renewal notice: It helps the provider locate the correct DMV transaction.
- Bring identification and payment: The provider may need identification and an accepted payment method for the renewal.
- Confirm the smog transmission: If the pass was recent, ask the station to verify that the result was submitted electronically.
- Complete the renewal: Once the DMV record accepts the inspection, pay the required registration fees.
- Collect the sticker and tag materials: An authorized provider may print available registration materials on site.
The timing matters. A certificate should be transmitted before registration expires if you want to avoid a late transaction or a record that hasn't updated in time. If the portal or renewal notice doesn't reflect the result, don't assume the inspection failed. First compare the VIN, license information, and certificate details, then ask the station or DMV service provider to reconcile the record.
A STAR certificate and a regular certificate both document a passing inspection, but the required certificate type depends on the vehicle's DMV direction and inspection category. The notice controls that choice. If the DMV specifically directed a STAR inspection, a pass from a station that doesn't satisfy that direction may not resolve the requirement.
Some drivers use separate trips for the smog check, registration payment, and sticker pickup. An Antioch provider that offers both inspection and licensed DMV registration services can combine those tasks when the vehicle and transaction qualify.
Quick Checklist and Next Steps for Your Vehicle
Use the inspection process as a decision tree rather than guessing from the dashboard light.
- Confirm the vehicle and test type. Check the registration notice, vehicle class, and any STAR direction before choosing a station.
- Protect monitor status. Avoid disconnecting the battery or clearing codes before an inspection. If memory was recently reset, allow enough mixed driving for the required monitors to run.
- Check basic conditions. Make sure the fuel cap is installed correctly and look for an illuminated malfunction indicator lamp.
- Ask for readiness results. If a monitor is incomplete, request the specific monitor name and the driving conditions needed to complete it.
- Read the VIR before authorizing repairs. Identify whether the result is a refusal-to-test, OBD failure, tailpipe failure, visual rejection, functional problem, or tampering finding.
- Request the code list. A DTC is evidence for diagnosis, not proof that the matching component needs replacement.
- Use the correct follow-up path. Return for an eligible no-repair retest, or visit a qualified smog repair technician when the report identifies a repair condition.
- Reconcile the DMV record. After a pass, confirm the electronic submission before completing registration renewal.
Digital records can also be delayed or appear inconsistent across portals. CARB's Clean Truck Check FAQ says results should appear in CTC-VIS within 0–1 days, and advises users to retest, disconnect other devices, check the vehicle-device connection, and confirm stable internet if a result doesn't appear within 5 minutes. It also explains that a vendor portal may show “Awaiting CARB's Response” while the CARB account shows no result, and that CTC-VIS displays submissions made on or after October 1, 2024, as detailed in the CARB test-results troubleshooting guidance. Those details apply to the referenced Clean Truck Check system, but they illustrate why a missing digital record needs reconciliation rather than an immediate assumption of failure.
Bring your emissions test results sheet to Fire House Smog in Antioch if you want the recorded outcome explained before choosing a next step. The station provides STAR-certified test-only inspections and licensed DMV registration services, so eligible customers can address the certificate and renewal workflow in the same visit.
Fire House Smog can review your VIR, explain readiness and trouble-code findings, perform eligible retests, and process qualifying DMV renewals with on-site tag services. Visit Fire House Smog at 2900 Lone Tree Way in Antioch with your inspection report and renewal notice so you can leave with a clear plan for the next pass.
Marcus in Antioch opened his mail and found the notice no truck owner wants: his 2012 Silverado 1500 needs a smog check before DMV will renew the registration. Without a valid certificate, the renewal stalls, and that can put a contractor's daily routine at risk, from hauling tools to reaching a job site.
“Clean air truck” isn't just a sales phrase. In California, it connects vehicle emissions, registration requirements, California Air Resources Board enforcement, and the inspection process at an approved smog station. The rules depend on the truck's fuel, weight, model year, and compliance history.
By the end, you'll know what California means by a clean air truck, how gasoline and diesel pickups follow different paths, what happens during a smog inspection, and how to prepare for a test-only STAR station. You'll also understand why older diesel equipment receives attention from CARB even when it doesn't use the same station-based test as a light-duty gasoline truck.
The practical takeaway is simple. By the last section, you'll know which station to use, what paperwork to bring, and what to check before paying for a test.
Table of Contents
- Why a Clean Air Truck Matters in California Right Now
- What a Clean Air Truck Means
- Diesel and Gasoline Trucks Under California Rules
- How Smog Checks and Certification Work
- Pre-Check Habits That Prevent Failed Smog Tests
- Getting Your Truck Compliant at a STAR Test-Only Station
- Common Misconceptions That Trip Up Truck Owners
- Your Next Steps and Where to Test in Antioch
Why a Clean Air Truck Matters in California Right Now
California treats emissions compliance as part of vehicle ownership, not as an optional maintenance project. If your renewal notice requires a smog check, the DMV generally needs the electronic certificate before it can complete the registration renewal. A truck that runs reliably can still fail because its emissions controls, diagnostic monitors, or inspection records don't satisfy the current test.
That's why the phrase clean air truck matters to owners. It describes a truck that meets the emissions requirements for its model year and passes the inspection required for its class. A clean-looking exterior, strong engine, or recent oil change doesn't establish compliance.
Practical rule: Read the DMV renewal notice before choosing a station. The notice tells you whether the state has placed a smog requirement on that registration renewal.
California's enforcement picture also reaches beyond the ordinary light-duty smog appointment. Visible smoke from a diesel truck can attract roadside attention, and commercial diesel operators may face CARB obligations that don't appear on a typical passenger-vehicle checklist. Heavy-duty trucks also matter disproportionately to air-quality policy. An EPA and Congressional Research Service summary states that heavy-duty trucks account for about 32% of mobile-source NOx emissions while representing roughly 2% of California's on-road vehicle fleet.
The policy direction is tightening, too. EPA's heavy-duty standards finalized in December 2022 are described as more than 80% stronger than the rules then in place, with model year 2027 and later trucks facing stricter emissions requirements. EPA's final-rule materials describe tailpipe NOx reductions of about 80% and particulate-matter reductions of 50% versus prior standards.
For an owner, the next step isn't to debate every future rule. It's to identify the truck category, follow the current registration instruction, and test before the deadline.
What a Clean Air Truck Means
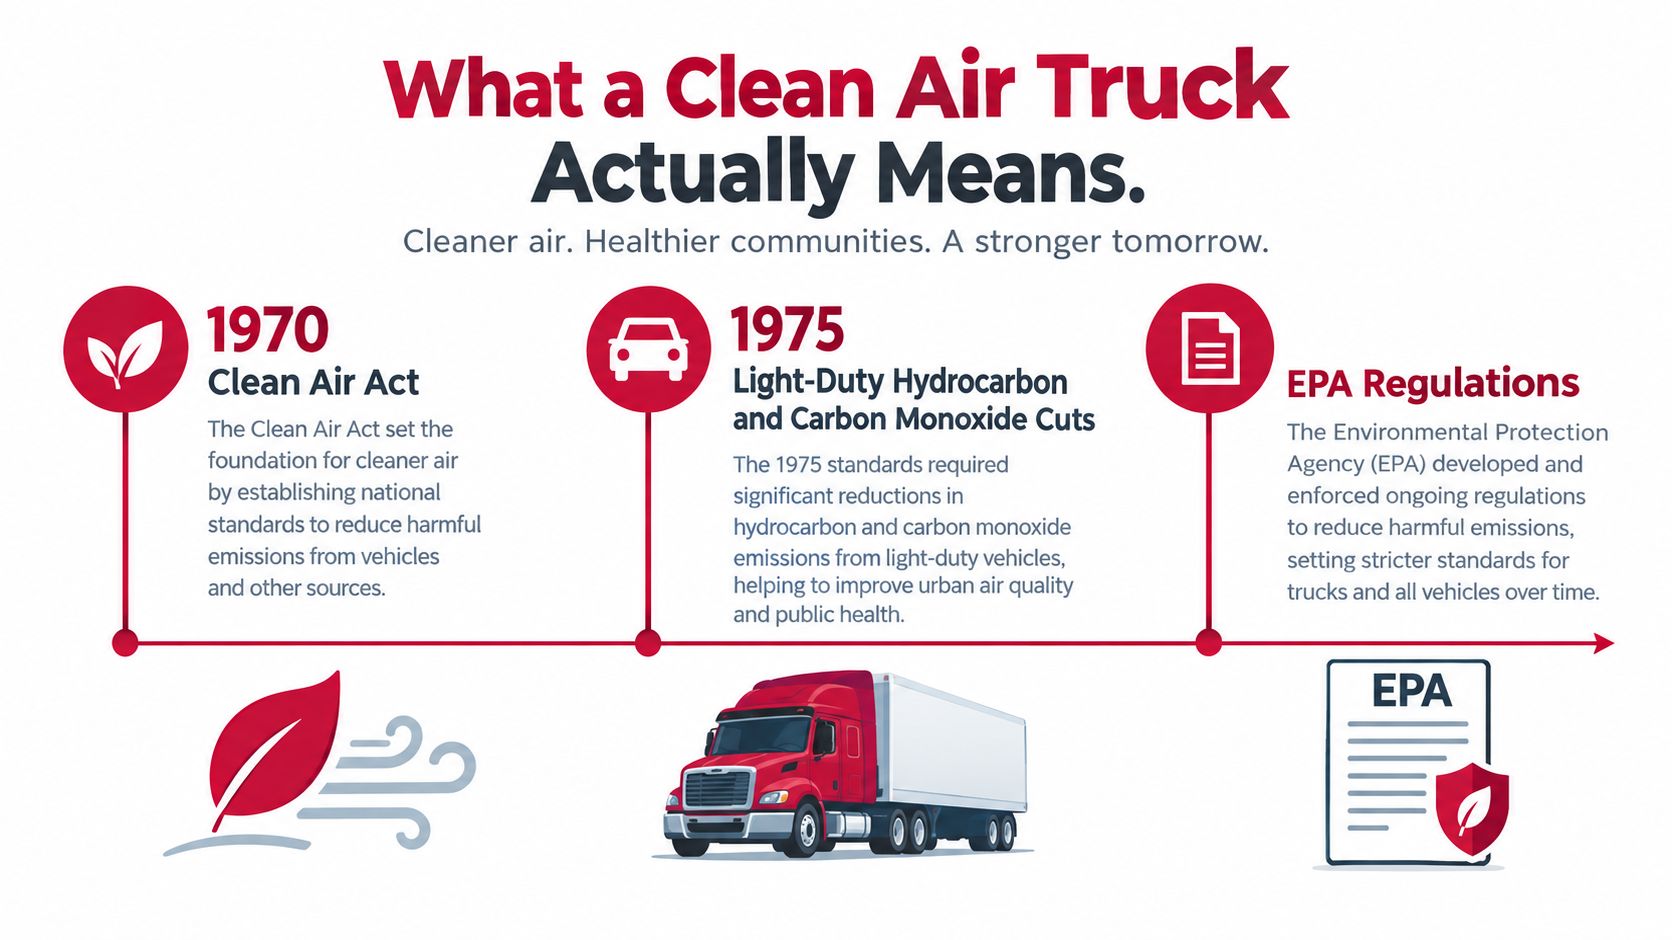
A clean air truck meets the emissions standard assigned to its model year and vehicle class. That definition comes from a long federal rulemaking history, not from a badge, aftermarket claim, or a clean-looking exhaust.
The federal Clean Air Act of 1970 established national vehicle-emissions controls. Standards for cars and light-duty trucks followed in 1975, and EPA continued tightening nitrogen oxide limits for light trucks. EPA's historical summary records a 2.3 grams-per-mile NOx limit by 1979, followed by stricter requirements for heavier and lighter light-duty trucks in later years. EPA's clean-vehicle history identifies the Tier 2 program, finalized in 2000 and phased in from the 2004 model year, as a major change. Its 0.07 grams-per-mile NOx standard represented an 86% to 95% reduction for light trucks compared with prior requirements.
The heavy-duty reset
Diesel freight trucks reached another major compliance point with EPA's 2007 heavy-duty standards. New heavy-duty engines had to reduce particulate matter to 0.01 grams per brake horsepower-hour, a near-zero level. EPA's SmartWay timeline describes the 2007-era rules as reducing smog-forming emissions from trucks and buses by about 95% and particulate emissions by about 90% compared with earlier levels. Newer clean-diesel engines have also been described as producing about 99% lower NOx and 98% fewer particulate emissions than previous generations. EPA's SmartWay timeline places the newer model year 2027 requirements within that continuing progression.
California adds a separate layer through CARB programs and vehicle rules. New truck sales, fleet composition, and emissions performance are moving toward stronger zero-emission and near-zero-emission requirements, with light-duty phases covering model years 2027 through 2033, according to the ICCT policy update. Those requirements shape new-vehicle purchases and fleet planning. They do not cancel an older truck's current smog obligation.
For an owner, the working definition is straightforward: your truck must meet the standard tied to its model year and pass the California inspection required for its category. That is what determines registration readiness. A truck can have newer emissions technology and still fail if its required inspection, equipment, or emissions controls do not meet California's rules.
Diesel and Gasoline Trucks Under California Rules
Start with fuel type. A gasoline pickup and a diesel work truck may look similar in the driveway, but California can send them through different compliance paths.
A gasoline light-duty truck generally enters the recurring smog-check cycle based on model year and age. California's process commonly uses OBD-II testing for newer vehicles, while older vehicles may receive additional inspection procedures. Diesel light-duty trucks are handled differently, especially around particulate controls, fees, and the types of enforcement that apply.
Use this quick sorting table before you book:
| Category | Model Year Scope | Smog Check Required? | Annual Fee | Main Exemption |
|---|---|---|---|---|
| Gasoline light-duty truck | 1976 and newer, subject to California's age and registration rules | Often, when listed on the DMV renewal notice | Smog Abatement and transaction charges may apply | 1975 and older gasoline vehicles |
| Diesel light-duty truck | 1997 and newer, under 14,000 pounds GVWR | Subject to the applicable DMV cycle | Diesel particulate fee may apply | Pre-1997 diesel light-duty vehicles |
| Heavy-duty diesel truck | Heavy commercial class | Often outside the station smog-check line | CARB reporting and equipment obligations may apply | Station-test exemption does not remove CARB duties |
| Electric or hydrogen fuel-cell vehicle | Applicable zero-emission vehicle class | No tailpipe smog test | Registration rules still apply | No combustion tailpipe |
A gasoline owner should first confirm the renewal notice. A diesel light-duty owner should also account for CARB's diesel particulate fee structure and confirm whether the truck's weight and model year place it in the light-duty testing category. For diesel-specific testing information, review diesel smog testing in California.
Heavy-duty diesel owners need a different mindset. A truck may not receive the same station inspection as a light-duty pickup, yet CARB can still regulate it through programs involving reporting, idling, transport refrigeration equipment, and roadside visible-smoke enforcement. Don't mistake “no station smog check” for “no emissions responsibility.”
Your three-bucket decision is straightforward:
- Gasoline light-duty truck: Follow the DMV smog instruction and use the correct station type.
- Diesel light-duty truck: Confirm test eligibility, particulate-fee treatment, and equipment requirements.
- Heavy commercial diesel: Check the applicable CARB programs before assuming a station visit is the only obligation.
How Smog Checks and Certification Work
A California smog inspection combines electronic diagnosis with a physical emissions check. The exact procedure depends on the truck's age, fuel, equipment, and the inspection program attached to its registration.
A STAR-certified station meets additional state performance and testing requirements. A test-only station can inspect the vehicle but doesn't perform repair work. That separation matters because the station's job is to document the result, not sell you a repair package after a failure. The STAR-certified smog explanation gives owners more background on how the designation affects station selection.
What happens in the bay
For newer gasoline trucks, the technician connects to the vehicle's OBD-II system. The system reports diagnostic trouble codes and readiness monitors. The technician also checks emissions-related components visually and may perform a fuel-cap inspection or tailpipe procedure when the vehicle and test require it.
Older vehicles may receive a tailpipe emissions test. Newer diesel trucks can involve different inspection equipment and procedures, so the technician must follow the applicable BAR process rather than applying a gasoline checklist to every truck.
| Station Type | Can Test | Can Repair | Handles Directed or Random Referrals | Typical Use |
|---|---|---|---|---|
| Regular licensed station | Yes | May, depending on license and business model | Some referral work | Routine inspections and repairs |
| STAR-certified station | Yes | May be test-and-repair or test-only | Yes, when authorized | STAR-required vehicles |
| STAR test-only station | Yes | No | Yes, when authorized | Independent certification and referrals |
| Repair facility | Not necessarily | Yes | Not necessarily | Diagnosis and emissions repairs |
If the BAR system directs or randomly refers a vehicle to STAR, the owner must use an eligible STAR station. A failed inspection produces a noncompliance result rather than a registration certificate. The owner then repairs the identified problem and returns for a retest under the station's and state's eligibility rules.
Ask about retest terms before leaving. A same-station retest may be free within the qualifying period, while changing stations can mean paying for another inspection. Once the truck passes, the station transmits the certificate electronically to DMV, and the owner can complete the registration step.
Pre-Check Habits That Prevent Failed Smog Tests
Most owners don't need a complicated emissions strategy before a routine test. They need to avoid arriving with an obvious fault or an incomplete diagnostic system.
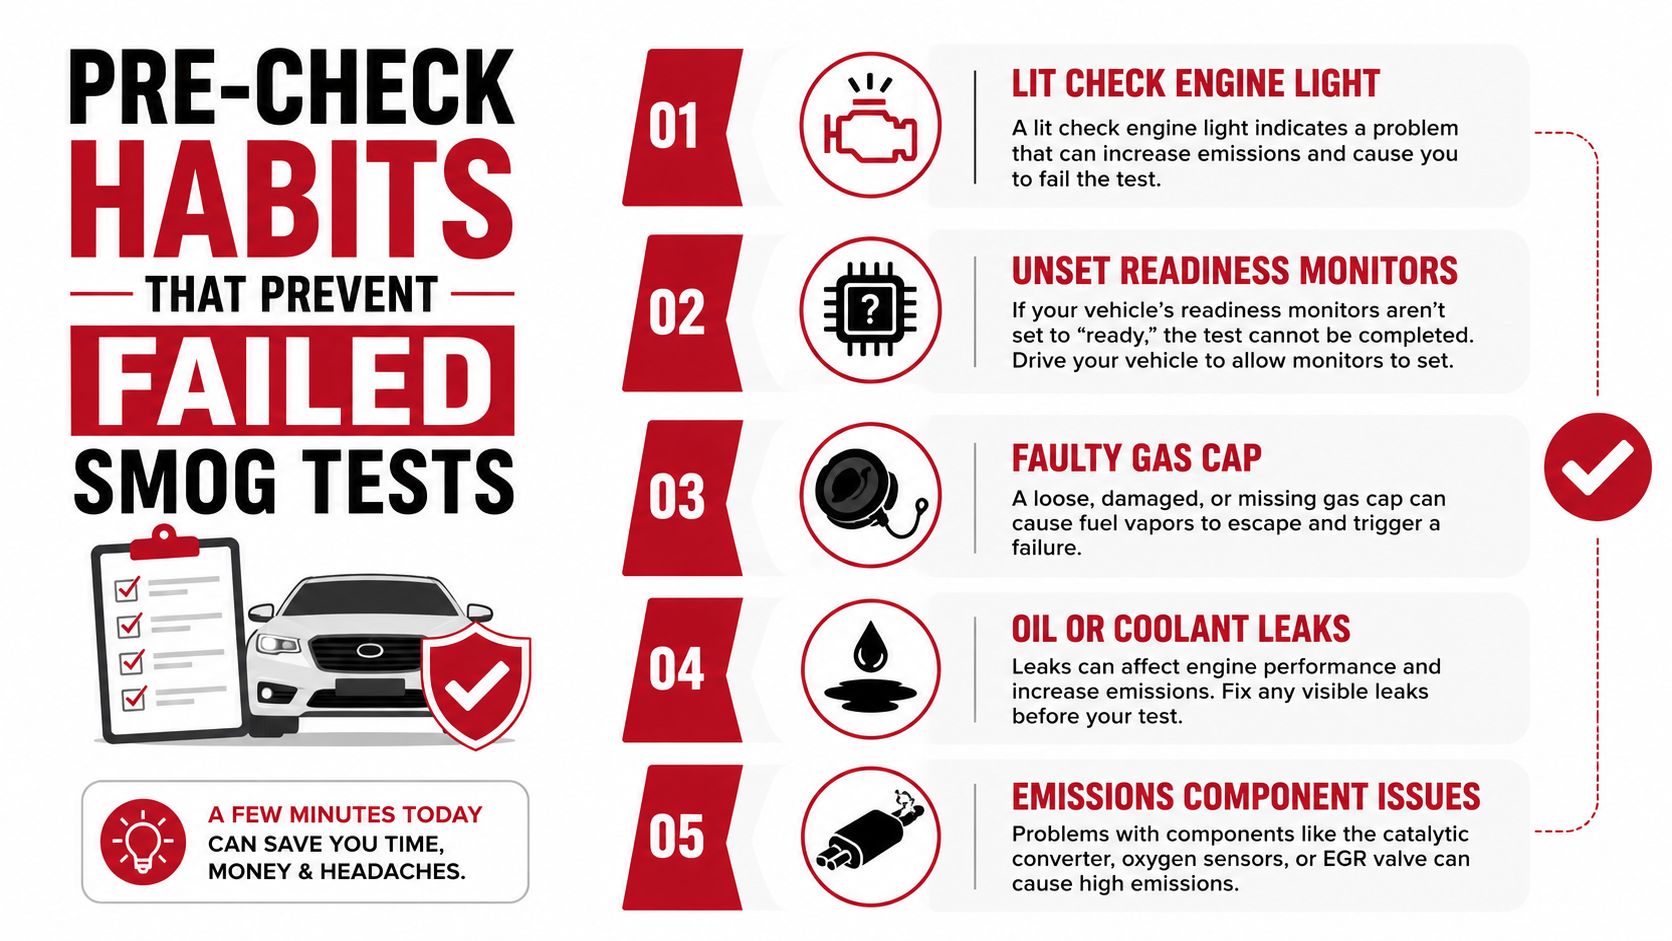
Start with the dashboard. An illuminated check-engine light, also called the malfunction indicator lamp, is a serious warning for an OBD-equipped truck. A vehicle can feel perfectly normal while storing an emissions code that causes an automatic failure.
Then check the readiness monitors. Disconnecting the battery or clearing codes resets the system's self-tests. The truck may need mixed driving before the monitors complete, and arriving too soon can leave the vehicle ineligible for a clean pass.
Your driveway checklist
- Inspect the fuel cap: Make sure the cap seals tightly and the gasket isn't cracked. A small EVAP leak can trigger a code.
- Look at emissions hardware: Check for obvious damage, missing shields, disconnected hoses, or an altered catalytic converter.
- Watch for leaks: Oil or coolant reaching the exhaust can create problems and may point to a larger mechanical issue.
- Check the warning lights: Don't assume a pending code is harmless. Have it diagnosed before scheduling the inspection.
- Drive normally after repairs: Use a mixed city and highway loop over several days so the vehicle can complete its self-checks.
A 50 to 70 mile mixed-driving routine is a practical preparation target for many vehicles, but it doesn't guarantee that every monitor will set. The truck's operating conditions and the specific fault determine how quickly the system completes its checks.
Avoid the battery-disconnect shortcut. Clearing the light without fixing the cause usually creates a second problem, incomplete readiness monitors, and a higher chance of referral or failure.
A failed test isn't always a major engine disaster. A loose cap, an EVAP fault, or an incomplete monitor can be easier to correct than a failed catalytic converter or diesel emissions component. Get the failure report, repair the listed issue, and retest instead of guessing.
Getting Your Truck Compliant at a STAR Test-Only Station
At a STAR test-only station such as Fire House Smog in Antioch, the process should be orderly. Bring the truck, registration paperwork, and the DMV renewal notice. If you're returning after a failure, bring the prior inspection paperwork or certificate of noncompliance so the technician can understand the retest situation.
The first step is document verification. The technician confirms the vehicle identification information, registration details, and the inspection type. A commercial owner with several vehicles should identify each truck clearly and ask whether the station can process the vehicles in a practical order.
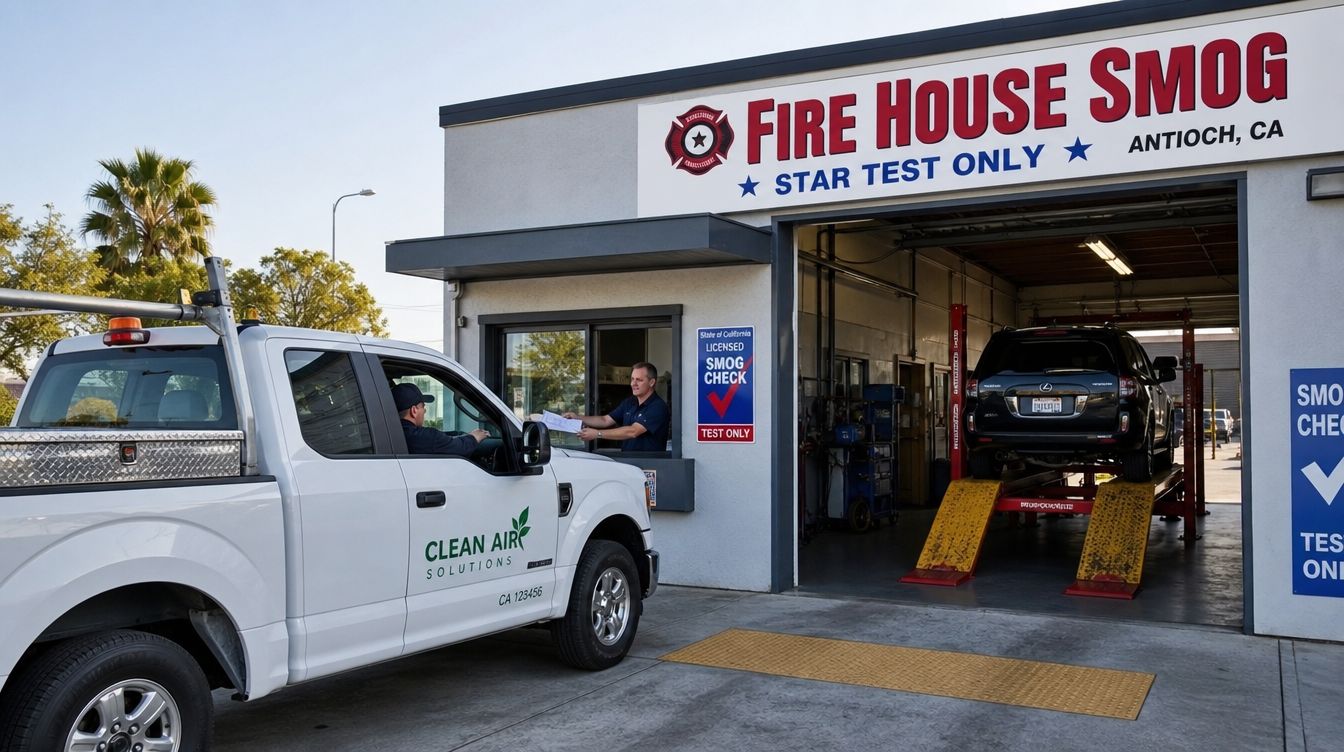
What the technician checks
The bay procedure may include a visual inspection of emissions equipment, a gas-cap test, an OBD-II connection, and a tailpipe test where applicable. The technician follows the state-required procedure for that truck rather than treating every pickup, diesel, and work vehicle the same way.
There are three practical outcomes:
- Pass: The station submits the smog certificate electronically to DMV.
- Fail: You receive documentation showing the noncompliance result and the reason for failure.
- Directed or random referral: The state requires the vehicle to complete the inspection at an eligible STAR station.
A test-only station doesn't repair the truck, which keeps the result separate from repair sales. If the truck fails, take the report to a qualified repair shop, address the exact cause, and ask the testing station about its retest policy before returning.
For contractors, operating hours matter. Fire House Smog is located at 2900 Lone Tree Way in Antioch, offers smog testing seven days a week, and provides DMV renewal and tag-printing services Monday through Saturday from 9:30 AM to 5:00 PM and Sunday from 12:00 PM to 4:00 PM, according to the publisher's supplied business information. The station lists two service bays and a phone number, 925-754-1600, for confirming vehicle fit and current service availability.
Common Misconceptions That Trip Up Truck Owners
Truck owners lose time when they treat California emissions rules as one-size-fits-all. Three assumptions cause repeated problems.
| Myth | Reality |
|---|---|
| Diesel trucks are exempt in California | Some diesel classes avoid the ordinary station test, but diesel light-duty vehicles can still face smog requirements, particulate-fee obligations, and CARB enforcement. |
| A check-engine light is fine if the truck drives normally | An illuminated emissions warning can indicate an active diagnostic fault, and incomplete readiness monitors can prevent a pass. |
| Every smog shop produces the same result | Station type matters when DMV or BAR requires STAR testing, including certain directed or random referrals. |
The first myth confuses test exemption with emissions exemption. A heavy-duty diesel truck may stay outside the regular station smog line while remaining subject to CARB rules involving smoke, idling, reporting, or emissions equipment. A light-duty diesel pickup can follow another path based on its model year and weight.
The second myth comes from relying on drivability. OBD systems monitor emissions functions that a driver may never feel from behind the wheel. A truck can start easily, pull a trailer, and idle smoothly while still failing the electronic portion of the inspection.
The third myth is expensive because the wrong station can create a scheduling problem. If the DMV or BAR directs the truck to STAR, choose an eligible STAR station before paying for an inspection elsewhere.
The certificate is the goal, not merely a running engine. Bring the truck to the station type shown by the registration or referral instructions.
Your Next Steps and Where to Test in Antioch
Handle the renewal in this order:
- Read the DMV notice: Confirm that the registration renewal requires a smog certificate and note any station or referral instruction.
- Gather paperwork: Bring the renewal notice, current registration, plates, and any prior smog paperwork if the truck is being retested.
- Prepare the diagnostic system: Inspect the fuel-cap seal, check for a lit malfunction indicator lamp, and have pending or stored emissions codes diagnosed.
- Drive before testing: Use mixed city and highway driving during the week before the appointment so readiness monitors have a chance to complete. A 50 to 100 mile preparation range is a practical target, but monitor completion still depends on the vehicle and repair history.
- Use the right station: Book a STAR test-only inspection when the DMV notice, BAR referral, or truck category requires it.
A light-duty gasoline or diesel truck owner in Antioch can review smog check service in Antioch before heading out. Bring the truck with enough fuel for the inspection, remove anything blocking access to the diagnostic connector, and tell the technician whether the battery was recently disconnected or codes were cleared.
Fire House Smog operates at 2900 Lone Tree Way, Antioch, California 94509. Its supplied business information lists smog testing seven days a week, DMV tag printing Monday through Saturday from 9:30 AM to 5:00 PM, Sunday DMV hours from 12:00 PM to 4:00 PM, and phone support at 925-754-1600. Confirm current hours and whether the truck fits the station's equipment limits before arrival, especially for larger work trucks and recreational vehicles.
A clean truck should leave with the certificate transmitted to DMV. If it fails, keep the report, repair the listed issue, and ask about the qualifying retest window before changing stations.
Fire House Smog provides STAR-certified test-only smog inspections for cars and light-duty trucks, along with DMV renewal services and on-site tag printing in Antioch. Bring your renewal notice and truck to Fire House Smog or call 925-754-1600 to confirm the correct service before you arrive.
Most advice on smog check vs smog test says the terms are identical and moves on. That answer is convenient, but it leaves California drivers unprepared for the part that matters: one term describes the state compliance program, while the other describes what the technician does to the vehicle.
That distinction affects where you go, what paperwork you receive, and whether your registration renewal can move forward. It matters even more after California tightened readiness-monitor requirements beginning October 1, 2025. A car can run smoothly and still fail because its emissions monitors haven't completed their checks.
If you're an Antioch driver, learn the practical vocabulary before booking. You need to know whether your notice sends you to a STAR station, whether your vehicle is ready for an OBD inspection, and whether you're seeking a legal certificate or only a diagnostic result.
Table of Contents
- Why Smog Check and Smog Test Are Not the Same Thing
- How the California Smog Check Program Works
- Smog Check vs Smog Test Side by Side
- What the Failure Data Tells You About Real-World Outcomes
- STAR Stations, Test-Only Stations, and Where to Go
- Surprising Ways a Healthy Car Can Still Fail
- A Real Antioch Driver Scenario From Booking to Tag
- Common Questions and Your Next Steps
- Can I use any station with a directed notice
- What's the difference between gross polluter and directed
- How long is a smog certificate good for
- Do I need an appointment
- What if I bought the car from out of state
- Does a new battery reset readiness monitors
- Can I fail if the Check Engine Light is off now
- Are hybrids exempt
- Your five-point preparation list
Why Smog Check and Smog Test Are Not the Same Thing
Smog Check names California's regulated emissions-compliance program. The Bureau of Automotive Repair oversees it, and a passing result can create the electronic certification needed for registration renewal, a sale, or a transfer when the vehicle requires inspection.
A smog test is the inspection performed in the service bay. The technician uses the equipment required for that vehicle, including electronic diagnostics on newer models and tailpipe measurement on older ones. The test produces findings. The Smog Check connects those findings to the state's compliance process and the vehicle's DMV record.
California's modern statewide system took shape in 1984, after the federal Clean Air Act Amendments pushed states toward biennial testing. Many vehicles require an inspection every two years before registration renewal, but the exact requirement depends on the vehicle and transaction. A historical overview of California's smog-check program describes that development and the program's continuing reach.
Why the wording affects your visit
Using the terms loosely can send you to the wrong station or leave you with the wrong expectation. A station may not be authorized for a directed vehicle. A printout showing test results may not be the electronic certification DMV needs. Clearing the battery before an appointment can also leave readiness monitors incomplete, even if the car runs normally.
Practical rule: Read the DMV notice first. Then choose the station. Do not select a location based only on “smog test” in an advertisement.
The distinction also clarifies what a STAR-certified smog inspection involves. STAR is not a separate pollution measurement. It identifies stations that meet additional inspection-quality requirements for vehicles assigned to that network.
Before handing over the keys, ask one direct question: does the vehicle need a regular Smog Check, a STAR-directed inspection, or a retest? Then confirm which document the station will transmit to DMV after a pass. That conversation prevents a failed appointment caused by choosing the wrong service.
How the California Smog Check Program Works
California's Smog Check program developed through successive regulatory changes, not one universal inspection format. The statewide system was formalized in 1984, and later changes added targeted oversight for vehicles associated with higher emissions. The inspection pathway now depends on factors such as model year, fuel type, and DMV direction.
The Bureau of Automotive Repair licenses stations and technicians, sets inspection requirements, and receives results through California's electronic reporting system. A licensed station performs an authorized inspection and submits the outcome. It is not giving an informal opinion about the vehicle.
The process at the station
A typical visit follows four steps:
- The station verifies the vehicle and transaction. The technician confirms the vehicle information and identifies the applicable inspection pathway.
- The technician performs the required checks. Depending on the vehicle, those checks may include visual, functional, and emissions-related inspections.
- The system records the result. The station reports the inspection electronically. A passing result can support the applicable DMV transaction.
- The driver receives the paperwork. The Vehicle Inspection Report lists the test findings, while the electronic certificate supports the state requirement.
For 2000-and-newer vehicles, California's BAR On-Board Diagnostic Inspection System collects OBD information. For 1999-and-older vehicles, the BAR-97 Emissions Inspection System measures tailpipe emissions. The California BAR Smog Check program description explains why the procedure differs between vehicle groups.
Which event brings you in
Registration renewal is the most familiar trigger. A sale or transfer may also require a valid inspection, and an out-of-state vehicle may need one before California registration is completed. The notice and transaction determine the requirement, not the casual wording in an online search.
That makes “I just need a smog test” incomplete. The test is the procedure performed at the station, while the Smog Check program is the compliance requirement tied to the DMV event. If the notice assigns a STAR-directed inspection, a regular station may not be authorized to perform it.
The 2025 readiness-monitor change also affects preparation and station choice. Applicable monitors must be set for a vehicle to pass, subject to narrow exceptions for unique design issues, according to BAR's readiness-monitor guidance. A vehicle can run smoothly and still fail because its emissions system is not inspection-ready. Avoid clearing diagnostic codes or disconnecting the battery shortly before the appointment, since doing so can leave monitors incomplete.
Smog Check vs Smog Test Side by Side
The simplest way to separate the terms is to ask what question each one answers.
Smog check asks: Has this vehicle satisfied the applicable California emissions requirement for the relevant DMV transaction?
Smog test asks: What did the inspection equipment and technician find during this visit?
The two concepts meet at the station, but they aren't the same deliverable. A technician performs the test, and the state uses that result within the Smog Check program.
Smog Check vs Smog Test at a Glance
| Dimension | Smog Check | Smog Test |
|---|---|---|
| Meaning | California's regulated compliance program | The inspection procedure performed on the vehicle |
| Authority | California Bureau of Automotive Repair and DMV requirements | BAR-approved inspection standards and equipment |
| Trigger | Registration renewal, sale, transfer, or another applicable DMV event | The scheduled inspection or retest visit |
| Technical work | Applies the correct inspection pathway to the vehicle | Performs visual, functional, OBD, or tailpipe checks as required |
| Output | Electronic Smog Check certification used for DMV compliance | Vehicle Inspection Report with inspection findings |
| Passing language | The vehicle passes the applicable Smog Check requirement | The test records a pass for the inspection performed |
| Failure handling | The compliance requirement remains unresolved until the vehicle passes or qualifies under an applicable process | The report identifies the failed area and supports repair and retest decisions |
A newer vehicle generally goes through an OBD-based procedure, while an older vehicle may receive tailpipe measurement. The program determines which standards apply. The test carries them out.
Why the same car can face different station rules
A vehicle assigned to a directed or higher-emission review may need a STAR station. That doesn't necessarily mean the technician uses an exotic test. It means the state has assigned the vehicle to a station class designed for added inspection quality and program control.
The distinction also clarifies failure paperwork. A Vehicle Inspection Report tells you what happened during the test. A passing electronic certificate addresses the DMV compliance requirement. You need the latter when your transaction requires official certification, not merely a piece of paper showing that a technician connected equipment.
What the Failure Data Tells You About Real-World Outcomes
California's statewide results show why the distinction between a Smog Check program and an individual smog test matters. In 2025, BAR recorded 11,275,981 initial tests and 12,200,718 total tests, with an 8.51% initial failure rate. Those figures are documented in the program's historical and statewide inspection data.
The pattern continued in January 2026. BAR reported 989,080 initial tests, including 82,543 failures, for an 8.35% initial failure rate. Across all tests, the report recorded 1,065,033 inspections and 93,789 failures, an 8.81% overall failure rate. The January 2026 BAR executive summary provides those results.
Smog Check vs Smog Test Failure Outcomes
| Metric | Smog Check | Smog Test |
|---|---|---|
| What failure means | The DMV-related emissions requirement isn't complete | The vehicle failed one or more inspection checks |
| What the driver receives | A compliance result is transmitted when the vehicle passes | A Vehicle Inspection Report identifies the result |
| Immediate concern | Registration, sale, or transfer may remain unresolved | Repairs, readiness completion, or a retest may be needed |
| Practical next move | Confirm the required station and transaction pathway | Review the failure items before authorizing repairs |
Vehicle age changes the odds and the inspection context. The January report lists an 18.69% overall failure rate for one all-model-year sample category and an 11.09% rate for a 2025 model-year group. Those categories show that results vary by vehicle population and inspection conditions. A newer car can still fail because of readiness or emissions-control issues, while an older car can pass its basic checks despite a smooth idle that gives no reliable guarantee.
Use this guide to common smog-check failure causes before approving parts or labor. The practical rule is simple: confirm the station pathway first, then diagnose the exact failure. That order prevents a wasted visit and reduces the risk of paying for repairs the test did not require.
STAR Stations, Test-Only Stations, and Where to Go
California station designations determine which businesses may inspect your vehicle and whether they may also perform repairs. The terms describe different regulatory roles, not interchangeable names for the same service.
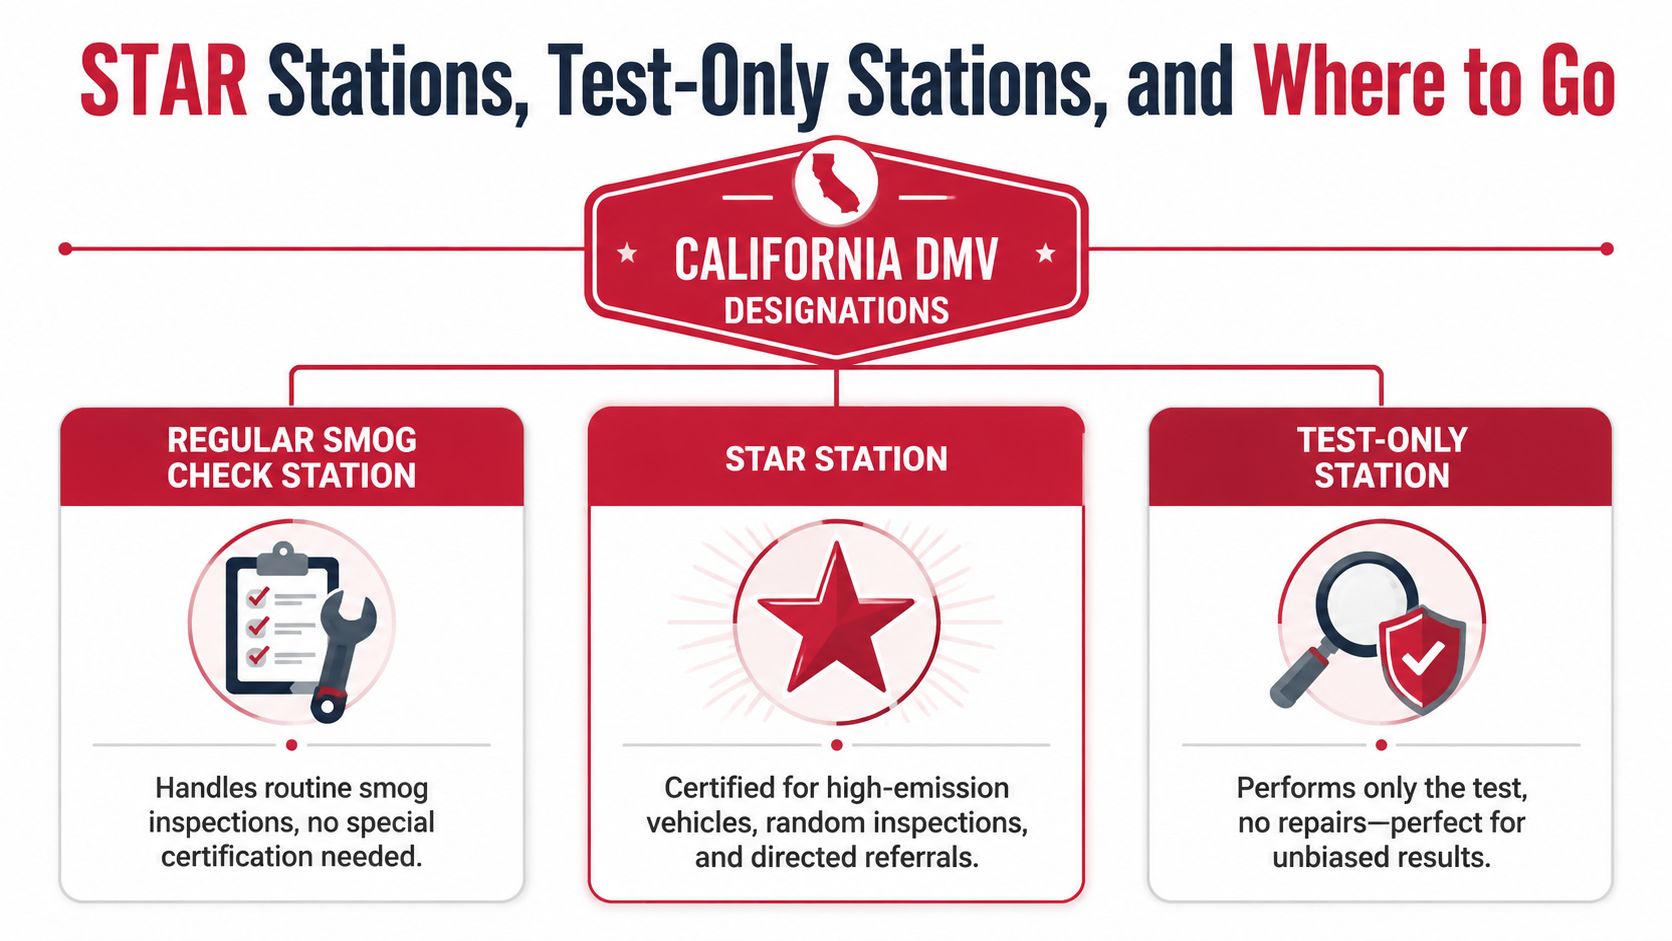
A regular station handles inspections within its license and equipment scope. A STAR station meets higher inspection-based standards and participates in the program when the state directs certain vehicles into that network. A test-only station performs the inspection but cannot repair the same vehicle, keeping testing separate from repair sales. Review the California STAR-certified station requirements before choosing a location.
Why test-only matters
A test-only station removes the direct repair-sales conflict. Its revenue does not depend on selling a catalytic converter, sensor, or other part after a failure. That separation does not guarantee a passing result, but it gives you a clearer boundary between inspection findings and repair recommendations.
The California STAR program explanation describes STAR as a quality-focused program supporting inspection accuracy and emissions reductions. STAR certification can apply to both test-only and test-and-repair stations that meet the required standards.
Read your DMV renewal notice or referral before booking. If it says STAR-directed, choose a STAR-certified station. Otherwise, confirm that the station performs the inspection required for your vehicle and transaction.
For Antioch drivers, Fire House Smog operates as a STAR-certified test-only station at 2900 Lone Tree Way. It provides emissions inspections without in-house repairs, DMV registration services, and a posted retest policy subject to its conditions. Verify your notice and the station's current policy before arriving.
Surprising Ways a Healthy Car Can Still Fail
A quiet engine and a dark dashboard don't prove that a car is ready for inspection. California's OBD procedure evaluates emissions-system self-checks that drivers can't feel from behind the wheel.
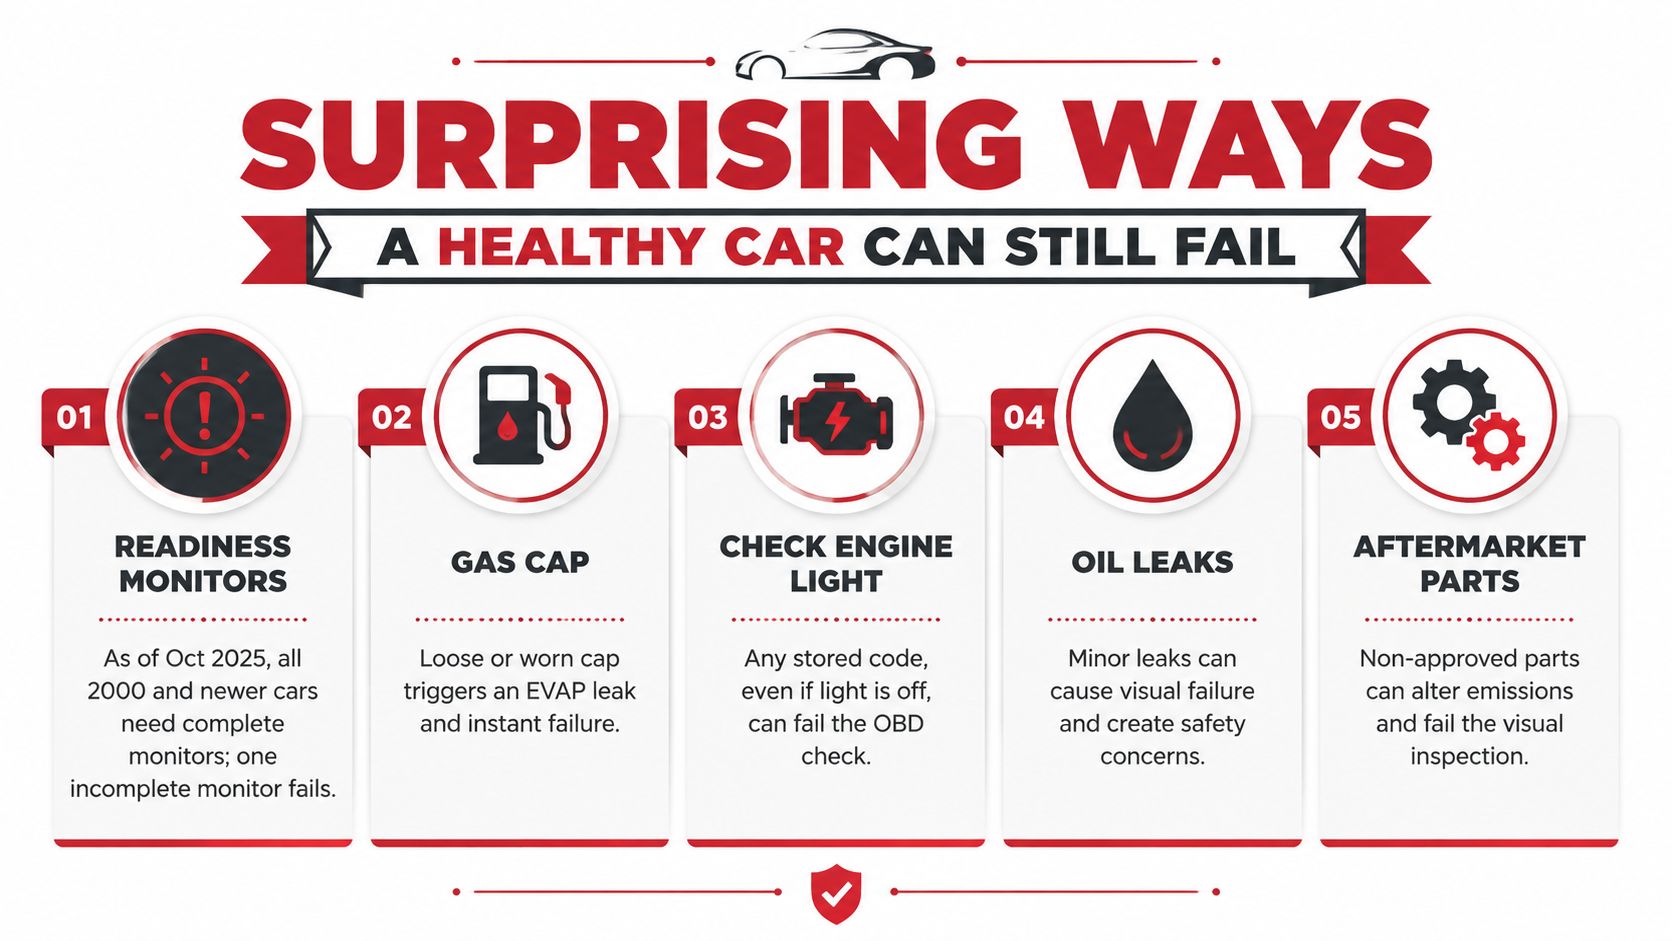
The biggest recent change took effect October 1, 2025. California BAR guidance says all readiness monitors must be set for a vehicle to pass, with narrow exceptions for unique design issues. That means disconnecting the battery or clearing a diagnostic code shortly before the appointment can leave the vehicle unable to pass even after the original problem appears fixed.
The traps I see most often
- Readiness monitors remain incomplete. The computer needs driving conditions to complete its emissions self-tests after repairs or a battery disconnect.
- A recently cleared code returns later. Clearing the code erases useful history but doesn't complete the drive cycle.
- The Check Engine Light is illuminated. An active malfunction indicator is a direct warning that the OBD inspection may fail.
- The gas cap doesn't seal. An EVAP leak can trigger an emissions fault even when the engine feels normal.
- Aftermarket equipment lacks approval. Intake or exhaust parts that don't carry the required California emissions approval can fail the visual inspection.
A fifteen-minute warm-up is a sensible preparation step, but it isn't a substitute for readiness verification. Before the appointment, use a compatible OBD scanner to check for pending codes and monitor status, confirm that the gas cap clicks and seals properly, and complete a mixed drive cycle rather than taking only short trips.
A healthy car isn't necessarily an inspection-ready car. Check the computer before you pay for the official test.
A Real Antioch Driver Scenario From Booking to Tag
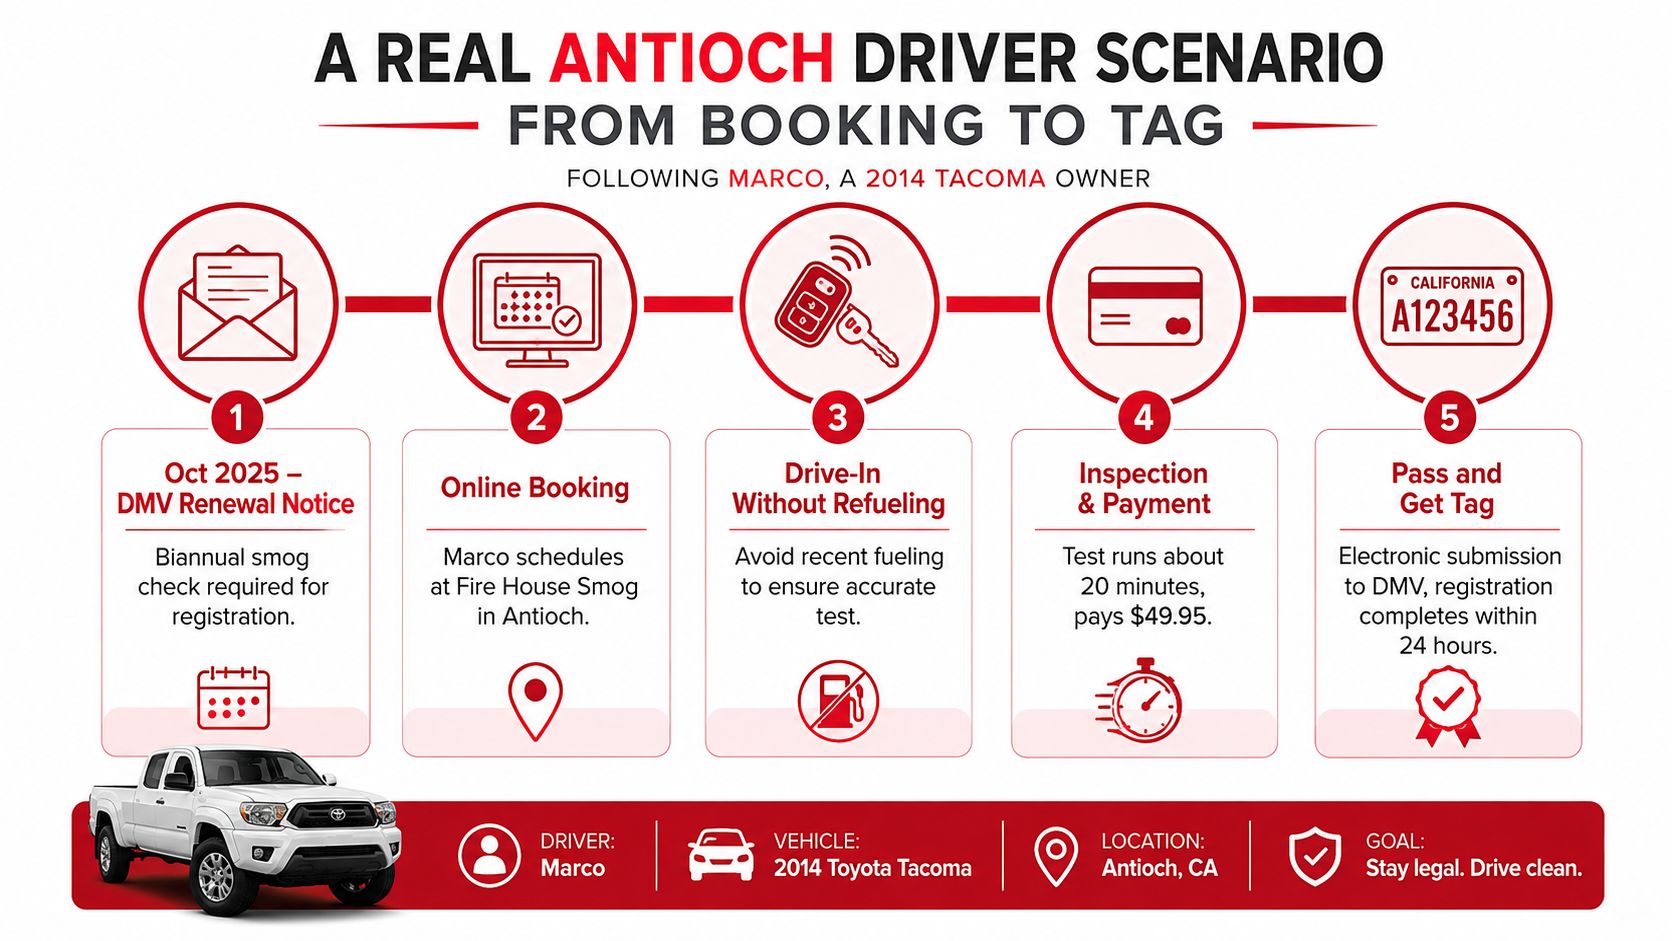
The following scenario is a practical illustration, not a verified customer case study. Marco owns a 2014 Toyota Tacoma in Antioch and receives a DMV renewal notice in October 2025. The notice indicates that his registration renewal requires a Smog Check, so he looks for a station that can handle the applicable inspection rather than booking the first generic “smog test” result.
He books online at Fire House Smog and arrives without recently refueling. The technician connects the inspection equipment and explains that Marco's readiness monitors aren't set. The truck runs normally, but the computer hasn't completed the emissions checks needed for the inspection.
What happens next
Marco pays the station's posted directed-inspection price, then gets the readiness issue addressed before returning. The station's stated example uses a $61.75 directed inspection, followed by a $40 retest within 90 days after the vehicle is ready. Those are scenario-specific amounts, not California-wide prices, and drivers should confirm current charges and eligibility before booking.
On the second visit, the technician completes the directed inspection, the gross-polluter notice is lifted, and the passing result is transmitted electronically for the DMV renewal. Marco leaves with the certificate needed to complete the registration process and later receives his new sticker.
His main regret is simple. He should have checked monitor status before the first appointment and read the notice more carefully. A scanner check would have told him that the vehicle needed more driving time, while confirming the station requirement would have prevented him from treating the appointment as an ordinary walk-in test.
The point isn't the exact invoice. The point is the sequence. Notice type, station eligibility, readiness status, inspection, electronic certification, then registration. Skip the first two checks and a healthy truck can still produce an expensive extra visit.
Common Questions and Your Next Steps
Can I use any station with a directed notice
No. A directed notice can require a STAR-certified station. Confirm the wording on your DMV notice before you book.
What's the difference between gross polluter and directed
A gross-polluter designation describes a vehicle identified as producing emissions at a significantly high level. A directed notice is the station-routing instruction that sends the vehicle into a particular inspection pathway.
How long is a smog certificate good for
The certificate's usefulness depends on the DMV transaction and applicable state rules. Ask the station or DMV how the result applies to your specific renewal, sale, or transfer.
Do I need an appointment
Not always. An appointment can still reduce uncertainty, especially if your vehicle is directed, requires a specific station class, or needs equipment that isn't available at every location.
What if I bought the car from out of state
An out-of-state vehicle may need California inspection before California registration can be completed. Bring the DMV paperwork and ask the station whether it can inspect that vehicle type.
Does a new battery reset readiness monitors
It can. Battery disconnection may erase monitor status, so check readiness with an OBD scanner and allow the required drive cycle to complete before testing.
Can I fail if the Check Engine Light is off now
Yes. The computer may still show pending faults or incomplete monitors. A dark dashboard alone isn't proof that the OBD system is ready.
Are hybrids exempt
Don't assume that a hybrid is exempt. Check the vehicle's fuel type, model year, and California DMV requirement before skipping an inspection.
Your five-point preparation list
- Read the notice. Identify whether the DMV requires a routine or STAR-directed inspection.
- Locate the OBD-II port. Know where the technician will connect and make sure nothing blocks access.
- Check monitor readiness. Use a compatible scanner before the appointment, particularly after battery work or repairs.
- Bring repair records. Prior receipts help explain recent work and guide the conversation if the vehicle fails.
- Confirm the station class. Verify STAR or test-only eligibility before you drive across town.
Fire House Smog provides STAR-certified test-only inspections, DMV registration services, and on-site tag issuance at 2900 Lone Tree Way in Antioch, with smog testing seven days a week and DMV service hours Monday through Saturday from 9:30 AM to 5:00 PM and Sunday from 12:00 PM to 4:00 PM.
If you want the inspection and DMV step handled in one visit, book your vehicle with Fire House Smog and bring your renewal or referral notice. The Antioch team can verify the required station pathway, check the emissions system, and process eligible registration services after a passing result.
You're at a two-bay test-only station on a Wednesday afternoon. One vehicle is already on the dynamometer, another is idling outside with its check-engine light glowing, and a third driver is staring at a phone, deciding whether to wait or leave. Everyone has the same question: will this quick STAR smog visit take about twenty minutes, or will it consume the afternoon?
The test itself can be short. The line isn't always short. Vehicle condition, readiness monitors, paperwork, bay availability, staffing, and the cars ahead of you determine how quickly you leave. California's Smog Check program is large and active, with 11,275,981 initial tests and 12,200,718 total tests recorded in 2025, while the initial failure rate was 8.51% and the overall failure rate was 9.04% according to the California Smog Check executive summary.
A quick visit is therefore a workflow outcome, not a promise printed on a sign. The practical questions are simple: does the station have a process that keeps bays moving, and have you brought in a vehicle that can complete the inspection?
Table of Contents
- The 20-Minute Question Every Driver Asks
- What STAR Certification and Test-Only Really Mean
- How a Test-Only Station Moves Cars Through Fast
- Documents, Prep, and the Actual Test Sequence
- Realistic Turnaround Times by Scenario
- Hours, Fees, Coupons, and the Free Retest Rule
- Practical Tips to Cut Your Wait
- Deciding Whether a Quick STAR Visit Is Right for You
The 20-Minute Question Every Driver Asks
At 2:15 on a normal weekday, a two-bay station can look busy without being backed up. One technician may be finishing a dynamometer test while another checks paperwork and connects an OBD scanner. A car outside with a warning light can change the rhythm immediately, because the technician may need to stop the normal sequence and explain that the vehicle isn't ready to pass.
That's why drivers confuse test time with wait time. A clean, prepared vehicle can move through the inspection promptly, but your total visit depends on what arrived before you. One bay may be occupied by a vehicle that needs a tailpipe procedure, while the other is handling a visual inspection, payment, and certificate paperwork. If the station has fewer technicians than open bays, the extra space won't help much.
Practical rule: Ask, “How many cars are ahead of me, and are both bays running?” That answer is more useful than a generic promise that the test is fast.
The best stations engineer speed around repeatable handoffs. They review the customer's paperwork before pulling the vehicle in, screen for warning lights and readiness problems, and keep repair discussions out of the testing lane. You control some of that outcome by arriving prepared. The station controls the rest through its certification standards, bay layout, staffing, equipment, and retest policy.
The central point is straightforward. Quick STAR smog service means fewer avoidable interruptions, not a relaxed inspection. California's STAR framework measures station performance, and the Bureau of Automotive Repair's STAR FAQ explains that short-term measures are updated monthly, pass/fail decisions are made quarterly, and the Follow-up Pass Rate is updated twice a year, in January and July.
What STAR Certification and Test-Only Really Mean
STAR certification is a performance designation from California's Bureau of Automotive Repair. It applies to stations that meet controlled performance standards, including similar-vehicle failure rates, gear-shift incidents, and excessive test deviations. The BAR STAR program requirements specify a Similar Vehicle Failure Rate of at least half the industry-wide failure rate for similar vehicles, a Gear Shift Incident rate no higher than 2%, and an Excessive Test Deviation Rate of no more than 1.
Those standards explain why a DMV notice may direct you to a STAR station. In 2025, STAR-certified stations represented 49% of licensed stations but performed 83% of all Smog Check tests, according to the 2026 Smog Check Performance Report information published by BAR. That concentration makes STAR a defined quality-control program, not a casual label for any shop that offers emissions testing.
Use a test-only station when repairs should stay out of the inspection
A STAR station can be test-only or test-and-repair. Test-only means the business performs the inspection but does not sell or perform the emissions repairs identified during it. That separation keeps the testing decision apart from the repair sale.
A test-only station may be appropriate or required for directed testing, including vehicles identified through DMV notices, certain gross-polluter procedures, and some ownership or registration situations. Check your renewal notice before booking. If it directs you to STAR, choose a STAR station rather than assuming any smog check will satisfy the requirement.
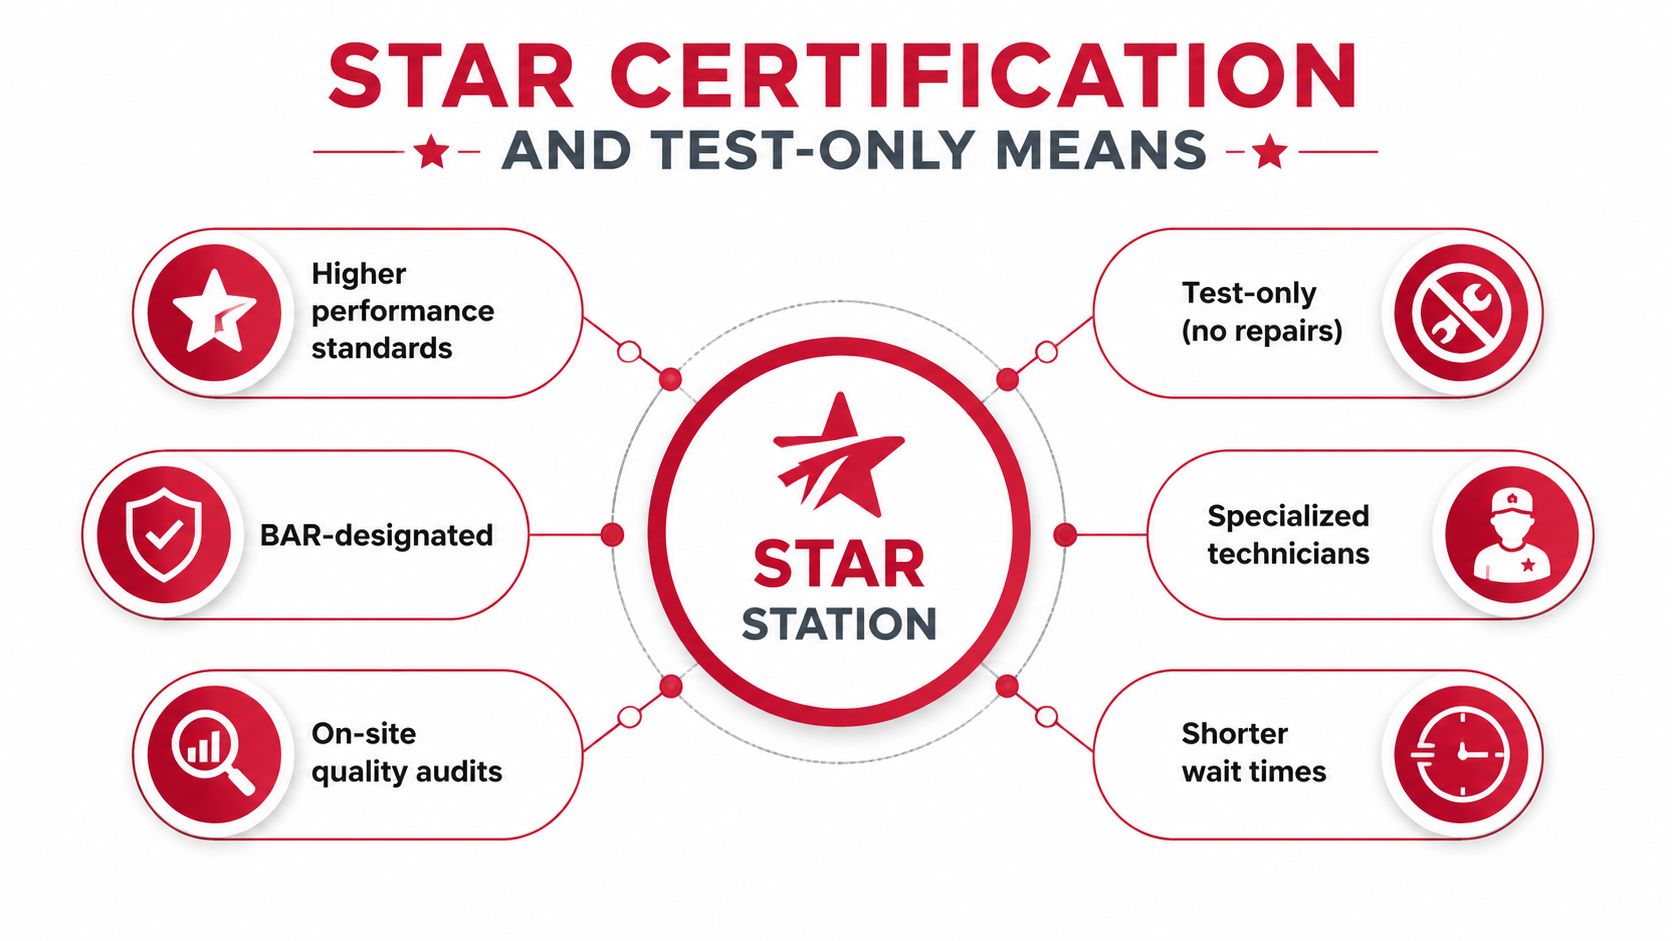
Test-only does not mean the inspection uses a tougher standard. The station follows California's approved procedure, including the applicable visual, OBD, dynamometer, or tailpipe elements. It also cannot issue a repair waiver or sell the repair needed after a failure.
For a plain-language explanation, read this guide to what STAR-certified smog means. The practical takeaway is simple: confirm the notice requirement, select the correct station type, and bring the vehicle in ready for the approved test.
How a Test-Only Station Moves Cars Through Fast
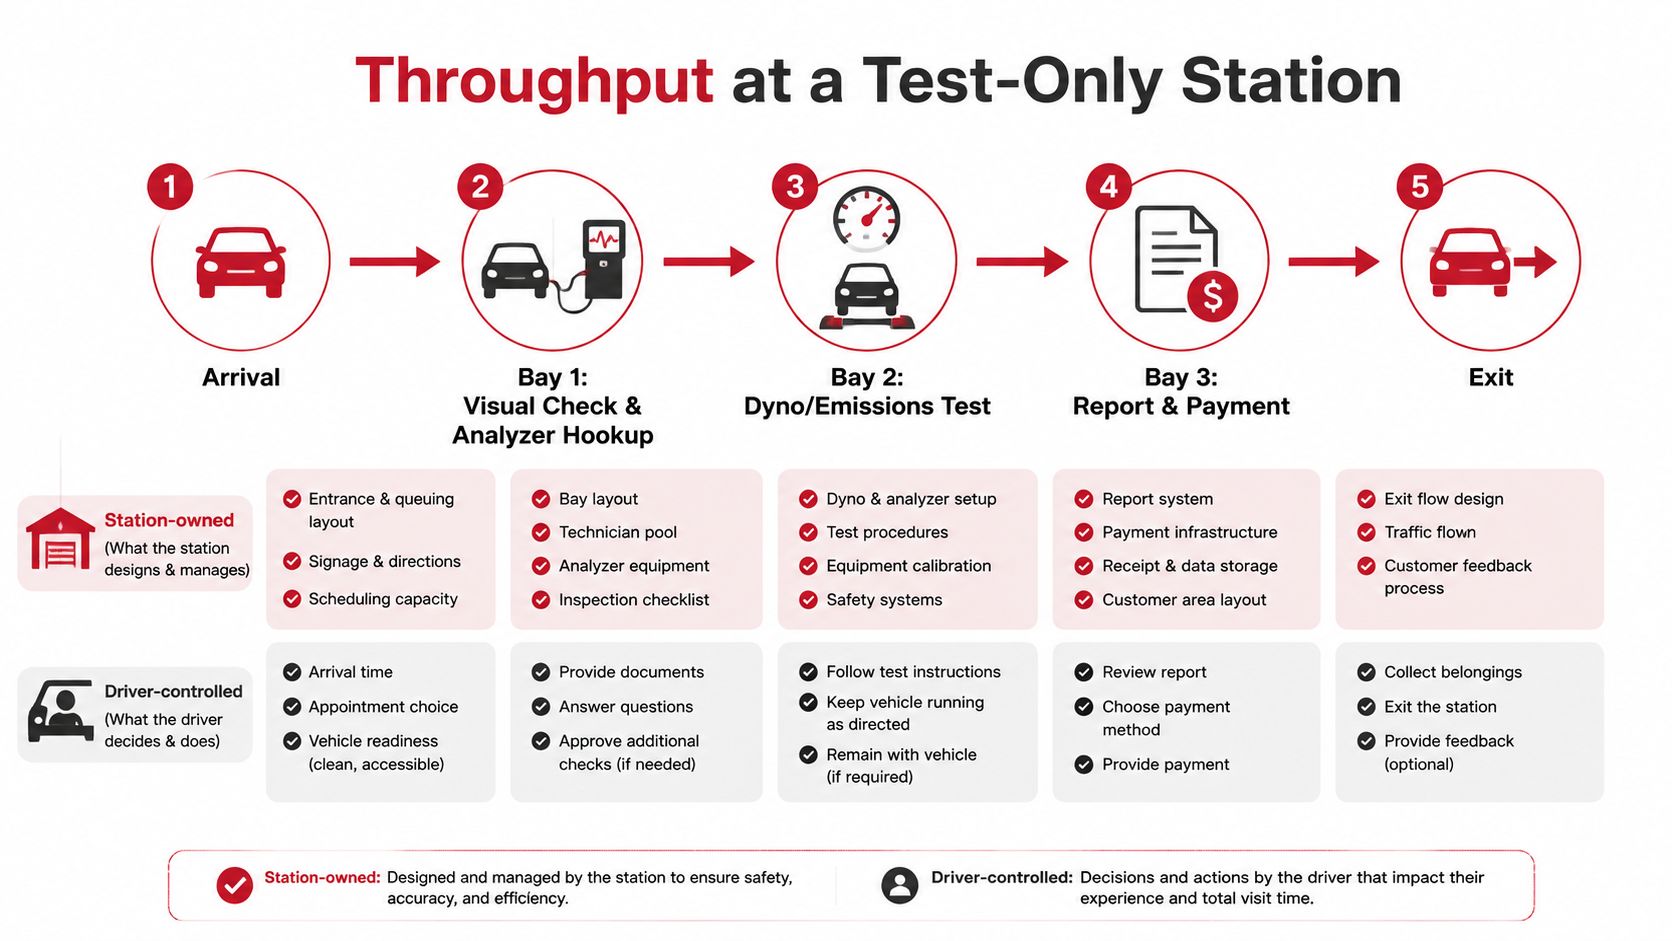
A fast station treats each vehicle as a sequence of handoffs. It doesn't let every appointment turn into an open-ended diagnosis. The technician confirms eligibility, checks the vehicle for obvious test blockers, connects the equipment, completes the required inspection, and prints the result.
At a two-bay station, the layout matters. One bay may handle an OBD-focused inspection while the other handles a dynamometer procedure. When the staff is coordinated, one vehicle can be leaving as another enters. When only one technician is working, both bays may exist but only one can move.
The station controls the process
A station's operational levers include:
- Bay assignment: Staff can send each vehicle to the appropriate equipment instead of creating unnecessary shuffling.
- Pre-screening: A quick check for a warning light, readiness issue, leaking fluids, or obvious modifications prevents wasted bay time.
- Paperwork preparation: Pulling registration details together before the inspection keeps the certificate and payment steps from becoming a bottleneck.
- Standardized testing: A defined sequence prevents technicians from wandering into repair diagnostics that a test-only facility isn't there to perform.
You control the other half. Bring your renewal notice or registration, disclose recent battery work or cleared codes, and don't arrive with a dashboard warning light you hope the technician won't notice. The technician will inspect the vehicle as presented, not as you wish it were presented.
The biggest bottleneck is often readiness, not the analyzer. If a vehicle's monitors aren't complete, the inspection may stop before the emissions portion can produce a valid result. California's OBD readiness regulation update says that, effective October 1, 2025, all readiness monitors must be set to pass. A station can be efficient, but it can't manufacture a completed drive cycle in the bay.
Documents, Prep, and the Actual Test Sequence
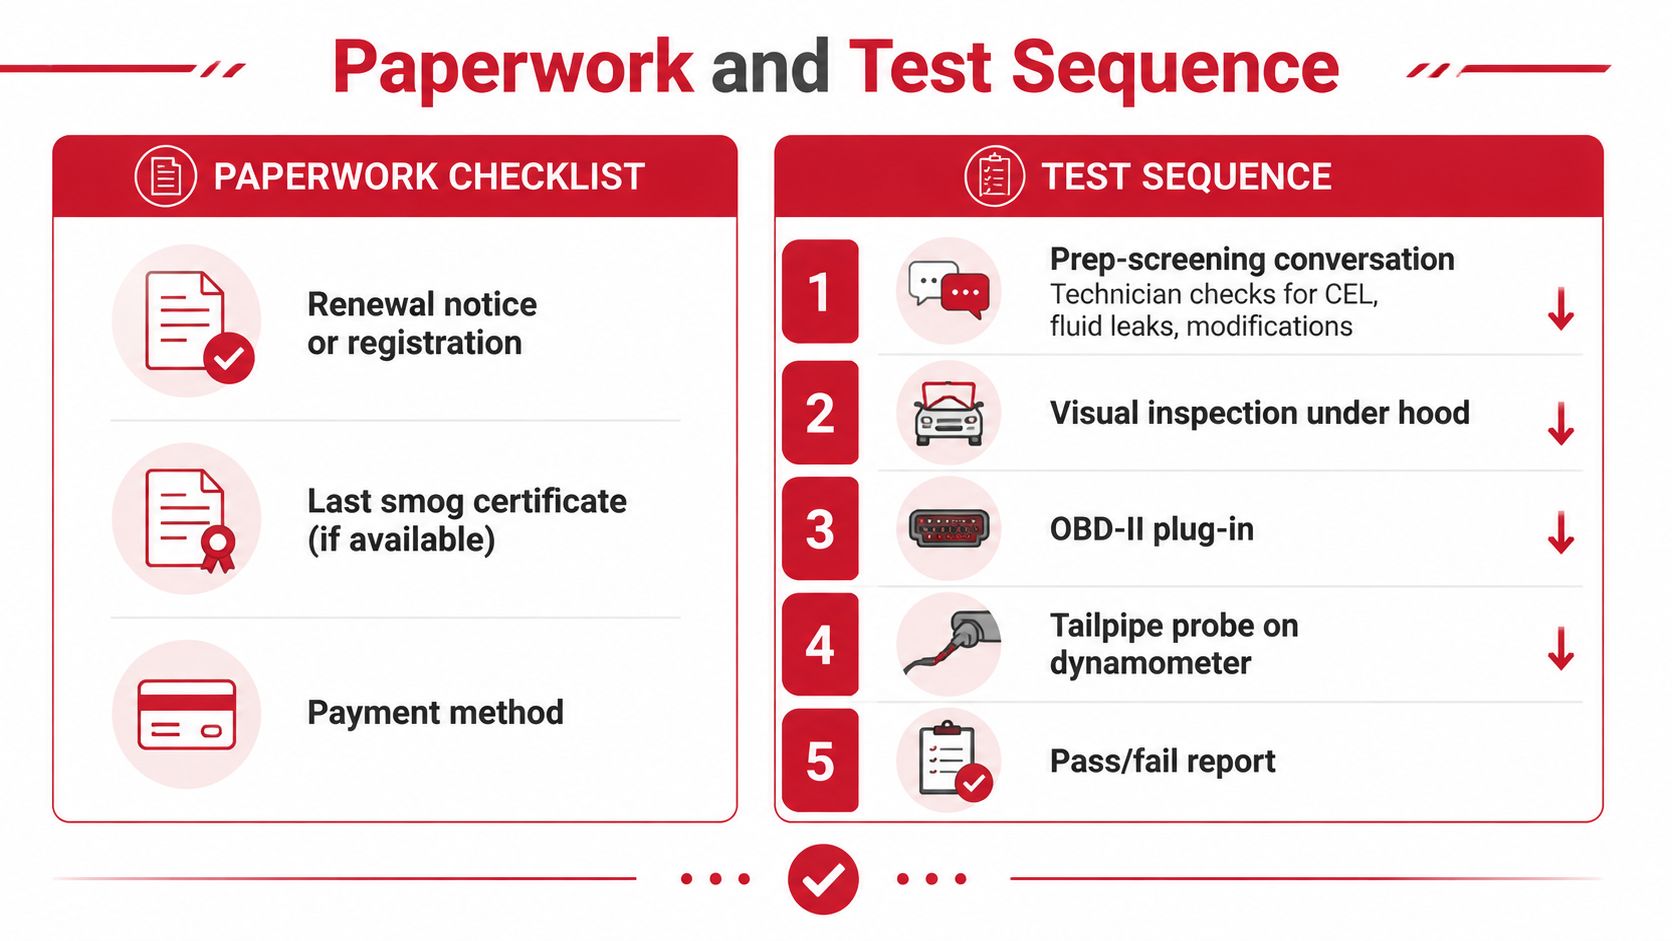
Bring the documents that let the technician identify the vehicle and complete the transaction without interruption. Your preparation folder should contain:
- Renewal notice or registration: The notice tells the technician what DMV event you're handling and whether STAR certification is specified.
- Last smog certificate, if available: It can help clarify recent testing history, though the station can determine the current inspection requirements.
- Payment method: Ask about accepted payment types and the total before the vehicle enters the bay.
The technician's pre-screening conversation is short, but answer it accurately. Mention a recent battery disconnect, cleared diagnostic codes, a repair that involved the engine computer, or a vehicle that has been sitting for an extended period. Those details can point to incomplete monitors even when the malfunction indicator lamp, commonly called the check-engine light, is off.
Readiness is not the same as a warning light
The malfunction indicator light tells you that the vehicle's onboard diagnostic system has detected a qualifying fault. Readiness monitors tell the technician whether the vehicle has completed its required self-checks. A light can be off while the monitors remain incomplete, especially after the battery has been disconnected or codes have been cleared.
For 1996-and-newer spark-ignition passenger vehicles and trucks under 14,001 GVWR, California's OBD II inspection checks the malfunction indicator light, fault codes, and readiness monitors, as described by BAR's OBD inspection guidance. The technician may reject or pause the test before emissions measurement if the vehicle shows a warning light, has incomplete required monitors, presents an inaccessible diagnostic connector, or has an obvious condition that prevents safe testing.
What happens in the bay
The sequence generally follows the vehicle's model year and equipment:
- The technician confirms the vehicle information and performs the initial screening.
- The station completes the required visual inspection, including relevant emissions equipment and warning indicators.
- The technician connects the OBD II interface when the vehicle uses that procedure.
- The vehicle undergoes the applicable tailpipe or dynamometer inspection.
- The station prints the pass or fail report and submits the certificate information through the state system.
A pass completes the emissions side of the visit. A failure produces a report that identifies the reason, but a test-only station won't become your repair shop. That clear boundary is useful because it keeps the inspection focused and lets you choose where to address the problem.
Realistic Turnaround Times by Scenario
A quick visit depends on the vehicle arriving ready, the bay available, and the station's screening process. A normally driven vehicle with complete monitors can move through a routine inspection. A warning light, incomplete readiness status, or older testing procedure can stop that workflow before a certificate is issued.
Use these ranges for planning, not as promises. Queue length, vehicle type, required procedure, and the technician's initial findings determine the actual visit time.
| Vehicle Scenario | Typical Visit | Notes |
|---|---|---|
| Clean, prepared vehicle with monitors complete | About 15 to 20 minutes | Fastest path when a bay is open and paperwork is ready |
| Vehicle with an incomplete monitor | Longer than a routine visit | The technician may stop the test and explain that more driving is required |
| Vehicle with the check-engine light on | No reliable quick turnaround | A passing certificate may require repairs and completed monitors first |
| Older vehicle requiring a tailpipe and dynamometer procedure | Longer than a modern OBD-only visit | Extra equipment and emissions steps add time |
Do not plan around the shortest scenario. A station can complete a failed test quickly, yet the visit still wastes time if the vehicle was not ready. See the readiness rules discussed earlier in this article before booking.
A test-only station cannot turn a check-engine-light vehicle into a passing inspection because you are in a hurry. Get a diagnostic assessment from a repair provider, fix the cause, complete the required driving, and return for testing. The station's bay count and retest policy affect how quickly you can recover from a failure, so ask about both before you arrive.
For more detail on queues, preparation, and inspection steps, review this guide to how long a smog check takes.
Ask the station a more useful question than “Can you do it in twenty minutes?” Confirm that your vehicle is ready, ask how many cars are ahead of you, and verify whether the station has an open bay. That workflow check gives you a realistic arrival-to-departure estimate.
Hours, Fees, Coupons, and the Free Retest Rule
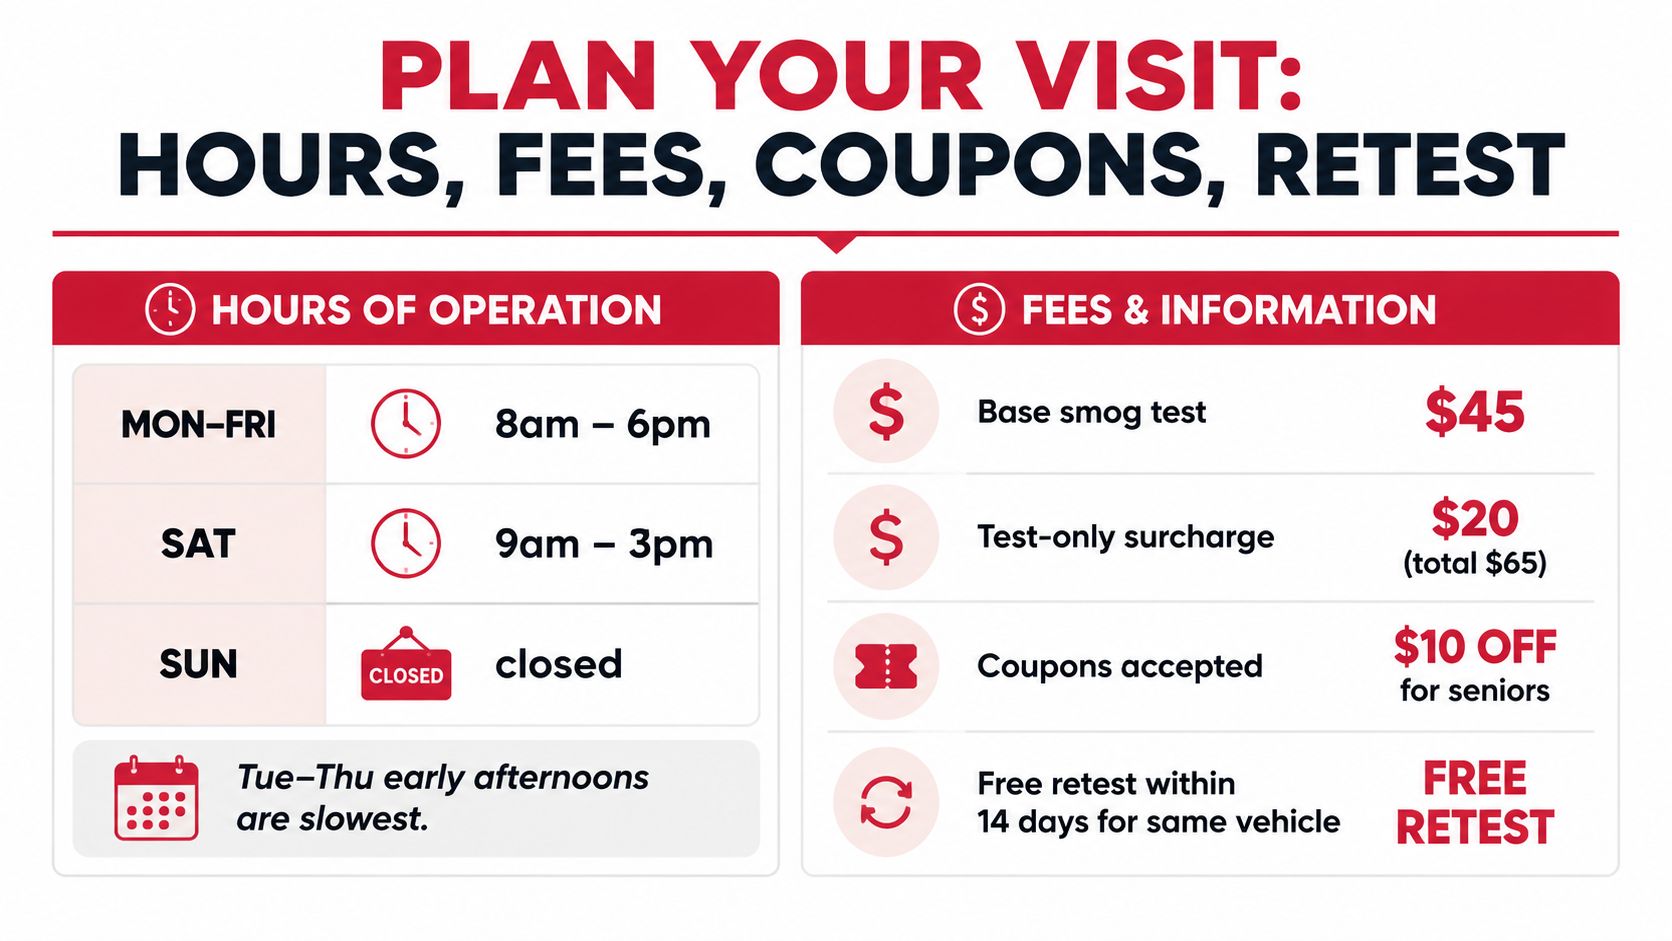
A fast visit starts with the station's real schedule, not a search listing. Check operating hours before leaving, then call if your vehicle has unusual equipment, a motorhome, a directed notice, or a recent failed test. Midweek mornings often produce a calmer queue than Monday, Saturday, lunch periods, or the final stretch before closing.
Ask for the full price before authorizing the test. California's mandatory state certificate fee is $8.25, and recent 2026 reporting placed the statewide average inspection cost at $68.56 before that fee, according to this California Smog Check 2026 cost and compliance update. The station may list a separate testing price, vehicle-type charge, payment fee, or convenience fee. Confirm the complete out-the-door amount.
Read the coupon terms before booking
Coupons apply under specific conditions. Check the vehicle class, service type, expiration terms, and participating station before you rely on the advertised discount. A free retest may require the original inspection to have been performed at that station, a return within the stated validity period, and the original paperwork or coupon.
Use this wording when you call:
“If my vehicle fails today, what exactly qualifies me for a free retest, how long is the offer valid, and do I have to return to the same station?”
Do not assume another shop will honor the offer. Do not assume the retest includes diagnosis or repairs. A test-only facility may waive the retest inspection under its policy while charging separately for outside repair work or another service. Ask what the policy covers before you leave after a failure.
A directed STAR notice can limit your station choice even when the vehicle appears ordinary. BAR updates performance measures on different schedules, so STAR selection is not based on one permanent label. Follow the DMV direction first, then compare price, bay availability, retest terms, and whether the station can process the related registration task.
As noted earlier, California's updated readiness rule requires all monitors to pass. For coupon terms and a focused list of questions, review this guide to a STAR smog test coupon. The useful comparison is the total cost after a pass, failure, or repeat visit, not the lowest advertised entry price.
Practical Tips to Cut Your Wait
The highest-value preparation happens before you leave home. Use this order, because it separates actions that prevent a wasted trip from tricks that merely sound automotive.
Call ahead for screening. Tell the station your vehicle's model year, whether the check-engine light is on, whether the battery was recently disconnected, and whether the DMV notice says STAR. A technician can often tell you whether the visit makes sense before you spend time driving there.
Choose the right arrival window. Midweek, midmorning visits usually give you a better chance of finding an open bay than Monday or Saturday rush periods. Avoid the lunch window and the last part of the day, when unfinished vehicles and paperwork can stack up.
Verify readiness with a scan tool. If you own an OBD II reader, check monitor status before booking. If you don't, ask a qualified technician to check it. California's current readiness rule makes this more important because all readiness monitors must be set to pass under the rule effective October 1, 2025, according to the BAR explanation of the updated OBD readiness requirements.
Drive normally after repairs. A vehicle that recently had codes cleared or a battery disconnected may need a manufacturer-specific drive cycle. Don't guess at the distance or route. Follow the vehicle's service information, and don't book the smog test until the monitors show ready.
Skip the myths
Running premium fuel, adding a mystery fuel additive, or arriving with an almost empty tank isn't a substitute for proper readiness. Those habits don't repair a failed oxygen sensor, restore a missing catalyst, or complete a monitor that hasn't run. Bring the car in normal operating condition, with properly inflated tires if the vehicle will use a dynamometer, and with the diagnostic connector accessible.
Have your registration and renewal notice in one folder. Remove clutter from the cabin, make sure the technician can access the dashboard, and disclose modifications rather than hoping they go unnoticed. These details won't change a failing emissions system, but they can prevent needless handling delays.
Deciding Whether a Quick STAR Visit Is Right for You
The fastest visit starts before you enter the bay. Decide whether the car is ready or needs screening first.
Book a quick STAR smog visit when the vehicle has been driven normally, the check-engine light is off, no recent battery reset or code clearing interrupted the monitors, and your registration paperwork is ready. Follow the DMV notice, confirm the station is STAR certified, ask about the current queue, and let the technician complete the inspection. Bay availability, readiness screening, and a clear retest policy determine speed more than a “quick” label.
Prepare first if the warning light is on, the vehicle was recently repaired, the battery was disconnected, the car has been sitting, or you already know a monitor is incomplete. A paid pre-inspection or diagnostic scan can cost less than a failed testing trip followed by another appointment. A test-only station can identify the failure, but it will not sell the repair that resolves it.
California requires a Smog Check for all out-of-state 1976 model-year and newer vehicles registering in California for the first time, along with other initial registration events determined by the DMV. The January 2026 BAR report cited earlier covers those requirements. It also explains that 100% battery-electric vehicles are exempt, while hybrids and plug-in hybrids remain subject to biennial inspection. Confirm your vehicle's category before booking.
Reserve an appointment, or visit promptly after receiving the renewal notice instead of waiting until the deadline. Bring the notice, registration details, and vehicle information in one folder. If you're in Antioch or East Contra Costa County, Fire House Smog is a STAR-certified test-only station at 2900 Lone Tree Way. Ask the station to confirm readiness screening and retest eligibility before you arrive.
You notice it while fueling up. The California vehicle registration sticker on your rear plate looks faded, torn, or older than you expected. Maybe you renewed online months ago, but the replacement never arrived. Or perhaps you paid the renewal and assumed the sticker would take care of itself.
That assumption causes avoidable trouble. California treats the sticker as part of the vehicle's current registration display, and the correct solution depends on what happened. A lost year tab, an unreadable month tab, and a sticker that the DMV never mailed are different problems with different remedies.
Table of Contents
- What the California Vehicle Registration Sticker Actually Is
- Legal Requirements and Correct Display Rules
- How to Renew Your California Registration Sticker
- Replacing a Lost, Stolen, or Undelivered Sticker
- Where to Get Your Sticker Without the DMV Wait
- Documents Checklist and Practical Tips
- Penalties, Deadlines, and Frequently Asked Questions
What the California Vehicle Registration Sticker Actually Is
A California vehicle registration sticker, commonly called a tab, is the validation device placed on the vehicle's license plate after registration renewal. California requires vehicle owners to renew registration every year, and the DMV sends new registration stickers after renewal. The owner must affix those stickers to the license plate to keep the registration display valid. The California DMV license plate guidance confirms that replacement month stickers may be issued at no cost when the owner is eligible.
The plate normally carries two important tabs. The year sticker identifies the registration year, while the month sticker identifies the month in which the registration expires. Together, they give a quick visual indication that the vehicle's registration should be current. Officers can also verify the vehicle record through DMV systems, so the physical sticker and the electronic record work together.
Practical rule: Treat the plate sticker as a required part of the vehicle's registration display, not as optional decoration.
California's system developed over time. The state first required vehicle registration in 1905, began issuing permanent license plates in 1914, introduced unique registration tags in 1916, and adopted annual registration stickers in 1976 to show that registration was current, as documented in the history of California vehicle registration plates. The DMV still uses stickers as part of the annual renewal process, even though registration information is also maintained electronically.
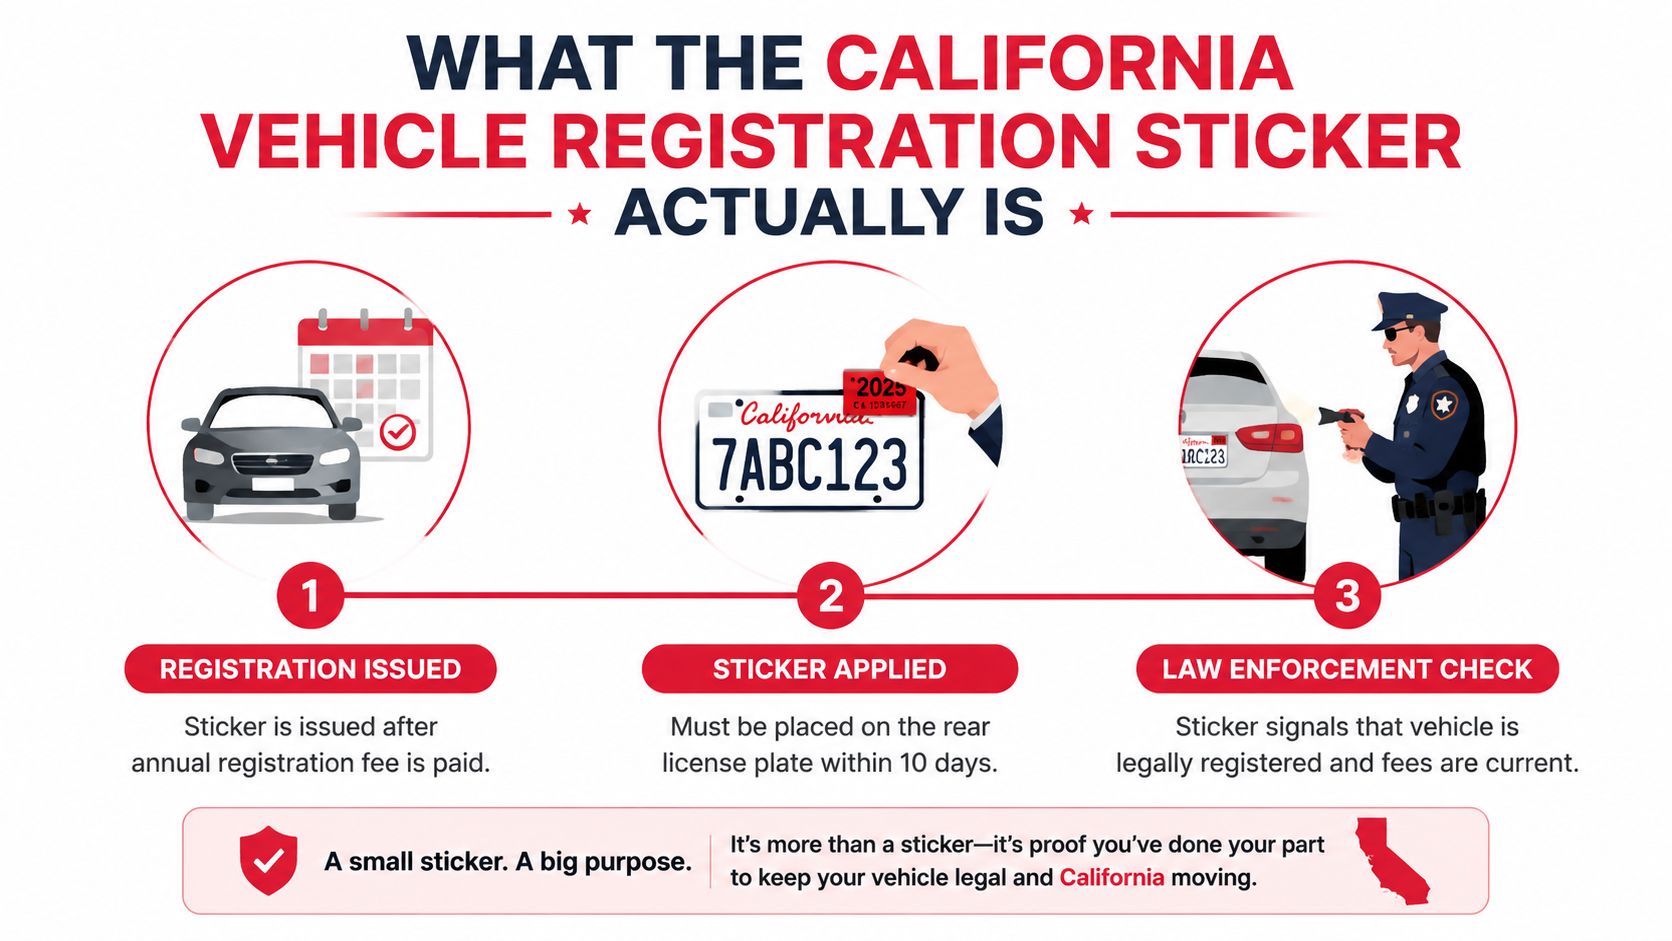
Look at the rear plate before you drive. If the year tab is missing, peeled away, or impossible to read, request the correct replacement rather than placing a random sticker over the problem. If the month tab is the issue, the DMV may treat it differently from a year-tab replacement.
The key question is simple: does your DMV record show current registration, and does your plate display the correct tabs? If the record is current but the sticker is missing, you need a replacement. If the record isn't current, ordering another sticker won't fix the underlying registration problem.
Legal Requirements and Correct Display Rules
The rear license plate is the required display location for California registration tabs. Apply each tab to the designated validation area, where it must stay visible and legible. Do not place it on the plate frame, vehicle body, or a removable cover. A frame that blocks the tab can make a current registration difficult to verify.
Before applying a replacement, clean away loose residue and let the plate dry. Press the tab down firmly. Follow the DMV's instructions for the specific replacement, especially before placing a new year tab over an older one. Layered or damaged tabs are harder to inspect and may peel away.
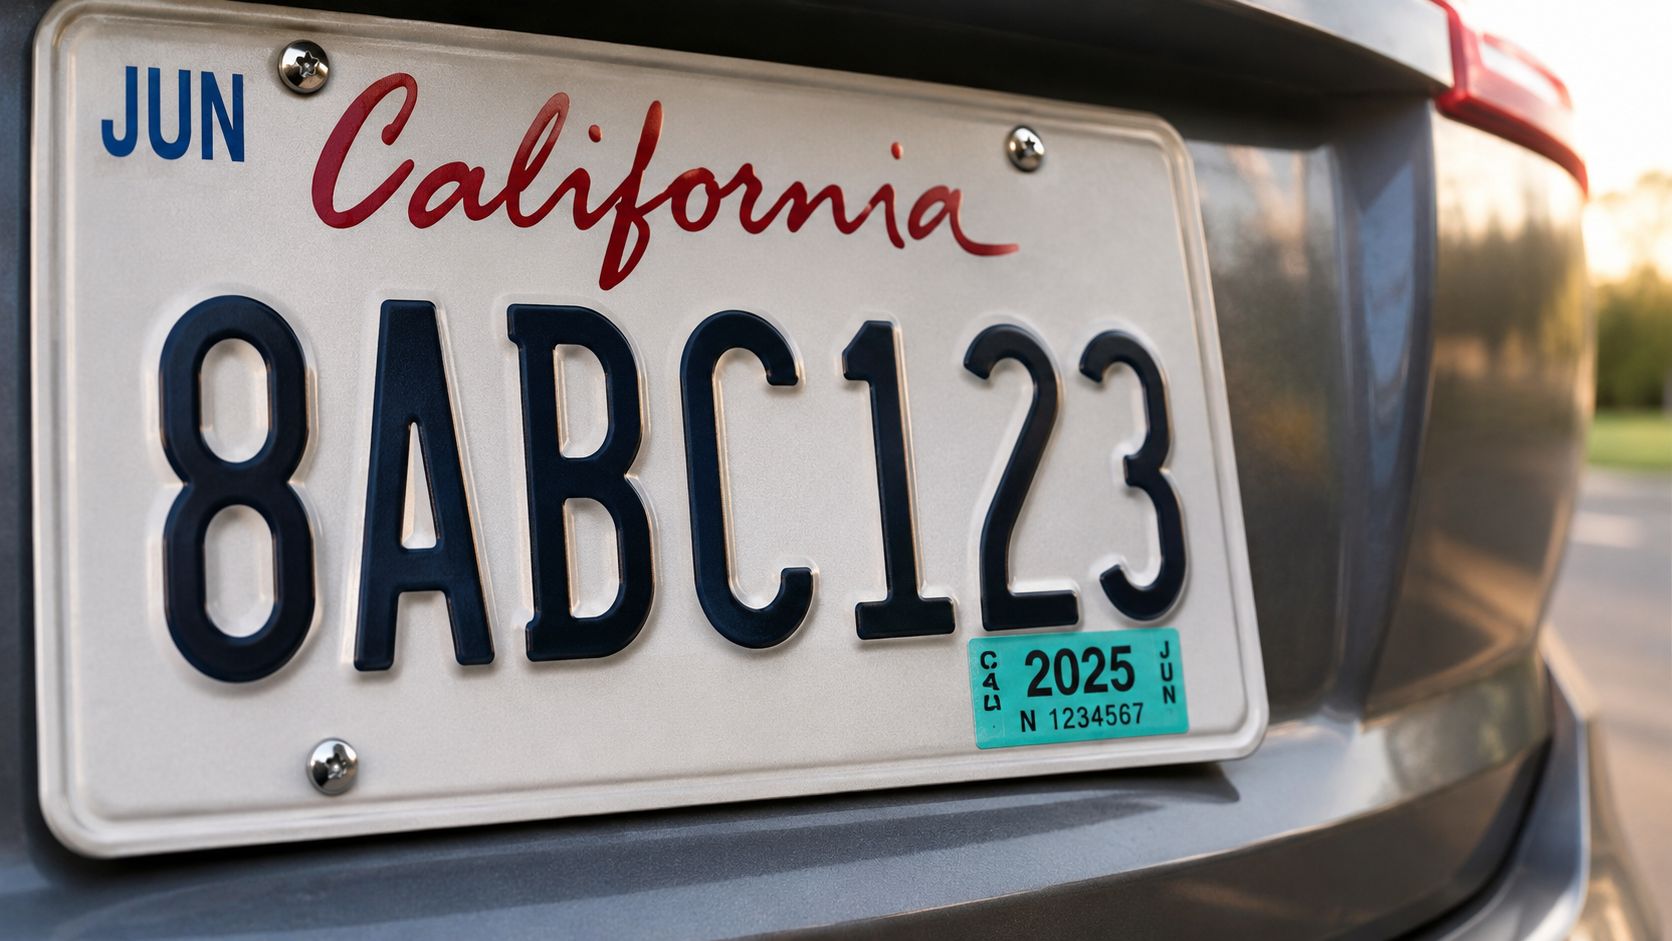
Check these common display mistakes
- Wrong plate: Ordinary vehicles generally display registration tabs on the rear plate. Do not attach one to a front plate or temporary paper document.
- Wrong location: A tab outside the designated area may be difficult to verify and may fail the display requirement.
- Blocked visibility: Oversized frames, tinted covers, dirt, and peeling edges can hide registration information.
- Unreadable condition: Replace a faded, damaged, or illegible tab.
- Out-of-date information: After receiving an issued replacement, remove the old tab and display the current one.
Year-tab and month-tab problems are not interchangeable. The DMV replacement process identifies the year sticker as lost, stolen, damaged, or illegible and requires vehicle and applicant information for the request. Use the DMV replacement sticker instructions to select the correct request. If the year tab never arrives by mail, verify the registration record and request a replacement instead of applying an unrelated tab. A missing month tab also needs attention, but do not assume the year-tab procedure automatically covers it.
A current electronic registration record does not make an obscured or unreadable plate display acceptable. Stand behind the vehicle and check both tabs before driving. Confirm that the year and month are present, readable, and uncovered. Fix any problem promptly, before it becomes an avoidable roadside issue.
How to Renew Your California Registration Sticker
California gives drivers several renewal channels. The right choice depends on whether your record is straightforward, whether a smog certification is needed, and whether you need the physical sticker immediately.
Start with the renewal notice if you received one. It usually identifies the vehicle and the amount due, but the notice isn't the only way to renew. The DMV confirms that registration renewal can be completed online or by phone through its renewal service, and renewal stickers are mailed after processing.
Choose the channel that matches your situation
Online renewal works well when the vehicle is eligible and the DMV already has the required information. Use the official DMV website, enter the requested vehicle details, complete any smog requirement, and submit payment. Keep the confirmation for your records, but remember that confirmation and the physical sticker are separate things.
Phone renewal is useful when you prefer a guided process and your transaction qualifies. Have the renewal information and payment method available before calling. If the system identifies a missing requirement, resolve that issue instead of repeatedly submitting the same payment.
A DMV self-service kiosk can be the fastest choice when the vehicle meets the kiosk's requirements. DMV kiosks can also print registration card or sticker replacements using the plate number and the last five digits of the VIN, according to the DMV's replacement information.
Mail renewal suits drivers who prefer paper processing. Send the required renewal materials and payment to the address listed by the DMV. Mailing is slower and gives you less immediate visibility into the transaction, so confirm your address first.
A licensed DMV partner can make sense when you need a smog check and registration service together. The provider can tell you whether the vehicle qualifies for same-visit processing and whether a sticker can be issued on-site.
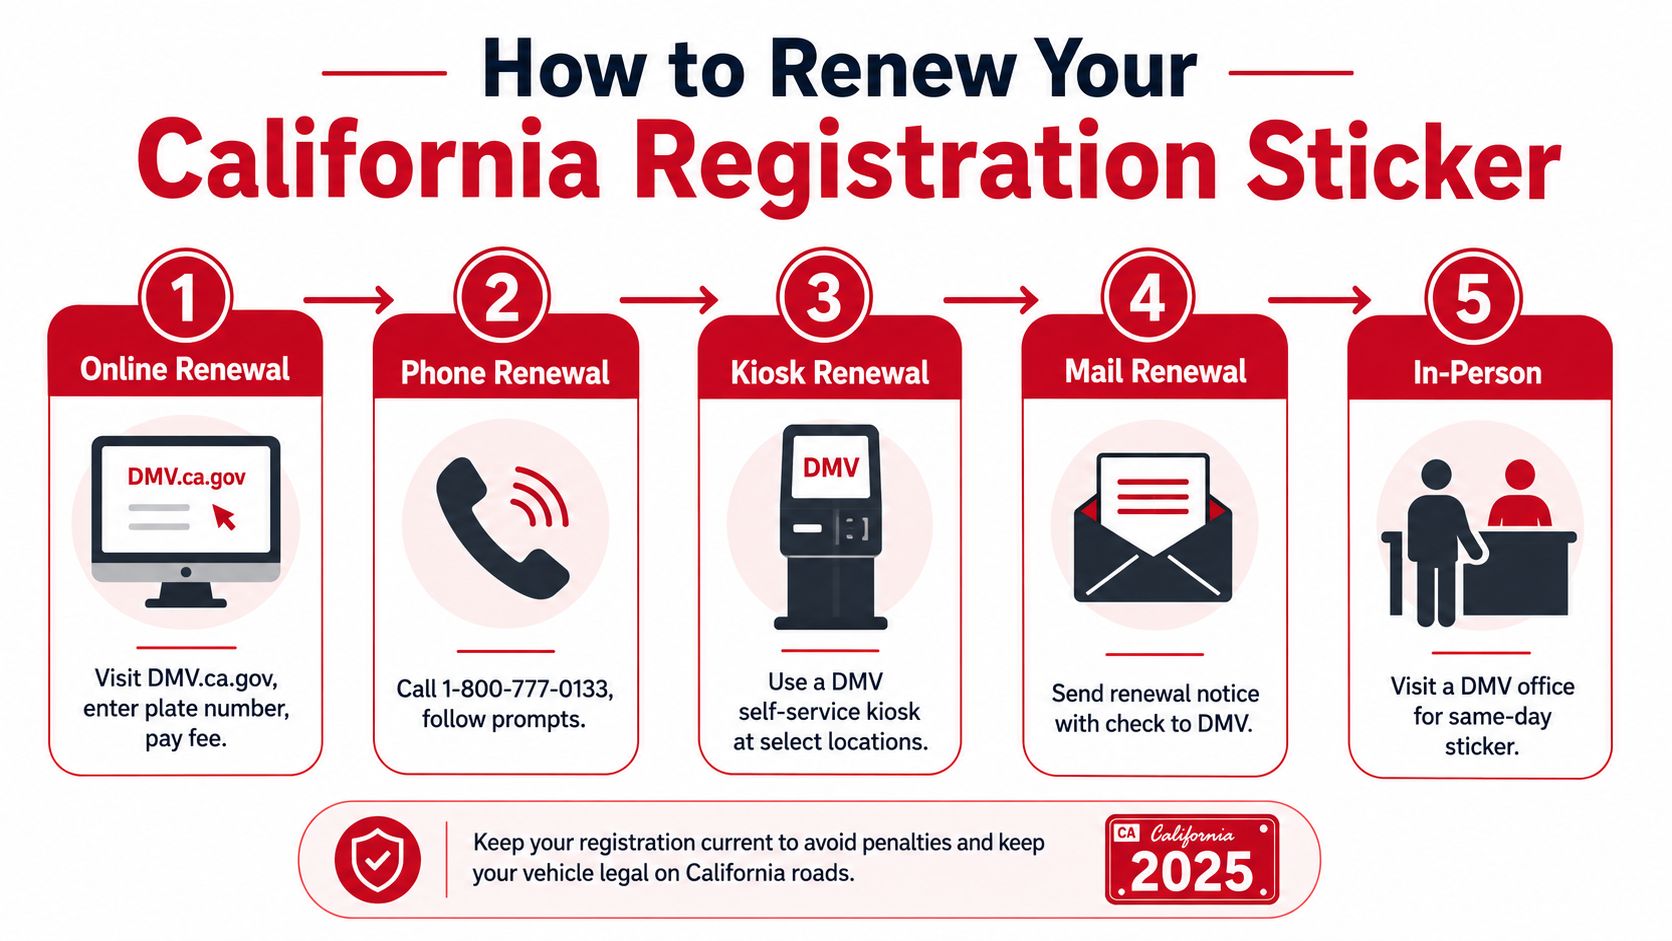
Don't confuse payment with completion
A payment alone doesn't prove that every renewal requirement has cleared. Smog certification, vehicle information, insurance records, or administrative holds can affect whether the DMV completes the renewal. Check the transaction status and follow the DMV's instructions if the record remains incomplete.
If fees have been paid but plates or stickers haven't been issued, the DMV may issue a temporary operating permit in situations where its requirements are met. That permit isn't a substitute for ignoring the missing sticker. Confirm what document applies to your vehicle and keep it with the registration paperwork while the DMV resolves issuance.
Renew early enough to account for mailing and unresolved requirements. If the sticker doesn't arrive, don't pay for a second renewal. Verify the original transaction first, then follow the replacement process that matches the problem.
Replacing a Lost, Stolen, or Undelivered Sticker
Start by identifying what happened. A sticker that vanished after installation requires a different request from one the DMV issued but never mailed. Damage, illegibility, and missing tabs also follow different rules. Check the year sticker and month sticker separately before submitting anything.
Year-tab replacements
For a lost, stolen, damaged, or unreadable year sticker, the DMV matches the replacement request to the vehicle record. You will need the plate number, registration information, and the last five digits of the VIN. The DMV's online replacement process explains the request and notes that a substitute-sticker fee applies in most cases.
Use the online process when the vehicle qualifies. A kiosk may be the faster choice when it offers replacement printing and you need a physical sticker promptly. Special or exempt vehicles may not qualify for the standard online route. In those cases, complete Form REG 156 and submit it by mail or at a DMV office.
Month-tab corrections
The month sticker follows a separate path. Eligible replacement month stickers may be issued without a fee, while replacing a year tab generally uses the substitute-sticker process. Selecting the wrong tab can send you through an unnecessary payment step or delay the request.
Check the tabs before applying. If the year remains visible but the month is missing or damaged, report the month-tab problem accurately and use the remedy assigned to that tab.
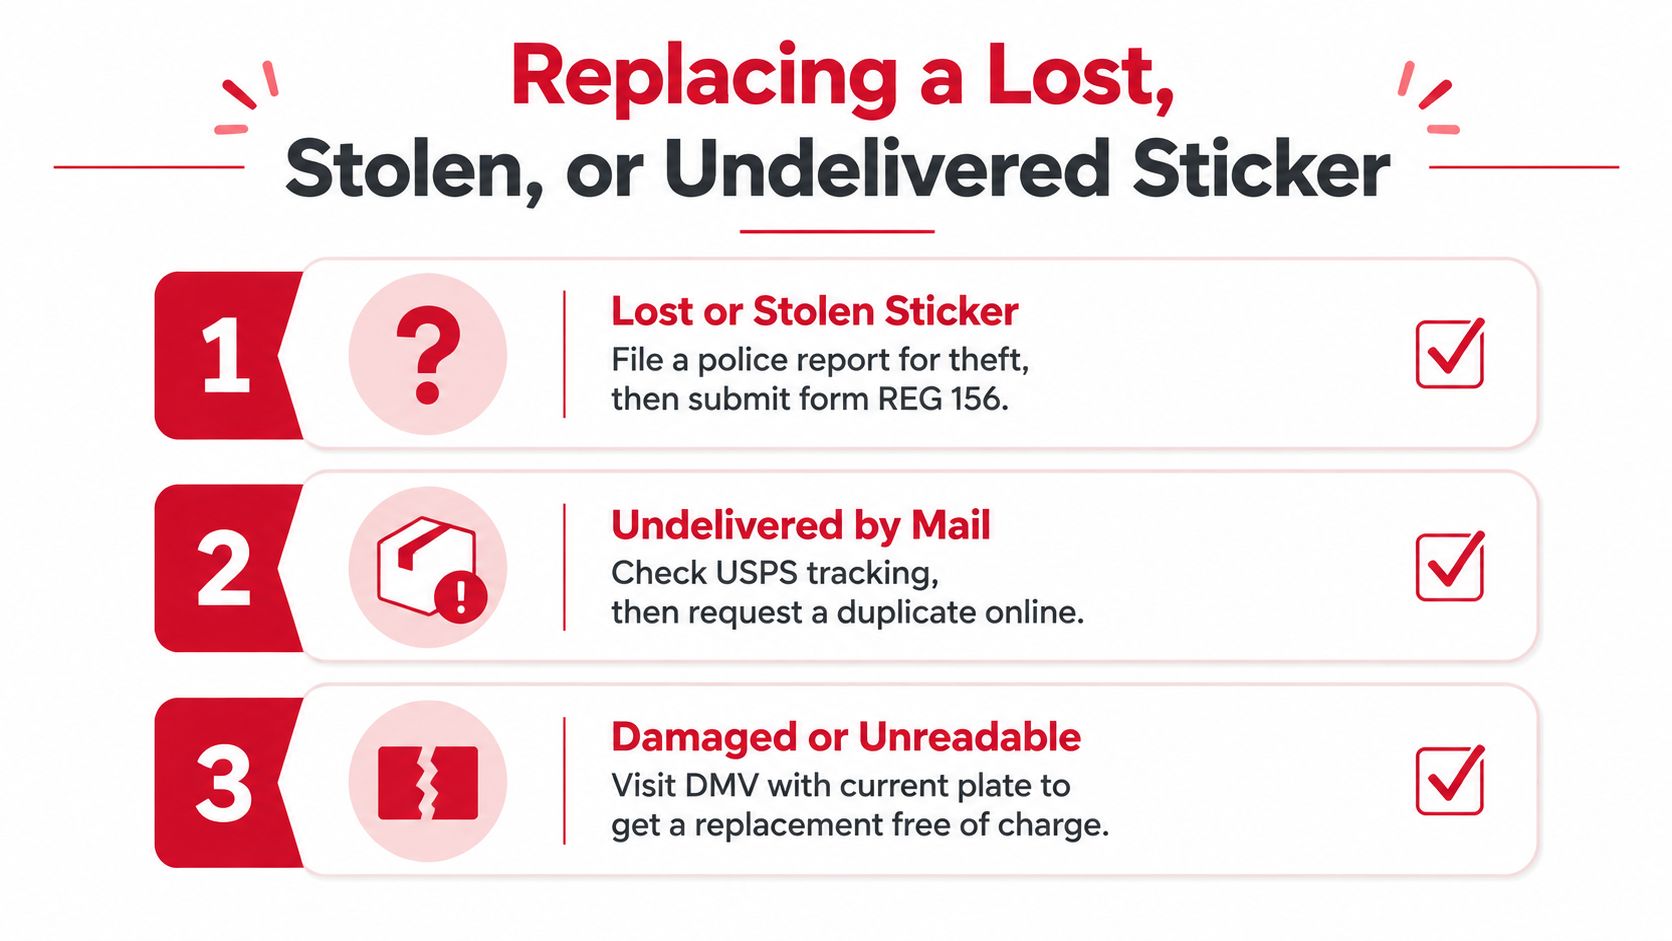
When the sticker never arrived
A sticker that never arrives requires a record check before a replacement request. Confirm that the renewal completed, then verify the mailing address on the vehicle record. The DMV mails stickers after renewal, but payment alone does not prove that issuance is complete.
Do not submit a second renewal or cancel the original payment because the envelope is late. Check the transaction status, confirm the address, and contact the DMV or use its replacement process if the record shows that the sticker was issued but not received.
Keep the renewal confirmation and related correspondence. Those records help establish nonreceipt rather than loss, theft, or damage, and they reduce the risk of paying twice for a completed transaction. If you need same-visit help, a licensed DMV partner such as Fire House Smog can handle eligible registration services without the standard DMV office wait.
Where to Get Your Sticker Without the DMV Wait
A DMV office is only one option, and it isn't always the most efficient one. Online renewal avoids the line but sends the sticker by mail. A kiosk can handle qualifying transactions quickly, while a licensed DMV business partner may combine emissions testing and registration work in one visit.
| Channel | Sticker in Hand | Typical Wait | Weekend Availability | Smog + Renewal Combo |
|---|---|---|---|---|
| DMV office | Depends on the transaction | Office queue and processing time | Limited | Not the usual format |
| DMV website | Usually mailed | Online processing plus delivery | Online access | No |
| DMV kiosk | Often available for qualifying replacements or transactions | Self-service transaction time | Depends on location | No |
| Licensed DMV partner | May be issued on-site | Appointment or walk-in workflow varies | Depends on provider | May be available |
For drivers who need only a routine renewal and aren't in a hurry, online processing is practical. For someone with a missing sticker, a kiosk can be preferable because eligible kiosks can print certain replacement documents without an office appointment. Check the specific kiosk's services before driving there.
A licensed provider can be more useful when the renewal depends on a smog inspection. Fire House Smog's DMV registration services include California registration renewals with on-site sticker printing during posted service hours. The location is 2900 Lone Tree Way in Antioch, and DMV service hours are Monday through Saturday from 9:30 AM to 5:00 PM and Sunday from 12:00 PM to 4:00 PM, based on the publisher's provided service information.
That combination can eliminate the back-and-forth between a smog station and a DMV office. Call ahead if the vehicle is a special category, a larger recreational vehicle, or has an unresolved registration hold. A licensed partner can process only what the vehicle record and applicable DMV rules allow.
Documents Checklist and Practical Tips
Prepare the information before you start. Most delays come from missing vehicle data, an unresolved smog requirement, or an address problem that nobody checked until after the sticker was mailed.
Renewal checklist
- Renewal notice: Bring it if you have it, but don't assume it's required for every renewal channel.
- License plate number: Use the plate number exactly as it appears on the vehicle.
- Vehicle identification information: The DMV replacement flow asks for the last five digits of the VIN.
- Smog information: Complete the required inspection before renewal when the vehicle record calls for it.
- Payment method: Use an accepted payment method for the selected channel and keep the confirmation.
- Address record: Verify that the DMV has the correct mailing address before submitting the renewal.
- Supporting documents: Bring any permit, ownership, exemption, or special-category paperwork that applies to the vehicle.
For a replacement, identify the failure clearly. Select a year-tab replacement when the year sticker was lost, stolen, damaged, or made illegible. Ask about a month-tab correction when only the month sticker is affected. Special-category and exempt vehicles may require REG 156 instead of the standard online flow.
Use the DMV's vehicle registration document checklist before visiting a service provider. It's better to discover a missing document at home than after you've already driven across town.
Keep a digital or printed copy of the renewal confirmation. It doesn't replace the plate sticker, but it gives you a record of the transaction while you resolve delivery or issuance. If the DMV record shows an unresolved requirement, address that item directly instead of submitting another payment.
Finally, check the plate after installation. Confirm that the sticker is on the rear plate, readable, firmly attached, and not blocked by a frame or cover. That quick inspection prevents a completed renewal from turning into a display problem.
Penalties, Deadlines, and Frequently Asked Questions
Registration problems become more expensive and harder to untangle when drivers ignore them. Late renewal can involve penalties, and an expired or missing tab can trigger a correction issue even when the underlying record needs a different fix. If you receive a citation, follow the court instructions and don't assume renewal alone closes the matter.
Use the DMV record as your starting point. A current record with a missing sticker calls for replacement. An expired record calls for renewal and resolution of whatever prevented completion, such as a missing requirement or administrative hold.
Can I drive while waiting for a mailed sticker?
Possibly, but don't rely on an envelope alone. If you submitted the proper registration application and the transaction is still being processed, keep your existing registration materials and any temporary operating permit issued by the DMV. Verify your status rather than assuming payment automatically completed the renewal.
What if my renewal notice never arrived?
A missing notice doesn't cancel the renewal obligation. Use the DMV's available renewal services, check the vehicle record, and confirm the mailing address. If the system shows a problem, resolve that problem before requesting a sticker.
Do out-of-state vehicles need California stickers?
The answer depends on the vehicle's registration status and where it is legally registered. A vehicle registered in another state follows that jurisdiction's plate and validation rules while it remains properly registered there. If you establish California registration, follow California's display requirements.
How does an ownership transfer affect the sticker?
An ownership transfer can change the registration record and may require new registration documents, plates, or stickers. Don't assume the previous owner's sticker remains appropriate after the DMV processes the transfer. Use the DMV transfer instructions or a licensed registration provider to identify the documents required for that vehicle.
For East Contra Costa County drivers who need help with renewal fees, review the California registration renewal fee service. Fire House Smog is located at 2900 Lone Tree Way, Antioch, California 94509, and can be reached at 925-754-1600.
Fire House Smog provides STAR-certified test-only smog checks and licensed California DMV registration services, including renewals with on-site sticker issuance during posted hours. Visit Fire House Smog to combine eligible smog and registration work in one stop, and call 925-754-1600 before visiting if your vehicle has a special category or unresolved DMV requirement.
The out of state title transfer California process typically must be completed within 30 days, and the vehicle must physically pass a California smog inspection before California plates can legally be issued. California treats the vehicle as a first-time California registration case, not as a simple continuation of its former registration.
You may be dealing with this immediately after moving, buying a vehicle across state lines, or bringing a car from another state into a new California household. The old plates and title may still look valid, but they don't complete California's requirements. The practical sequence is title conversion, California registration paperwork, vehicle identification verification, and emissions compliance.
A smooth application depends less on luck than on preparation. Owners who collect the right documents, arrange the smog inspection early, and use an authorized registration provider can avoid the most common return trips and processing delays.
Table of Contents
- Understanding the California Out of State Title Transfer Process
- Required Documents for Your Title Transfer Application
- Navigating California Smog and VIN Requirements
- Estimating Fees and Timeline for Registration Completion
- Using Local Authorized Services for a Faster Transfer
- Common Pitfalls to Avoid During the Transfer
- Finalizing Your California Vehicle Registration
Understanding the California Out of State Title Transfer Process
A new resident often discovers the problem at the least convenient moment. The car is packed, the move is complete, and the out-of-state title is safely stored in a folder. Then the owner learns that California doesn't just stamp the old document and issue plates. The vehicle enters California's first-time registration pathway, which requires ownership documents, a completed application, and verification of the vehicle's identity.
The California DMV identifies an out-of-state vehicle as a first-time California registration case. Its title-transfer guidance requires the Application for Title or Registration, REG 343, together with the last-issued out-of-state title or registration, while vehicle and owner information are verified during processing. The California DMV title transfer guidance is the controlling reference for the agency's requirements.
Why the deadline matters
The transfer is tied to both ownership and registration compliance. A widely used California registration guide notes that buyers generally must submit ownership documents and pay the $15 vehicle title transfer fee within 30 days. That fee and deadline should be confirmed against the DMV's current instructions before submission, especially where the transaction includes other registration or title actions.
The timing problem becomes more serious when an owner waits until the deadline is close and then discovers that the car hasn't passed smog or that the title contains a signing error. A failed inspection, missing document, or mismatched name can leave the application incomplete while the vehicle remains outside California's registration system.
Practical rule: Start with the smog and document review, not the DMV appointment. A scheduled visit can't fix a title that hasn't been correctly signed or a vehicle that hasn't met California emissions requirements.
The process resembles an ownership conversion rather than a routine renewal. Owners who want a practical overview of the ownership paperwork can also review this guide to DMV transfer of ownership requirements. The safest approach is to treat the move-in date or qualifying purchase date as the start of a compliance clock and assemble the complete file immediately.
Required Documents for Your Title Transfer Application
Paperwork determines whether the application moves forward or comes back for correction. Begin with the original out-of-state title, if available. It should show the proper seller release and buyer information, with signatures and dates completed in the manner required by the issuing state.
A dealer invoice isn't automatically a substitute for an ownership title. An invoice can document a sale, but it doesn't necessarily establish the same title information as the state-issued ownership document. If the title hasn't yet been issued, the DMV may need additional proof, such as an out-of-state registration and bill of sale, but owners should confirm the acceptable combination before appearing in person.
Assemble the core file
Use a physical folder or a carefully organized digital checklist, then verify every name and signature against the application.
- Out-of-state ownership document: Bring the last-issued title or registration required for the transaction. If a lienholder still controls the title, resolve the lien documentation before expecting a clean California title.
- REG 343 application: Complete the Application for Title or Registration with the owner information exactly as it appears on the supporting documents.
- Identity documentation: Carry a valid driver's license or identification card so the DMV or authorized verifier can connect the applicant to the ownership record.
- California insurance proof: Use documentation showing current California coverage. An out-of-state insurance card may not establish the coverage required for California registration.
- Sale and supporting records: Keep the bill of sale, dealer paperwork, and any other ownership records together. They can clarify the purchase circumstances when the title alone doesn't tell the complete story.
- Vehicle verification paperwork: Plan for a physical VIN verification as part of the out-of-state registration pathway.
The DMV's vehicle registration documents checklist can help you organize the file before scheduling service. The reason for this discipline is simple. A single incorrect signature, incomplete field, or inconsistent owner name can force you to restart part of the process.
Don't alter the title with correction fluid, erasures, or improvised cross-outs. If the document is damaged or the transfer section is unclear, contact the issuing state's motor vehicle agency or California DMV before making another entry. A clean, consistent document package gives the verifier and registration processor fewer reasons to stop the application.
Navigating California Smog and VIN Requirements
The emissions requirement is the trap that catches many otherwise prepared owners. California doesn't apply the usual 4-year or 6-year smog exemption to an out-of-state vehicle brought into California for its initial registration. Instead, gasoline and diesel out-of-state vehicles generally need a California smog check for the initial registration, followed by testing every two years afterward, as described in California out-of-state smog guidance.
That means an apparently current inspection from the previous state may not solve the California requirement. The vehicle must meet California's emissions process, and the inspection certificate becomes part of the registration file. Owners should arrange this before the final DMV submission because an incomplete emissions record can hold up the title and plate transaction.
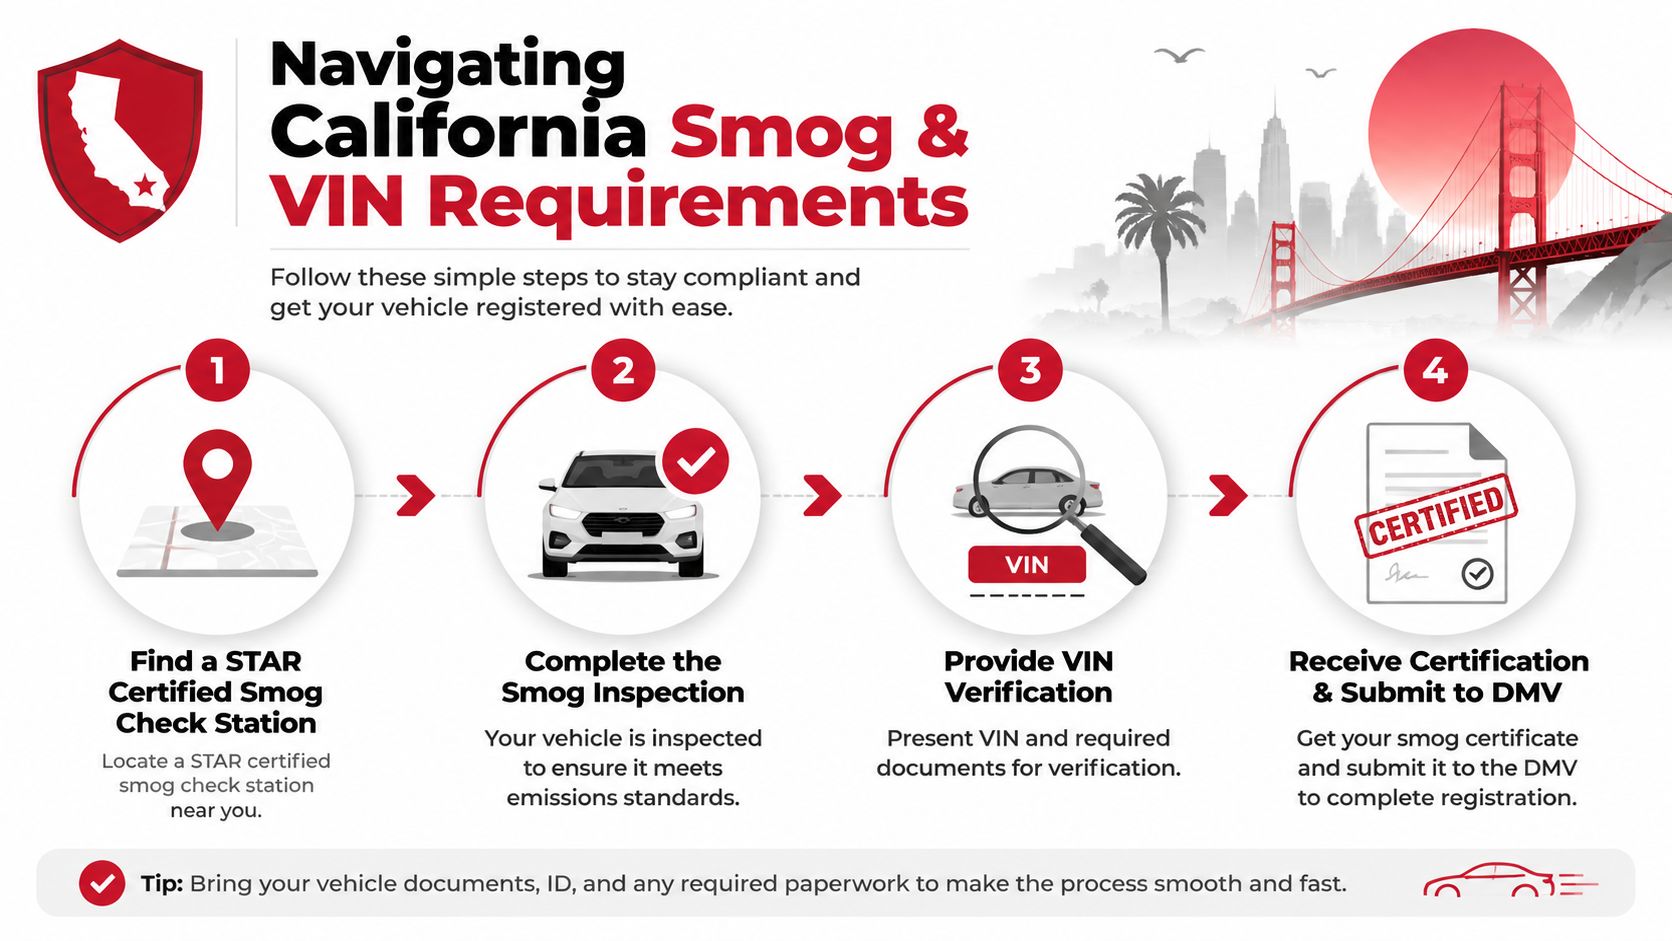
Treat smog and VIN verification as separate checks
The smog inspection answers an emissions question. VIN verification answers an identity question. The verifier physically examines the vehicle identification number and compares it with the title and application, helping California confirm that the vehicle presented is the vehicle described in the ownership records.
A vehicle can pass one requirement and still fail to complete the other. Passing smog doesn't replace VIN verification, and a successful VIN check doesn't waive the emissions certificate.
- Locate an appropriate station. Choose a California-licensed facility that can perform the required inspection for the vehicle. A STAR-certified smog station is a practical option when the transaction requires a recognized California emissions test.
- Bring the actual vehicle. Documentation alone isn't enough for a physical inspection or VIN review. The vehicle must be available for the technician or verifier to examine.
- Review the result before submission. If the vehicle fails, identify the cause and determine the retest path before presenting the DMV file. A failed result can stop registration completion.
- Keep the certification with the application records. The DMV needs the emissions result associated with the California registration transaction.
The cleanest workflow is to arrange the inspection and VIN review close together, then submit the title, REG 343, identity documents, insurance proof, and certification as one complete package. This reduces the chance that an owner will make a DMV trip before the vehicle has met both technical gates.
Estimating Fees and Timeline for Registration Completion
The $15 title transfer fee covers only one part of the transaction. Registration charges, vehicle-related assessments, county items, and transaction-specific amounts can change the final total. Since no single registration price applies to every out-of-state vehicle, confirm the amount for your vehicle with the DMV or an authorized provider before budgeting.
Budgeting only for the title fee can leave the registration payment short. Keep the compliance deadline separate from the processing timeline as well. Filing within the required period protects compliance, while the California title, plates, or other documents may arrive after the application has been accepted.
Typical Costs and Timelines
| Service Type | Estimated Cost | Typical Timeframe |
|---|---|---|
| Title transfer | $15 | Submit within the required 30-day period |
| Smog inspection | Varies by station and vehicle | Before final registration submission |
| VIN verification | Varies by provider or transaction | During the out-of-state registration process |
| California registration | Transaction-specific | After required documents and verification are accepted |
| Additional title or registration action | Some guidance identifies $27 for certain actions | Depends on the transaction |
Treat the $15 transfer fee and the possible $27 fee for certain registration or title actions as separate possibilities. Do not combine them automatically. Confirm which charge applies to your transaction through the DMV's title transfer instructions or with the authorized provider handling the file.
Plan for compliance first
A complete file and a passing inspection give an authorized service provider the information needed to process eligible registration work. Some providers may issue registration items on-site during posted service hours, which can reduce the delay associated with a field-office visit. That convenience does not remove California's requirements. A provider cannot replace a required inspection or correct defective ownership paperwork without supporting evidence.
The most useful budget is a transaction checklist: title, REG 343, VIN verification, smog certification, insurance proof, the transfer fee, and any vehicle-specific registration charges quoted before submission. Ask for the estimated total and expected processing steps together, especially if the vehicle still needs emissions testing. This helps separate costs you can confirm in advance from charges that depend on the completed application.
Using Local Authorized Services for a Faster Transfer
Waiting at a field office isn't the only way to handle an out-of-state vehicle. An authorized DMV registration service can review the paperwork, coordinate the emissions step, and process eligible registration work without sending every customer through the standard field-office queue.
That advantage matters most when the owner has limited time or is unfamiliar with California's separate title, VIN, and smog requirements. The provider still works within DMV rules, so the service doesn't eliminate the need for a valid title, a passing inspection, or accurate owner information. It can, however, reduce avoidable movement between separate locations.
What to verify before choosing a provider
Ask practical questions before arriving:
- Authorization: Confirm that the business is a licensed DMV partner and handles out-of-state ownership transfers.
- Inspection scope: Verify that the station can test your vehicle type and complete the California emissions requirement.
- VIN capability: Ask whether VIN verification is handled on-site or requires a separate appointment.
- Document review: Find out whether staff will check the title, REG 343, insurance proof, and supporting records before submission.
- Issuance options: Confirm whether stickers or plates can be issued on-site for the transaction.
- Hours and vehicle limits: Check posted hours, weekend availability, and whether the vehicle's size or equipment affects service.
For owners in Antioch and East Contra Costa County, Fire House Smog is one local option. The business operates as a STAR-certified test-only smog station and licensed DMV registration services provider at 2900 Lone Tree Way in Antioch, with transfer-of-ownership services for California and out-of-state vehicles. Its posted operating information includes smog testing seven days a week, DMV service Monday through Saturday, and limited Sunday DMV service.
A test-only model also creates a clear boundary. The station performs the emissions inspection but doesn't sell repair services, so a failed vehicle may need to go elsewhere for repairs before retesting. That's an important trade-off to understand before choosing any test-only facility.
The service model is most useful when your paperwork is already close to complete and you want one coordinated visit. It won't rescue an unsigned title, replace California insurance proof, or guarantee a passing result.
Call ahead if you have a diesel vehicle, motorhome, recreational vehicle, unusual equipment, or a title with a lien. Confirming eligibility first is faster than arriving with a vehicle the station can't accommodate.
Common Pitfalls to Avoid During the Transfer
Most delays come from preventable mismatches, not from an unusually complicated DMV rule. Owners often focus on collecting documents but fail to compare the names, signatures, dates, and vehicle information across every page.
Errors that stop the file
- Submitting before smog compliance: An out-of-state vehicle generally needs the California inspection for initial registration. Arrange the test before relying on the DMV visit to finish the transaction.
- Using the wrong ownership record: A dealer invoice may show a purchase but may not replace the original out-of-state title. Bring the state-issued ownership document or confirm the acceptable alternative first.
- Signing the title inconsistently: Match the owner's legal name across the title, REG 343, identification, and insurance records. Don't guess where a seller or buyer should sign.
- Ignoring VIN verification: The DMV needs the vehicle identity checked as part of the out-of-state pathway. Have the physical vehicle available and make sure the VIN is readable.
- Relying on old insurance: Provide proof of California coverage rather than assuming an out-of-state policy will satisfy the registration file.
- Waiting until the deadline: The 30-day submission window is a compliance deadline, not a suggested target, according to the California title-transfer guidance linked earlier.
A final pre-submission check
Before handing over the packet, compare the VIN character by character, inspect the title for alterations, confirm all required signatures, and check that the smog result is associated with the correct vehicle. Keep copies or clear scans of everything you submit.
A complete application is not merely faster. It gives you a record of what was submitted if a processor later requests clarification.
If a title contains an error, don't cover it with correction fluid or add unexplained changes. Stop and ask the issuing authority or an authorized California registration provider how to correct the document. Improvisation on a title can create a bigger ownership problem than the original mistake.
Finalizing Your California Vehicle Registration
The owner who handles this process efficiently usually follows a straightforward order. First, secure the out-of-state title or acceptable ownership records and complete REG 343. Next, arrange California insurance, smog testing, and VIN verification. Finally, submit the complete packet and pay the transaction-specific charges before the 30-day deadline.
That sequence prevents the most common false start, arriving at a DMV counter with a valid-looking title but no California emissions certificate. It also makes it easier to identify the exact missing item if a verifier or processor asks for clarification.
For many new residents, the task feels intimidating because several agencies and requirements meet in one transaction. Once the ownership document, emissions result, vehicle identity, and registration application agree, the process becomes a manageable compliance errand rather than an open-ended DMV problem.
Don't wait until the last week. Review the title now, confirm the smog and VIN requirements for your vehicle, and choose either the DMV or an authorized local provider based on the complexity of your paperwork and the time you have available.
Fire House Smog handles California and out-of-state vehicle transfer-of-ownership services alongside STAR-certified smog inspections at 2900 Lone Tree Way in Antioch. Bring your vehicle and ownership paperwork for a coordinated review, and visit Fire House Smog to confirm current services and hours before you arrive.
You're in Antioch, the check engine light has just come on, and the car feels a little lazy pulling away from a stop. Maybe there's a sulfur smell after a drive, or a rattle underneath that wasn't there last week. The search for “when to replace catalytic converter” quickly turns into a list of expensive possibilities.
Don't approve a converter replacement based on mileage, a smell, or one trouble code. A catalytic converter should be replaced when testing confirms that it has lost efficiency, is physically damaged, or has become restricted. If a misfire, rich fuel mixture, oil consumption, coolant leak, or exhaust leak caused the failure, fix that problem first or the replacement may fail again.
Table of Contents
- Your Check Engine Light Just Came On Now What
- How Catalytic Converters Work and Why They Fail
- Symptoms and Diagnostic Steps That Confirm Failure
- Replacement Costs and Choosing the Right Option
- California Smog Tests and What a Failed Converter Means
- The Mileage Myth and the Theft Factor
- Prevention Tips and Local Next Steps for Antioch Drivers
Your Check Engine Light Just Came On Now What
A driver in Antioch might see P0420 on a scan tool and assume the catalytic converter is finished. That assumption is understandable, but it's not a diagnosis. P0420 means the powertrain control module believes catalyst efficiency is below its expected threshold. The code tells you where to investigate, not automatically which part to buy.
Start by recording the exact code and noting how the vehicle behaves. A steady check engine light with normal drivability calls for prompt testing, but a flashing light, severe shaking, strong fuel smell, or major power loss deserves immediate attention because an active misfire can send unburned fuel into the exhaust.
Practical rule: A code is a starting point. Live data and a complete engine check decide whether the converter is actually bad.
A proper inspection looks for the causes that can imitate converter failure. An exhaust leak near an oxygen sensor can introduce outside air and distort the reading. A biased sensor, fuel-control problem, or ignition fault can also make the computer interpret the exhaust incorrectly. The diagnostic guidance for P0420 catalyst efficiency testing emphasizes confirming the sensor pattern before replacing the converter.
If you're preparing for a California emissions inspection, don't erase the code and hope for a pass. Clearing codes resets emissions monitors, and the vehicle may need to complete its drive cycle before a station can evaluate it normally. Have the fault diagnosed, repair the underlying issue, and then confirm readiness and emissions performance.
For a useful overview of what a warning light can mean before a smog appointment, see this guide to check engine light and smog testing. The right question isn't “How many miles are on the converter?” It's “What test proves the converter can't do its job?”
How Catalytic Converters Work and Why They Fail
A catalytic converter is a high-temperature chemical filter in the exhaust system. It doesn't trap pollutants like an air filter. Instead, its coated internal substrate uses catalyst materials to promote chemical reactions that convert harmful exhaust compounds into less harmful gases before they leave the tailpipe.
Think of it as the car's liver. The liver processes unwanted substances, while the converter processes exhaust produced by combustion. This comparison isn't perfect, but it explains why the converter depends so heavily on the engine feeding it the right mixture. A healthy converter can clean up normal exhaust. It can't survive a continuous stream of raw fuel, oil, or coolant.
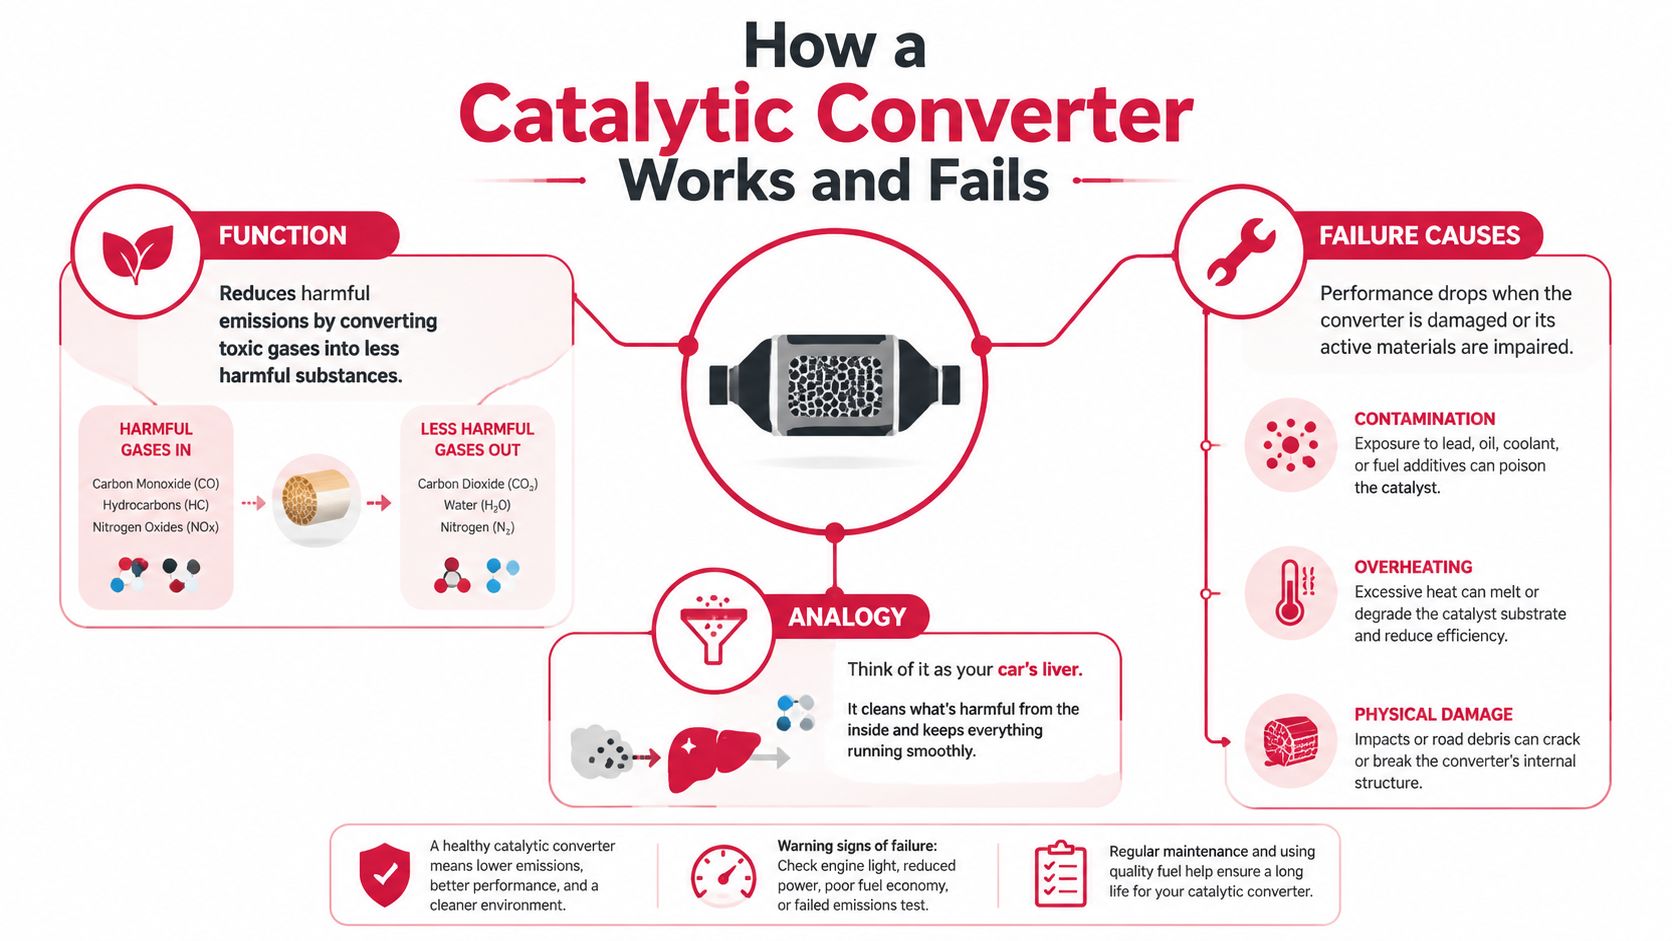
The three failure paths
Overheating usually starts upstream. A dead ignition coil, worn spark plug, injector problem, or other misfire can leave unburned fuel in the exhaust. The converter burns that fuel internally, creating excessive heat that can melt or damage the ceramic substrate.
Contamination happens when oil or coolant enters the combustion process. An engine that burns oil, leaks coolant internally, or runs with an incorrect fuel mixture can coat the catalyst and reduce its ability to store oxygen and process emissions. Replacing the converter without correcting the consumption or leak merely exposes the new part to the same damage.
Physical damage is easier to recognize but still needs confirmation. A hard impact from road debris, a damaged heat shield, or a broken internal substrate can produce a metallic rattle. The outer shell may look acceptable while the material inside has cracked, shifted, or begun restricting exhaust flow.
Engine condition determines converter life more than the odometer does. EPA materials state that original equipment converters on model year 1998 and newer vehicles generally have a useful life of 120,000 miles, while some California-certified PZEV vehicles reach 150,000 miles. The same EPA catalytic converter durability material distinguishes original equipment durability from aftermarket requirements.
That difference matters. A converter isn't a routine mileage service item like engine oil or a timing belt. If the engine is healthy and the converter passes efficiency testing, leave it alone.
For the broader relationship between exhaust components and vehicle emissions standards, remember the central repair order: diagnose the engine, correct the cause, then judge the converter.
Symptoms and Diagnostic Steps That Confirm Failure
Drivers usually notice a converter problem through a combination of symptoms rather than one unmistakable sign. The common clues include a check engine light, P0420 or P0430, a rattling sound under the vehicle, a sulfur or rotten-egg odor, failed emissions testing, and sluggish acceleration.
Those symptoms point toward the exhaust system, but none proves converter failure by itself. A sulfur smell can follow an overly rich mixture. Poor acceleration can come from ignition, fuel, transmission, or intake problems. A rattle may be a loose heat shield rather than a broken catalyst.
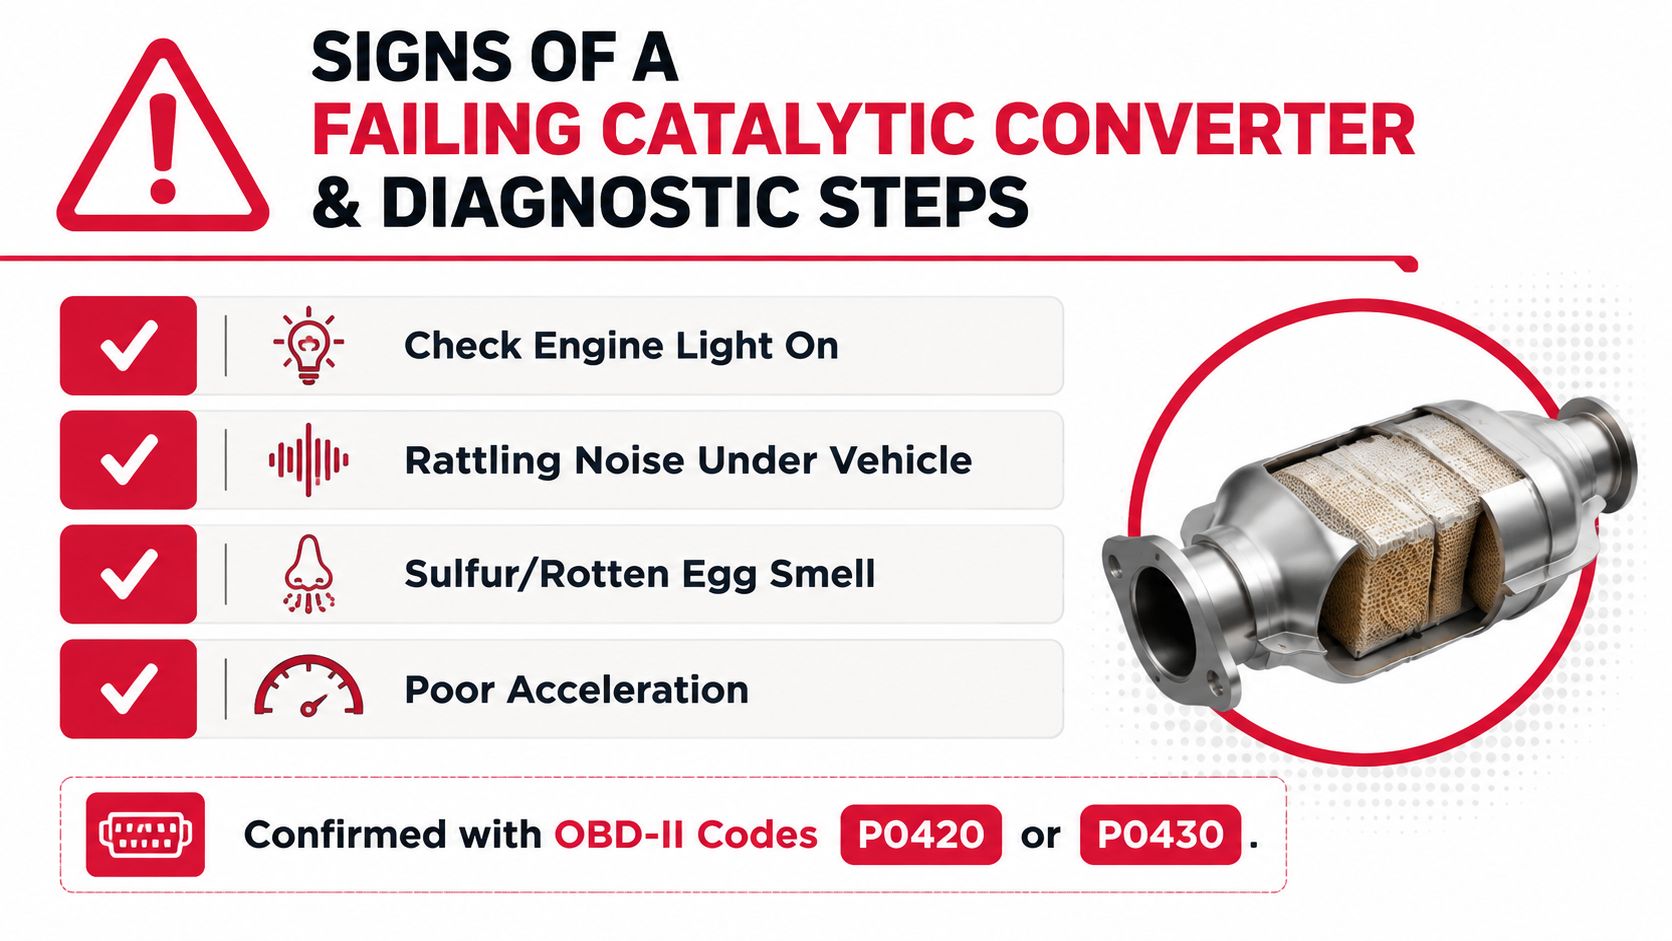
What a responsible diagnostic includes
A technician should begin with a complete scan, not just the one code that appeared on a basic reader. The inspection should consider:
- Stored and pending codes: P0420 generally identifies catalyst efficiency on one bank, while P0430 refers to the other bank on vehicles that use a dual-bank layout.
- Misfire information: Active or recent misfires can damage a converter and must be corrected before condemning the part.
- Fuel-trim data: Abnormal fuel correction can indicate a vacuum leak, injector issue, air-measurement fault, or other mixture problem.
- Exhaust leaks: Leaks ahead of or near the oxygen sensors can pull in outside air and produce misleading readings.
- Sensor operation: The upstream sensor should respond to changing mixture conditions. The downstream sensor should show a comparatively damped pattern when the converter stores and releases oxygen effectively.
The decisive pattern is the relationship between the sensors. If the downstream oxygen-sensor waveform closely mirrors the upstream waveform, the converter isn't damping the exhaust-gas changes as it should. That evidence is stronger than P0420 alone because it demonstrates reduced oxygen-storage performance under the test conditions described in the P0420 diagnostic explanation.
A technician may also check for restriction when the vehicle has major power loss. A converter can lose efficiency without being plugged, and it can also become physically restricted after substrate damage. Those are separate faults with different testing requirements.
Ask the shop three direct questions: What code is present? What upstream cause was ruled out? What live-data pattern confirms converter inefficiency? If the answer is only “the scanner said catalytic converter,” keep asking.
The replacement decision is justified when the evidence shows the converter itself can't meet the required efficiency, or when inspection confirms physical collapse or restriction. If the engine still misfires, runs rich, burns oil, or leaks coolant, repair that first.
Replacement Costs and Choosing the Right Option
Once failure is confirmed, the cheapest part isn't automatically the cheapest repair. A low-priced converter installed on an engine with an unresolved misfire is money wasted. California drivers also face compliance requirements that can rule out an otherwise attractive aftermarket part.
OEM converters usually offer the closest match to the vehicle's original emissions calibration and fit. They can also be expensive and may have longer parts lead times. Aftermarket direct-fit converters are shaped for a particular application and typically reduce installation complexity. Universal converters may cost less initially, but installation requires cutting and welding, and the part still must be legal for the vehicle and location.
For California vehicles, verify the converter carries the required California Air Resources Board approval for that specific application. An EPA-compliant part may not satisfy California requirements. Confirm the part number, emissions certification, vehicle application, and warranty before installation.
Compare the choices before authorizing work
| Option | Typical Cost Range | Warranty | California Legal |
|---|---|---|---|
| OEM direct-fit converter | Obtain a vehicle-specific estimate | Check the manufacturer and seller terms | Generally, when correct for the vehicle |
| CARB-compliant aftermarket direct-fit converter | Obtain a vehicle-specific estimate | Varies by manufacturer and application | Yes, when approved for the exact application |
| CARB-compliant universal converter | Obtain a vehicle-specific estimate, including fabrication | Varies by manufacturer and installation | Yes, when approved and installed for the exact application |
| Unapproved aftermarket converter | Avoid | Warranty doesn't solve compliance problems | No, if it lacks required California approval |
The EPA material on aftermarket catalytic converter durability and warranty requirements describes historical aftermarket performance durability of 25,000 miles, with shell and end-pipe warranty coverage of 5 years or 50,000 miles. Treat warranty language as a condition to read carefully, not as proof that every replacement will last.
Fix the cause before fitting the part
A good repair sequence is straightforward:
- Diagnose and repair misfires, fuel-control faults, oil burning, coolant contamination, or exhaust leaks.
- Confirm the engine operates correctly after the repair.
- Test converter efficiency with scan data and, where appropriate, restriction testing.
- Install the correctly certified converter.
- Verify that the monitors run and the emissions fault doesn't return.
Don't let a shop skip step one. The converter is often the victim, not the original criminal.
California Smog Tests and What a Failed Converter Means
California drivers often discover converter trouble at the smog station. The inspection can expose an emissions problem even when the car feels normal, and a vehicle with an active check engine light generally has a serious readiness or emissions issue to resolve before certification.
A STAR-certified station follows California testing procedures and evaluates the vehicle's emissions-related systems. Depending on the vehicle and test configuration, the process can involve an OBD-II inspection and tailpipe emissions measurement. The station's job is to report the result, not to guess which repair will produce a passing certificate.
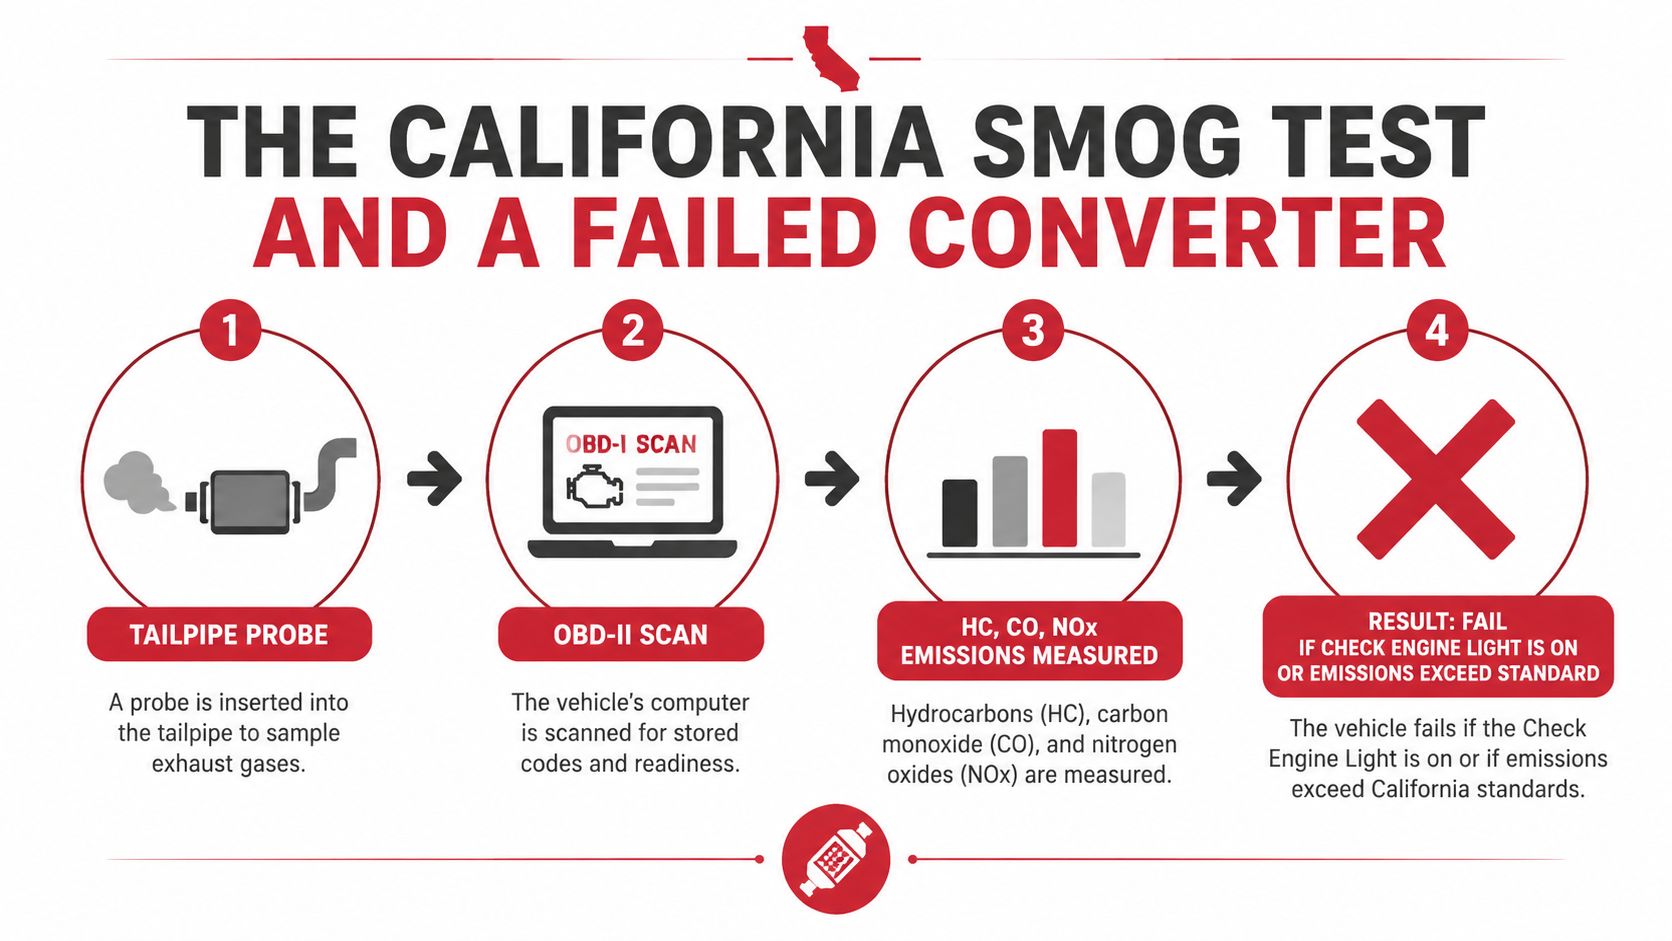
What to do after a failed result
Read the failure information carefully before buying parts. The result may identify an illuminated malfunction indicator, incomplete monitors, excessive emissions, or another emissions-system problem. A failed test doesn't automatically establish that the converter needs replacement.
Use this sequence:
- Keep the test paperwork: Give the diagnostic technician the exact failure information rather than a general description.
- Avoid clearing codes casually: Clearing the PCM can erase useful evidence and leave monitors incomplete.
- Repair the verified cause: Correct engine faults before replacing emissions hardware.
- Complete the drive cycle: The vehicle needs to demonstrate that its monitors have run successfully.
- Retest at a qualified station: Bring the repair documentation and ask about retest terms before scheduling.
A failed smog check can interfere with California registration renewal until the emissions issue is resolved. Registration deadlines still matter, so contact the DMV or use an authorized registration provider if you need clarification about your specific renewal status. Don't assume that driving with a failed test creates an unlimited repair window.
For Antioch and East Contra Costa County drivers, a guide to common smog-check failure reasons can help you interpret the result before visiting a repair shop. A test-only business such as Fire House Smog doesn't sell in-house repairs, which separates the inspection from the repair decision.
The local appointment matters
Choose a STAR-certified location when your renewal notice or vehicle requirement calls for it. Ask whether the station offers a retest policy, what documentation you'll need, and whether your vehicle type can be accommodated. Some larger vehicles and recreational vehicles require advance confirmation because equipment limits vary.
The practical goal is simple. Get an impartial test result, diagnose the failure elsewhere if necessary, complete the repair correctly, and return for a compliant retest.
The Mileage Myth and the Theft Factor
There's no fixed replacement interval for most catalytic converters. EPA guidance gives useful-life expectations for original equipment, but that doesn't turn the odometer into a replacement schedule. An engine that has been maintained and isn't misfiring, burning oil, or contaminating the exhaust can still have a serviceable converter at 150,000 miles, as noted in guidance on when catalytic converter replacement is appropriate.
That's why mileage alone is a poor reason to replace the part. Use symptoms, diagnostic codes, emissions-test results, live-data confirmation, and physical inspection. A high-mileage converter that passes those checks stays on the vehicle.
Theft creates a different decision entirely. The owner isn't replacing a worn component. The owner is restoring a missing exhaust system, often under insurance and repair-shop constraints, while deciding how much theft protection to add.
Local crime changes the practical answer
Catalytic converter theft remains uneven across regions. One independent dataset reported U.S. thefts remained above 137,000 in 2025, while a separate report recorded St. Paul thefts rising from 172 in 2024 to 504 in 2025, a 193% increase. Those figures come from the catalytic converter theft cycle analysis, which also describes areas moving in the opposite direction.
Colorado analysis reported that theft incidents peaked in 2021 and then trended downward, while a UK report found average thefts in 2024 were down 98% versus 2021. The contrast is the point. Local parking conditions, vehicle height, neighborhood patterns, insurance requirements, and changing enforcement can matter more than a national headline.
If theft caused the damage, photograph the vehicle, contact your insurer, and confirm whether the replacement must meet California certification requirements. Ask the installer about a shield, security fasteners, identification marking, and parking strategies that fit your vehicle. Don't confuse a theft replacement with a failed-efficiency replacement. The first restores missing equipment. The second follows diagnostic proof.
Prevention Tips and Local Next Steps for Antioch Drivers
Converter prevention starts under the hood. Keep the engine properly tuned, respond to a misfire quickly, and investigate oil or coolant loss instead of treating the converter as a disposable fix. A healthy combustion system protects the substrate far better than any mileage-based replacement plan.
Short trips can leave the exhaust system below its intended operating temperature for longer periods, especially when the vehicle is used almost exclusively for brief errands. Combine necessary trips when practical, but don't use longer drives to hide a check engine light or active misfire. A warning light needs diagnosis, not exercise.
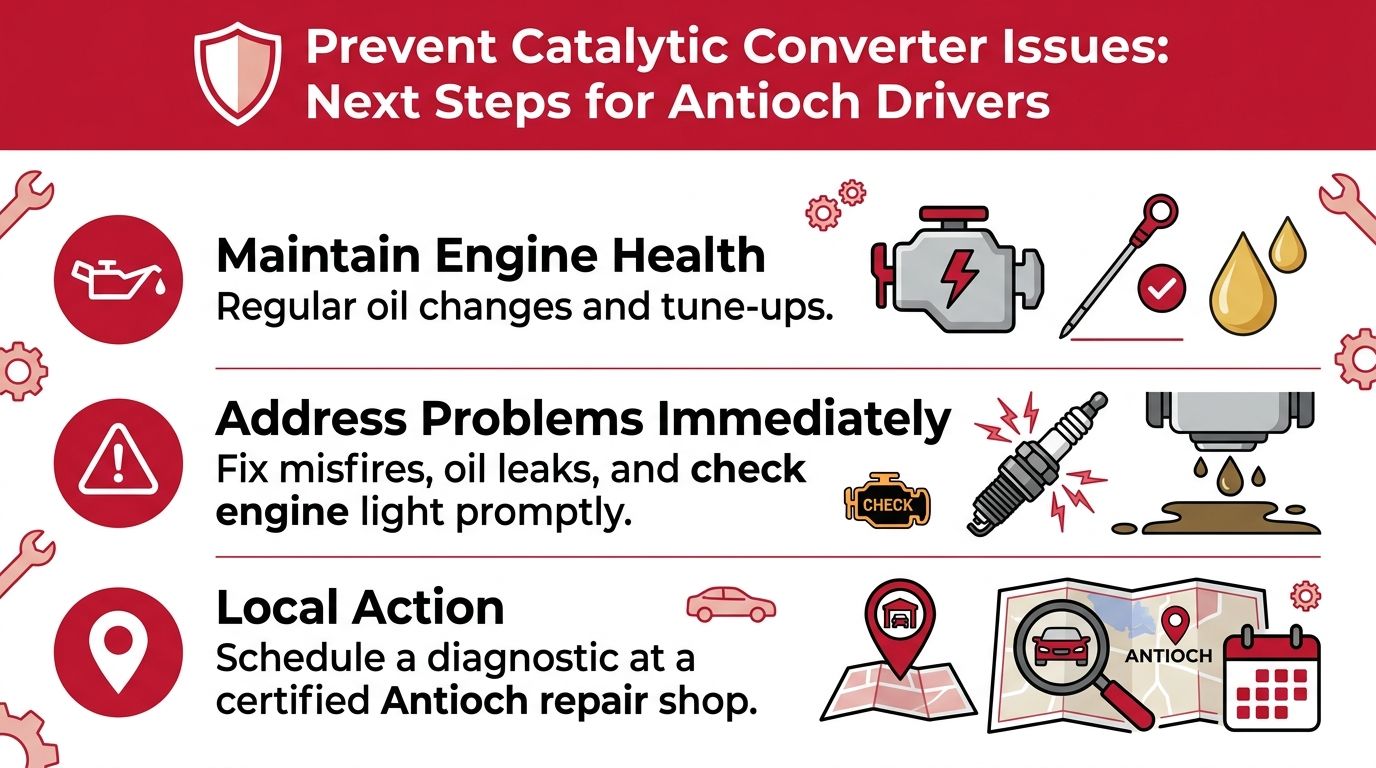
A sensible Antioch action plan
- Light on, car running normally: Get the codes read and request live-data testing before authorizing a converter.
- Light flashing or vehicle shaking: Stop treating it as a routine smog issue. Have the misfire diagnosed promptly.
- Failed smog test: Keep the paperwork, repair the verified cause, confirm monitor readiness, and arrange the retest.
- Rattle or major power loss: Ask for an inspection for substrate damage and exhaust restriction.
- Suspected theft: Photograph the damage, contact insurance, and ask for a California-compliant replacement plus theft deterrence.
- Registration due: Use a STAR-certified test-only station when required, and ask about retest eligibility before returning.
For local testing and registration logistics, Fire House Smog operates as a STAR-certified test-only smog station and licensed DMV registration services provider at 2900 Lone Tree Way in Antioch. It offers emissions inspections, selected DMV services, and a free retest according to its policy and coupon terms. Call 925-754-1600 to confirm vehicle or RV requirements before arriving.
The right answer to “when to replace catalytic converter” is rarely a mileage number. It's a documented decision: correct the upstream fault, confirm converter failure, install the right California-compliant part, and verify the result.
If your Antioch vehicle has a check engine light, failed smog result, suspected converter restriction, or theft damage, visit Fire House Smog for a STAR-certified test-only inspection and clear emissions information before you authorize repairs. Bring your failure paperwork or scan results, and use the test outcome to guide the next repair instead of replacing parts by guesswork.
California requires you to complete vehicle ownership-transfer paperwork within 10 days of the sale, and license plates can't be transferred separately from the vehicle's title and registration record. The plate number, VIN, registered owner, and vehicle record must move together through the California DMV process.
You may be standing beside a newly purchased car with the signed title in your hand, wondering whether you can remove your old plates and bolt them onto the replacement vehicle. That assumption causes many avoidable delays. California treats a plate transfer as an ownership and registration transaction, not a physical handoff of metal plates.
The straightforward path is manageable when you identify the plate type, confirm the smog requirement, prepare the correct forms, and submit everything on time. Special-interest, personalized, historical, exempt, missing, damaged, and out-of-state situations follow different rules, so the details matter.
Table of Contents
- Understanding California License Plate Transfers
- Documents and Forms You'll Need
- The Step-by-Step Transfer Process
- Smart Tips for a Smooth Transfer
- Special Plates Out-of-State and Dealer Transfers
- Getting Your Plates Transferred Without the Hassle
Understanding California License Plate Transfers
A buyer may leave the DMV with the right paperwork but still have the wrong expectation about the plates. California treats a plate transfer as part of the vehicle's ownership and registration record, not as a separate exchange of metal plates.
Ownership-transfer paperwork must be started within 10 days of the sale, and the DMV record must be updated within that same 10-day window when the registered owner or lienholder changes. The California DMV ownership-transfer rule ties the deadline to the vehicle record. Removing a plate and attaching it to another vehicle does not complete the transaction.
California connects the plate with the vehicle identification number, title chain, registration record, and registered owner. Those records establish which vehicle carries the plate and when responsibility changed. This is why a plate transfer can stall even when the physical plate is available.
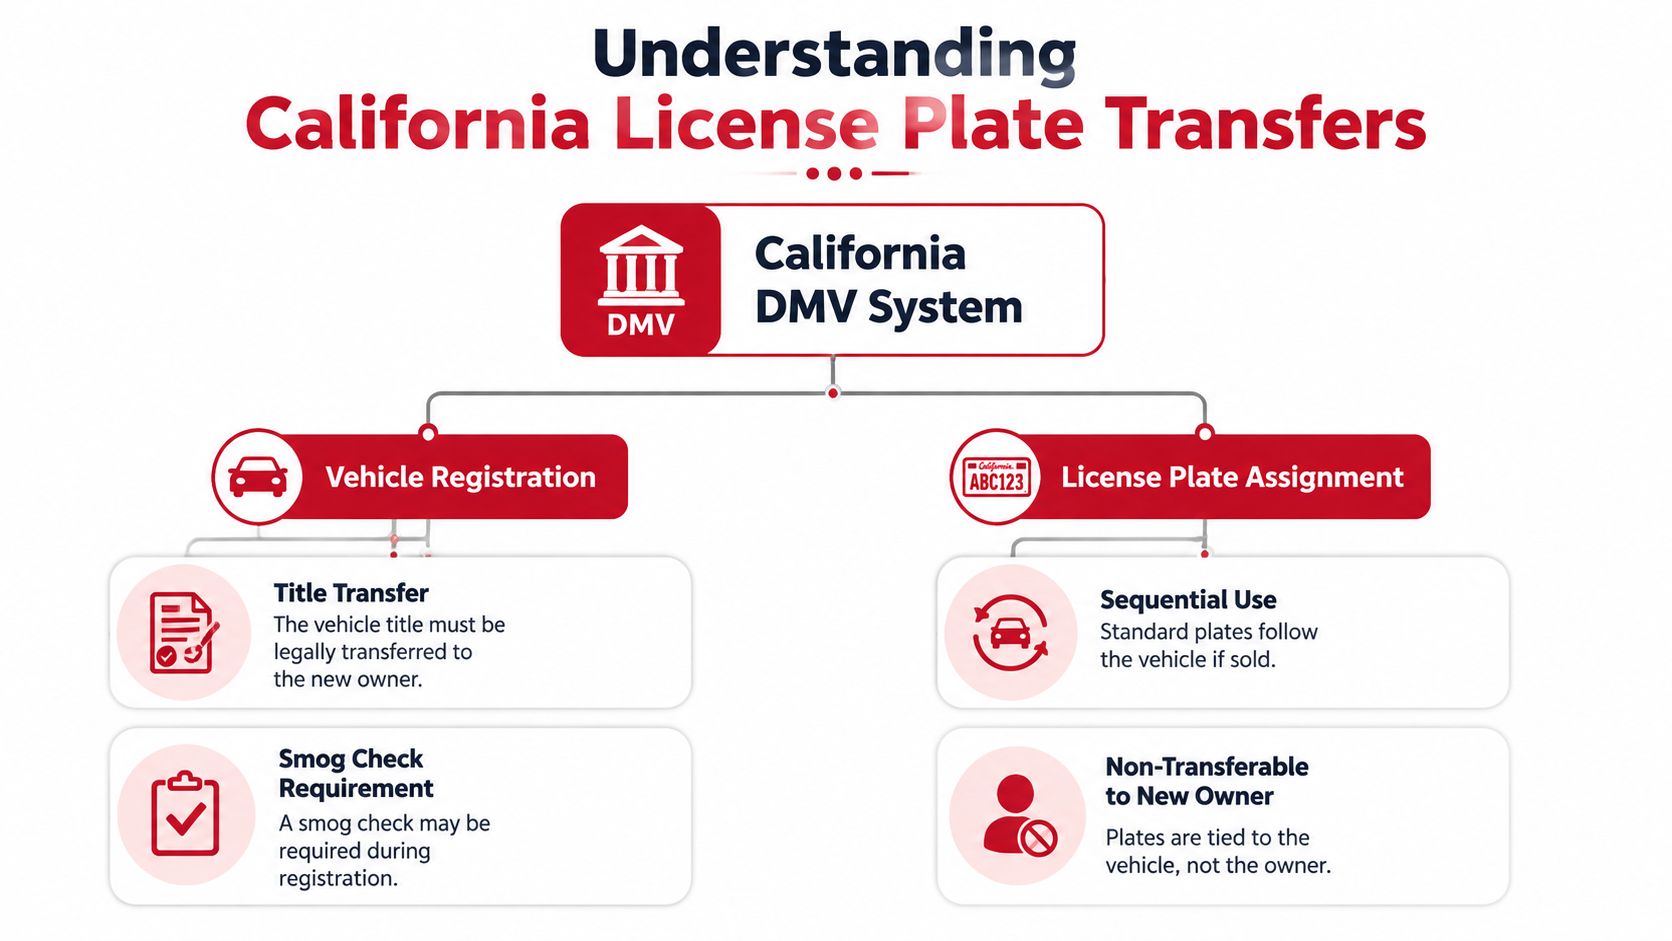
Why the release of liability matters
The seller's Notice of Transfer and Release of Liability records the sale and helps prevent responsibility for the vehicle from remaining with the seller. The notice requires the new owner's name and address, plate number, last five digits of the VIN, odometer reading at the time of sale, and date of sale, as described in the California DMV transfer guidance.
Enter each field directly from the transaction documents. A wrong plate number, missing VIN digit, or buyer address that conflicts with the paperwork can trigger follow-up questions and delay completion.
Practical rule: Handle the plate as one part of the complete ownership update. Do not attach it first and plan to correct the title record later.
Standard plates versus eligible special plates
Ordinary sequential plates generally stay assigned to the vehicle. Only certain personalized environmental, special recognition, and special-interest plates may be reassigned. The California DMV's license plate guidance identifies the plate class as the first factor in deciding whether reassignment is available.
The answer therefore depends on the plate and the record behind it. Registration status, renewal fees, ownership names, and the required form can change the result. Special plates may follow a separate reassignment process, so confirm eligibility before removing anything from the vehicle.
Documents and Forms You'll Need
A plate transfer can fail even when the plate is physically correct. California ties the plate to the vehicle record, ownership information, and registration status, so assemble the ownership paperwork before addressing the plate itself.
The signed California title is the main document when it is available. If the title is missing, complete the REG 227 application for a replacement or transfer title. Buyer and seller signatures must appear where required, and the applicable transfer fee must accompany the filing. A bill of sale can document the transaction, but it does not replace the DMV's title and registration requirements.
Core paperwork at a glance
| Document | When Required | Key Information Needed |
|---|---|---|
| Signed California title | Standard ownership transfer when the title is available | Buyer and seller signatures, vehicle and ownership details |
| REG 227 application | When the title is missing | Replacement or transfer title information and required signatures |
| Notice of Transfer and Release of Liability | Seller reports the completed sale | New owner's name and address, plate number, last five VIN digits, odometer reading, and sale date |
| Smog certification or smog transfer fee | Depends on the vehicle's model year and transfer circumstances | Current certification when required, or the applicable fee for newer vehicles |
| REG 17 | Eligible special-interest plate reassignment or interchange | Current plate ownership, requested reassignment, and required signatures |
| Related special-plate forms | Certain specialty or owner-issued plate situations | Ownership proof, registration status, plate details, and fees when applicable |
Use this vehicle registration documents checklist to organize the packet before visiting a DMV office or licensed registration provider. Keep originals together, then make copies or clear scans for your records.
Match every name and address
Check the title, registration record, buyer and seller details, and submitted forms line by line. A changed name, an active lienholder, or an address that differs from DMV records can stop the transaction until the discrepancy is resolved.
The Notice of Transfer and Release of Liability requires accurate vehicle and sale information, including the plate number, identifying details, buyer information, and sale date. Submit complete information rather than expecting the DMV to correct missing fields. Enter the last five VIN digits and odometer reading directly from the transaction documents.
Special plates require their own review. Ordinary sequential plates generally remain assigned to the vehicle, while eligible personalized environmental, special recognition, and special-interest plates may be reassigned or interchanged through the appropriate process. Confirm the plate class, ownership, registration status, and required form before removing the plate. A plate transfer and an ownership transfer are related filings, but they are not always the same transaction.
The Step-by-Step Transfer Process
A plate transfer can stall even after the buyer and seller sign the paperwork. California ties the plate to the vehicle record, ownership filing, and registration status, so complete each step in order and keep proof of what was submitted.
Start with the smog decision
California DMV and the Bureau of Automotive Repair state that most vehicles over four model years old need a current smog certification for a change of ownership, while vehicles four model years old or newer do not need the inspection and instead require a smog transfer fee, according to the California Smog Check guidance.
Do not rely on an older inspection because it appears in the vehicle history. For a private-party sale, confirm that the certificate is valid for the ownership change and recent enough for the transaction. Exempt vehicles and special transfer situations follow different rules, so verify the applicable exception before arranging the inspection.
Gather the signed title and supporting forms
Confirm that the title contains the required buyer and seller signatures. If the title is missing, complete the replacement-or-transfer title application before submitting the ownership change. Prepare the Notice of Transfer and Release of Liability information, the smog documentation or applicable fee, and any special-plate form required for plates other than ordinary sequential stock.
Use this California title transfer paperwork guide to check the paperwork sequence before leaving home. A missing signature or incomplete field is easier to fix before the DMV visit than at the counter.
File within the statutory window
Submit the ownership transfer to the DMV or an authorized registration service within the 10-day period. Use the actual sale date and make sure the filing matches the vehicle identifiers, plate number, and ownership information. Pay the transfer and registration charges required for the transaction.
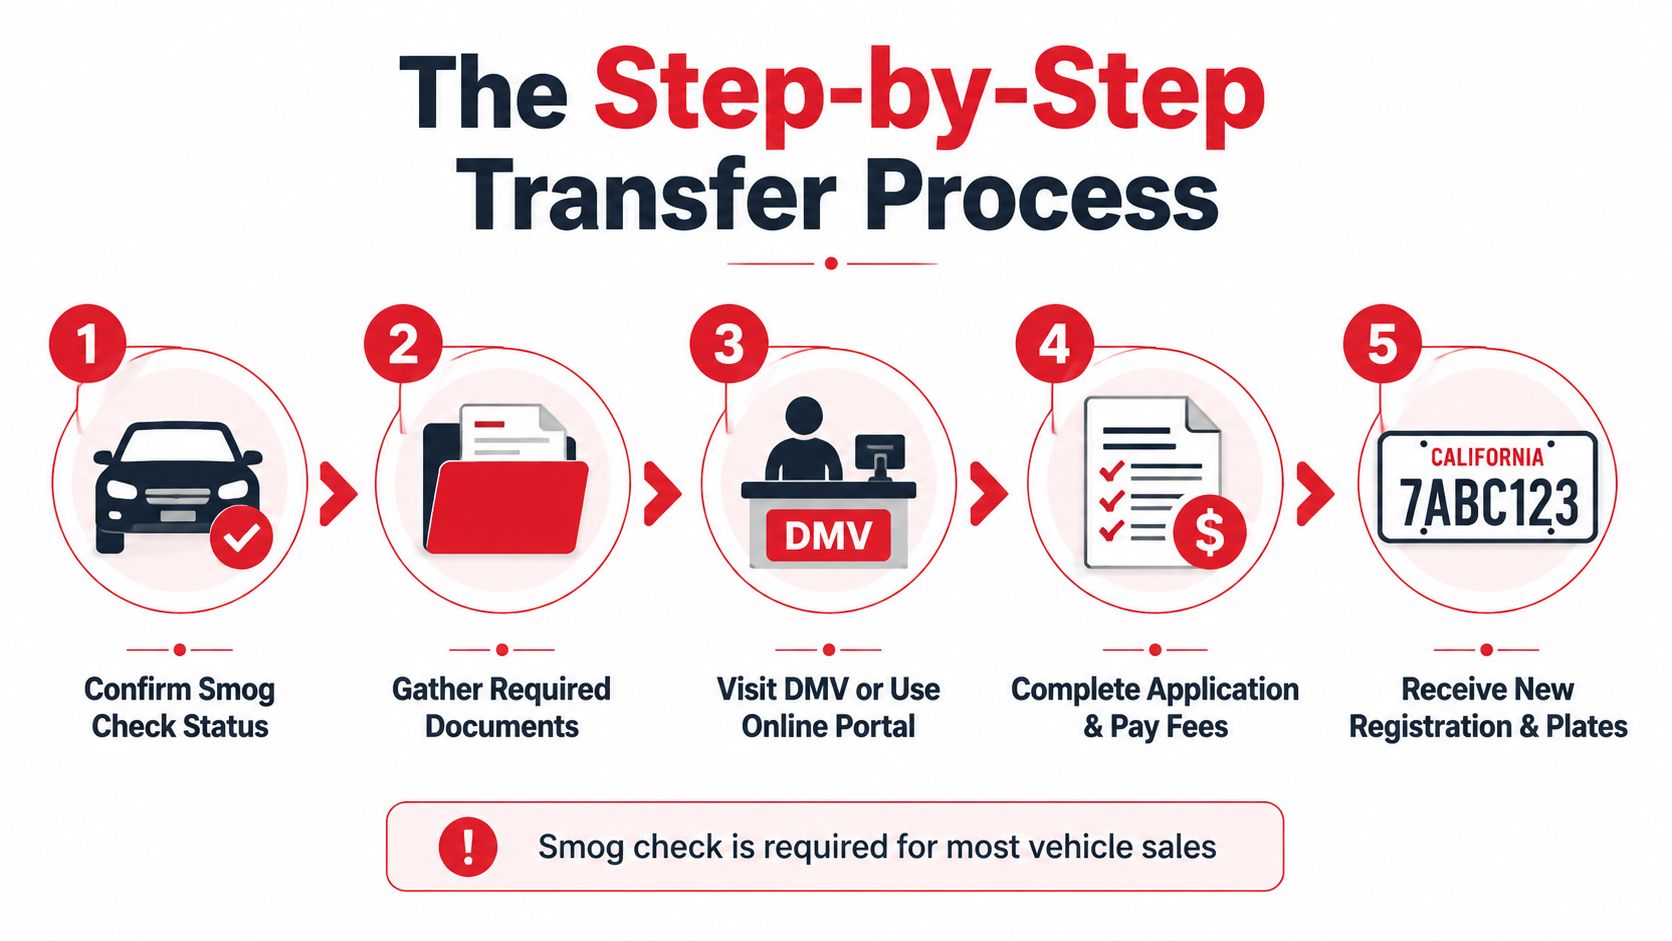
Before leaving, obtain a receipt, confirmation, or other evidence that the DMV or service provider accepted the filing. Keep it with the title records until the updated registration arrives. On-site registration services may reduce repeat visits when the packet is complete, but they still must follow the same record and plate requirements.
The following video offers a visual overview of the ownership and registration workflow:
If the DMV requests more information, respond with the same names, addresses, plate number, VIN details, and sale date used in the original filing. Consistent information helps prevent a correction from becoming a second transfer problem.
Smart Tips for a Smooth Transfer
Most stalled transfers don't fail because the owner misunderstood the fee. They stall because a document is incomplete, a plate condition doesn't match the record, or the applicant's address conflicts with the DMV file.
California's replacement-plate guidance explains that replacing plates can require surrendering the remaining plates and providing proof of identity. In some cases, a CHP vehicle verification may be required when the plates were issued within the last 90 days, and mail-in replacement requests require the registered owner to have the same address as the DMV record, according to the California DMV replacement-plate instructions.
Inspect the plates before filing
Look at both plates before you submit the transfer. If one is missing, stolen, badly damaged, or unreadable, tell the DMV or registration provider immediately instead of presenting the transaction as a normal plate movement.
Replacement and transfer are different tasks. A transfer changes the vehicle or ownership record. A replacement addresses the physical plate problem. Combining both without the required identity, surrender, or verification documents can stop the entire packet.
Treat address mismatches as a real issue
An address mismatch can affect more than where the registration card is mailed. It can prevent a mail-in replacement request, trigger a request for identity or residency information, and create confusion when the buyer's address on the Notice of Transfer differs from other documents.
Before submitting:
- Compare the address: Check the address on the title, registration record, replacement request, and release-of-liability filing.
- Confirm identity details: Use the legal names that belong to the vehicle record and transaction.
- Record the plate carefully: Recheck every character against the physical plate.
- Verify the VIN digits: The Notice of Transfer requires the last five VIN digits, not a guess based on another document.
- Separate damaged-plate work: Ask whether replacement or surrender paperwork must accompany the ownership transfer.
The fastest filing is the one that doesn't need a correction.
A licensed service provider can be useful when the transaction combines a missing title, smog requirement, replacement plate, address change, or out-of-state record. The provider can identify the form conflict before submission, but you're still responsible for supplying accurate ownership information and signing where required.
Special Plates Out-of-State and Dealer Transfers
Special plates don't follow the same path as ordinary sequential plates. California's DMV procedures distinguish special-interest plate transfers, owner-issued special plates, historical plates, and exempt-vehicle plates, and each category can impose different eligibility and surrender requirements.
For special-interest plates, both the current plate owner and the new owner generally submit REG 17. The current owner releases plate priority, while the new owner requests the plate. The California DMV special-plate transfer procedures also state that owner-issued special-plate interchange requires both vehicles to be currently registered, with renewal fees paid, and both plates eligible for reassignment.
Compare the common scenarios
| Situation | Main rule | Common extra requirement |
|---|---|---|
| Standard sequential plate | Usually remains tied to the vehicle during the ownership record update | Signed title, transfer filing, and required smog documentation |
| Special-interest or personalized plate | May be reassigned when the plate qualifies | REG 17 from the current and new owner |
| Owner-issued special plate interchange | Allowed only when both vehicles meet registration conditions | Both vehicles currently registered and renewal fees paid |
| DP, DV, CMOH, or POW plate | Ownership names may require additional proof | Statement of Facts showing the registered owner's connection to the plate |
| Historical plate on a collector vehicle | Can't be affixed before DMV approval | Surrender of prior plates if approval is granted |
| Exempt agency vehicle | Exempt plates generally must be surrendered when the vehicle leaves the exempt agency | Retention may be allowed only when moving to another exempt agency |
| Vehicle coming from another state | Requires a California registration and vehicle-record process | Plate surrender and inspection requirements depend on the transaction |
The DMV's special-plate interchange procedures also explain that eligible special plates can be reassigned or interchanged only when the vehicles are currently registered and renewal fees are paid. Some reassignment procedures state that a substitute license plate fee isn't due, although current registration fees still must be paid.
Out-of-state and dealer transactions
An out-of-state vehicle isn't a simple California plate swap. The vehicle must enter California's registration system, and the existing out-of-state plates may need to be surrendered to the California DMV. The exact inspection, title, and verification requirements depend on the vehicle and transaction, so don't assume that an out-of-state plate can be retained under California rules.
Dealer purchases often feel easier because the dealer submits much of the registration paperwork. That convenience doesn't change the underlying plate rules. Tell the dealer early that you want to retain an eligible special plate, and confirm whether the plate is being transferred, replaced, or left with the vehicle.
For a private sale, the buyer and seller usually have to coordinate signatures and disclosures themselves. A dealer may coordinate the packet, but you should still review the plate number, ownership names, address, and odometer information before signing.
Getting Your Plates Transferred Without the Hassle
A smooth transaction depends on decisions made before anyone reaches the counter. Identify the plate type first. Then verify whether the vehicle needs a current smog certification, locate the signed title or REG 227, prepare the Notice of Transfer and Release of Liability information, and check every address and VIN character.
Use this working checklist:
- Confirm the sale date: Count the filing window from the completed sale and aim to submit within the 10-day period.
- Classify the plate: Standard sequential, special-interest, personalized, historical, exempt, damaged, missing, or stolen plates don't all use the same process.
- Resolve the title: Bring the signed title, or complete the replacement-or-transfer title application if it's missing.
- Check smog status: Determine whether the vehicle falls within the smog-certification requirement or the newer-vehicle fee path.
- Prepare the liability notice: Have the buyer's name and address, plate number, last five VIN digits, odometer reading, and sale date ready.
- Submit and retain proof: Keep the receipt or confirmation until the DMV record and registration documents reflect the transaction.
A licensed DMV service provider can reduce the practical burden when you need ownership-transfer processing, registration work, smog certification, or on-site sticker and plate issuance. Fire House Smog in Antioch provides licensed DMV registration services and STAR-certified test-only smog inspections, with service hours listed as Monday through Saturday from 9:30 AM to 5:00 PM and Sunday from 12:00 PM to 4:00 PM. Availability for specific transactions can vary, so confirm the required documents before visiting.
You can skip the DMV line by using an authorized service option, but preparation still matters. No provider can correct an unsigned title, an inaccurate VIN, or an ownership detail that doesn't match the record without the proper supporting documents.
Visit Fire House Smog in Antioch for California ownership-transfer and registration assistance, including smog testing and applicable sticker or plate processing. Bring your signed title, identification, sale details, and any special-plate or replacement documents so the staff can review the transaction before submission.
You arrive at the smog station with no warning lights, no rough idle, and no obvious performance problem. Then the technician connects a scan tool and tells you the car can't be tested because one or more OBD readiness monitors are incomplete. It feels like a failure even though nobody has found a broken part.
Usually, the issue is that the vehicle's computer hasn't finished checking itself. A battery disconnect, cleared diagnostic codes, recent repair, or driving routine made up mostly of short trips can leave those tests unfinished. California's requirements make this especially important because the state is moving toward a pass standard that requires every applicable monitor to be set.
Table of Contents
- Why Your Car Was Turned Away at the Smog Test
- What OBD Readiness Monitors Do
- California Smog Check Requirements for Readiness Monitors
- How to Check Monitor Status with an OBD-II Scanner
- Common Reasons Monitors Show Not Ready
- Drive Cycles That Set Stubborn Monitors
- Your Pre-Smog Checklist and When to Visit a STAR Station
Why Your Car Was Turned Away at the Smog Test
The technician didn't turn you away because the car looked unsafe or because the engine sounded bad. The station connected to the vehicle's OBD II system and found that its emissions self-tests hadn't completed. Federal OBD inspection rules recognize an unset readiness flag as evidence that the vehicle isn't ready for a complete emissions evaluation, not automatic proof that an emissions component has failed. The EPA's description of OBD inspection rules explains why a vehicle with unset readiness flags may be rejected from further testing.
Your car's computer needs to verify that systems such as the catalytic converter, oxygen sensors, fuel system, and evaporative controls are working within expected limits. Some checks happen during ordinary operation. Others require a particular combination of engine temperature, speed, load, fuel level, and time. If those conditions haven't occurred, the computer can't mark the test complete.
Why a healthy-feeling car can still be unready
A recent repair may have solved the original problem but erased the computer's stored testing history. Disconnecting the battery can do the same thing. Clearing a diagnostic trouble code with a scanner may switch several monitors back to Not Ready, even if the check engine light stays off while the vehicle begins a new round of testing.
That creates the frustrating sequence many owners experience:
- The repair is completed: The suspected fault may be fixed.
- The memory is cleared: The vehicle loses its completed monitor records.
- The car is driven too casually: Short trips may not provide the conditions needed for every test.
- The inspection comes too soon: The station sees incomplete monitors and can't complete the emissions evaluation.
A useful explanation of related smog check fail reasons can help you separate an incomplete-monitor rejection from a true emissions fault. The next step isn't guessing or repeatedly clearing codes. It's finding out which monitors are incomplete, then giving the vehicle the conditions it needs to run them.
Practical rule: An illuminated check engine light points to a fault. An incomplete readiness monitor points to an unfinished self-test. They're related, but they aren't the same diagnosis.
What OBD Readiness Monitors Do
After a repair or battery disconnect, your vehicle may start with several emissions tests unfinished. The OBD-II system works like an onboard checklist. Each readiness monitor runs a specific self-test when the right operating conditions occur. If the result meets the programmed standard, the computer records the monitor as Ready or Complete.
These monitors judge system behavior while the engine operates. The catalyst monitor uses sensor data to assess catalytic-converter performance. The oxygen-sensor monitor checks whether the sensors and related circuits respond as expected. The evaporative system monitor looks for conditions linked to fuel-vapor control and leak detection.
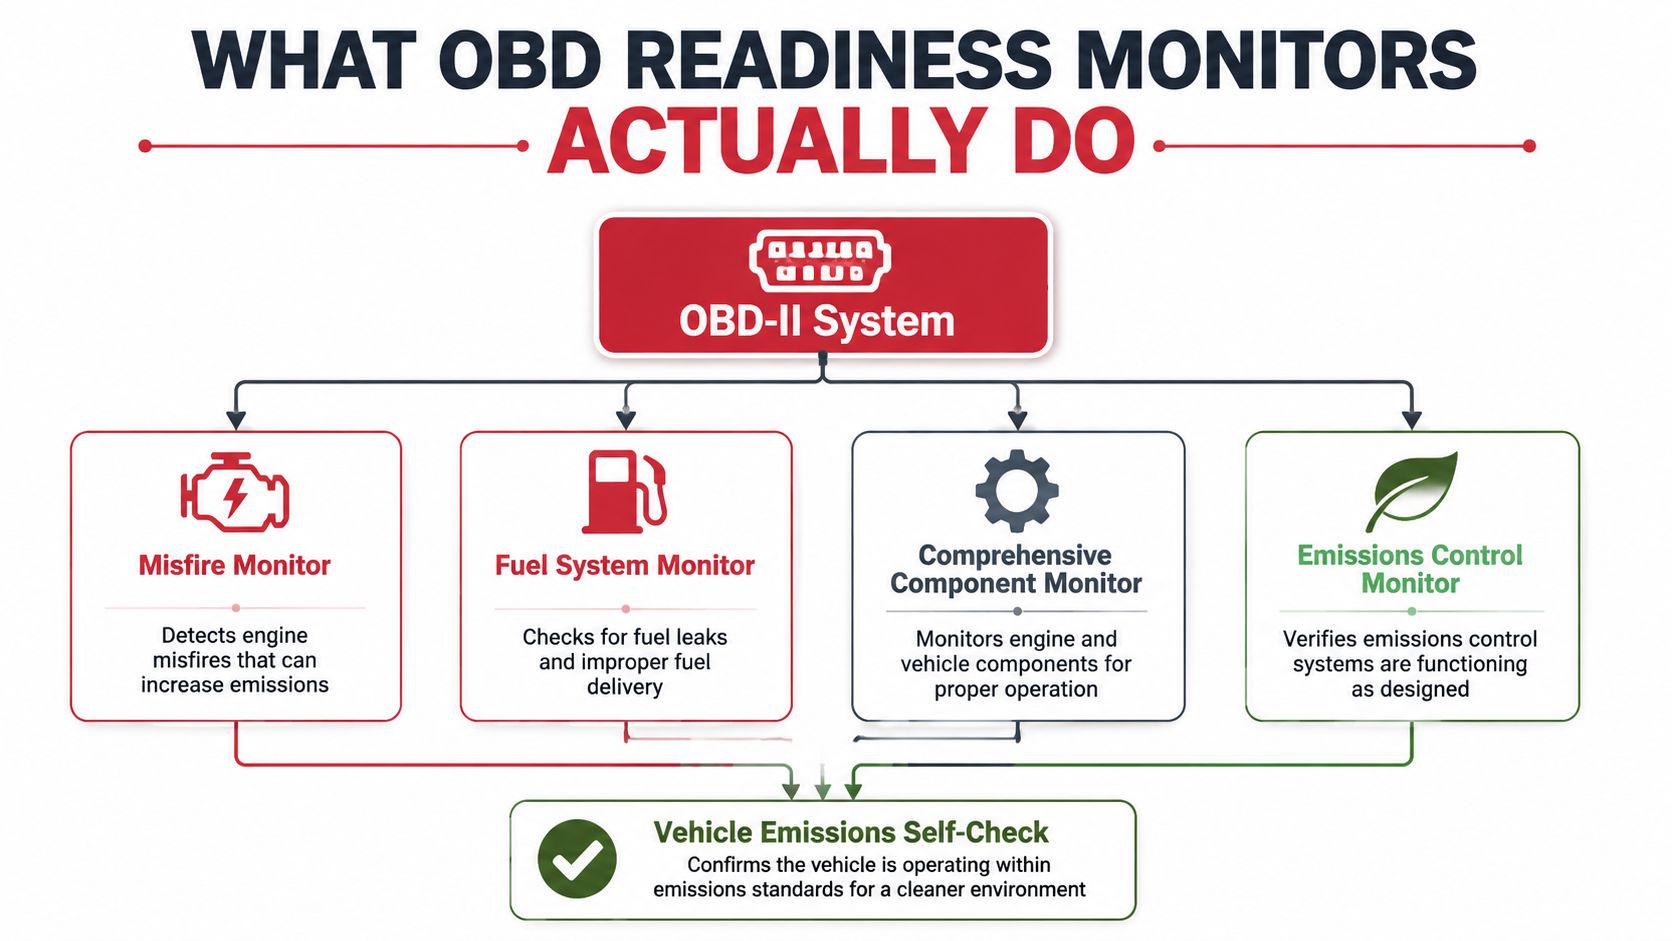
The checklist runs under specific conditions
Some monitors are continuous. The vehicle can evaluate misfire, fuel-system, and component operation during much of normal driving. Other monitors are non-continuous and need a particular sequence, such as a cold start followed by warm operation, steady cruising, or deceleration.
A short trip around the block may provide none of those conditions. The engine might already be warm, the vehicle might not maintain the needed speed, or traffic might interrupt the sequence. This mismatch explains many failures after a repair. The owner drives regularly, but the vehicle's testing logic is waiting for a narrower pattern.
What each status means
- Ready or Complete: The computer finished that applicable test and stored its result.
- Not Ready or Incomplete: The test has not finished. This status does not prove a part is defective, but it can prevent the inspection from proceeding under California's applicable requirements.
- Not Supported: The vehicle does not use that monitor for its engine or emissions configuration. An unsupported monitor generally does not create a problem because it is not an applicable test.
California's Bureau of Automotive Repair describes readiness monitors as OBD self-tests that verify emissions-control functionality. The practical distinction is between applicable and supported monitors. You do not need to force a test the vehicle was never designed to run. You need to complete every monitor that applies to that vehicle, particularly under California's stricter October 2025 completion requirement.
California Smog Check Requirements for Readiness Monitors
California readiness rules have changed from a limited-allowance model toward a much stricter completion standard. The state's Bureau of Automotive Repair reported that updated standards for 2007 and newer light-duty diesel vehicles took effect on July 5, 2023, narrowing which diesel monitors could remain unset. BAR also announced that, effective October 1, 2025, all readiness monitors must be set for a vehicle to pass a Smog Check inspection. These requirements are described in BAR's explanation of the new OBD readiness monitor regulations.
The practical impact is significant. Under the earlier framework, some vehicle categories could pass with a limited number of unset monitors, depending on fuel type and model year. The newer direction treats monitor completion as a hard eligibility condition, while BAR recognizes that unusual vehicle designs may require review or an exception.
Which systems the computer may test
The OBD system can include monitors for:
- Misfire
- Fuel system
- Components
- Catalyst
- Evaporative emissions
- Oxygen sensor
- Oxygen-sensor heater
- Diesel particulate filter
- Non-Methane Hydrocarbon catalyst
- NOx and SCR aftertreatment systems on applicable diesel vehicles
The EPA's diesel OBD guidance describes 11 readiness-monitor bits in both gasoline and diesel OBD systems, with diesel vehicles receiving additional assignments for aftertreatment equipment. Your scanner may show fewer named monitors if some aren't supported by your vehicle.
| Requirement | Current Rule | October 2025 Rule |
|---|---|---|
| Applicable readiness monitors | Pass criteria can vary by fuel type and model year, with limited allowances in some categories | All monitors that can feasibly be set must be complete for a pass, subject to applicable exceptions |
| Gasoline vehicles | Earlier standards differed by model year and could permit a limited unset monitor allowance | Completion becomes the central pass condition |
| Diesel vehicles | Diesel standards can be stricter and use diesel-specific monitor categories | All applicable monitors must be set under the updated standard |
| Unique vehicle designs | Some vehicles may have difficulty completing a monitor through ordinary operation | BAR and CARB may address qualifying design-related difficulties |
Don't assume that every vehicle follows the same threshold. Model year, fuel type, engine configuration, and monitor support matter. California also evaluates hybrid systems according to the monitors supported by their particular OBD configuration, so a hybrid owner should check the vehicle-specific status rather than rely on a gasoline-car rule of thumb.
How to Check Monitor Status with an OBD-II Scanner
You don't need to wait for the smog station to discover the problem. A scan tool with an I/M readiness function can show whether each applicable monitor is Ready, Not Ready, or Not Supported.
The diagnostic connector is usually under the driver's side dashboard, near the steering column. Plug the scanner into the port with the ignition off, then turn the ignition on without starting the engine unless the tool instructs you otherwise. Select the emissions, I/M readiness, or monitor-status menu.
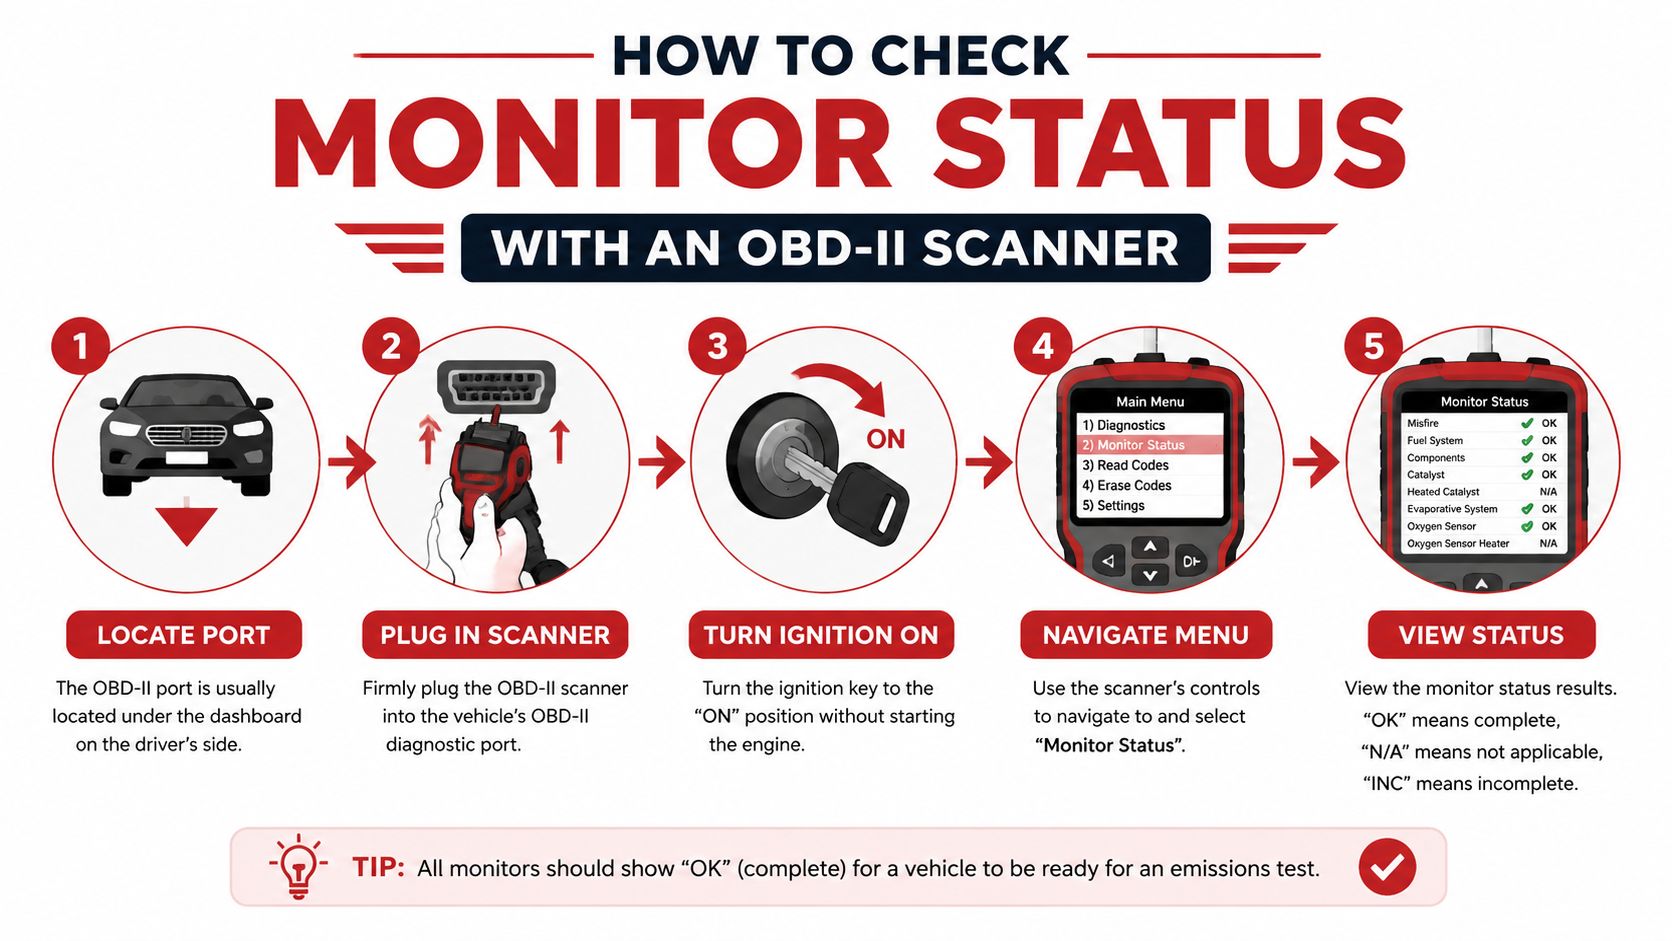
Read the screen before you clear anything
A basic code reader with readiness functionality is enough for this specific check. Some Bluetooth adapters paired with apps such as Torque or Carista can also display readiness information from the driver's seat. The exact menu names vary, but the meaning of the results remains straightforward.
- Ready: That monitor completed its self-test.
- Not Ready: The vehicle hasn't met the conditions needed to finish it, or a fault is preventing completion.
- Not Supported: That monitor doesn't apply to the vehicle.
Write down the results before taking further action. If the scanner shows a stored or pending fault, don't erase it just to turn off the light. Clearing the code also removes useful diagnostic information and can reset completed monitors. A check engine light and smog check guide can help you understand why an apparently resolved warning may still affect inspection readiness.
What to do with the results
If only a monitor is incomplete and no active fault is present, the next step is usually a suitable drive cycle. If the same monitor stays incomplete after appropriate driving, or the check engine light returns, the vehicle needs diagnosis rather than more random mileage.
Before visiting the station, scan the car again. That simple check can prevent an unnecessary appointment when the computer still shows an unfinished test.
Common Reasons Monitors Show Not Ready
Most incomplete-monitor problems come from a mismatch between how the vehicle performs its tests and how the owner drives. The car may spend its life on short errands, stop-and-go streets, or repeated cold starts. Those trips keep the vehicle moving, but they may never create the stable conditions required for a non-continuous monitor.
Power loss and code clearing
A disconnected battery removes power from the control module and can erase monitor history. Clearing diagnostic trouble codes with a scan tool has a similar effect. In both situations, the computer starts over and waits for the applicable self-tests to run again.
This is why clearing a check engine code immediately before a smog appointment often creates a new problem. The warning may disappear temporarily, but the inspection computer can still see that the readiness record is incomplete.
The absence of a warning light doesn't automatically mean the vehicle is ready for inspection.
Driving patterns can block the test
A monitor may need a cold start, a gradual warm-up, steady cruising, specific deceleration, or a period of undisturbed parking. Heavy traffic can interrupt the sequence. A vehicle that only makes brief trips may never complete a catalyst or evaporative-system test, even though it's driven every day.
Fuel level can also matter for evaporative testing. If the tank is nearly empty or nearly full, the computer may postpone that test because the vapor-space conditions aren't suitable.
Faults and vehicle-specific behavior
A pending fault can prevent a monitor from completing normally. A stored emissions code may also indicate that the computer has detected a problem that requires repair before the monitor can produce a passing result.
Some vehicles are more particular about the order and conditions of their tests. The catalyst and EVAP monitors are common sources of frustration because they may require a carefully timed sequence rather than general driving. If one monitor repeatedly refuses to set, use manufacturer service information or have a technician check for a system fault instead of assuming the scanner is wrong.
Drive Cycles That Set Stubborn Monitors
There isn't one universal drive cycle that works for every make and model. The manufacturer controls the conditions and logic used by the vehicle's computer, so the owner's manual or service information should take priority. A practical routine can still help you create the types of conditions many monitors need.
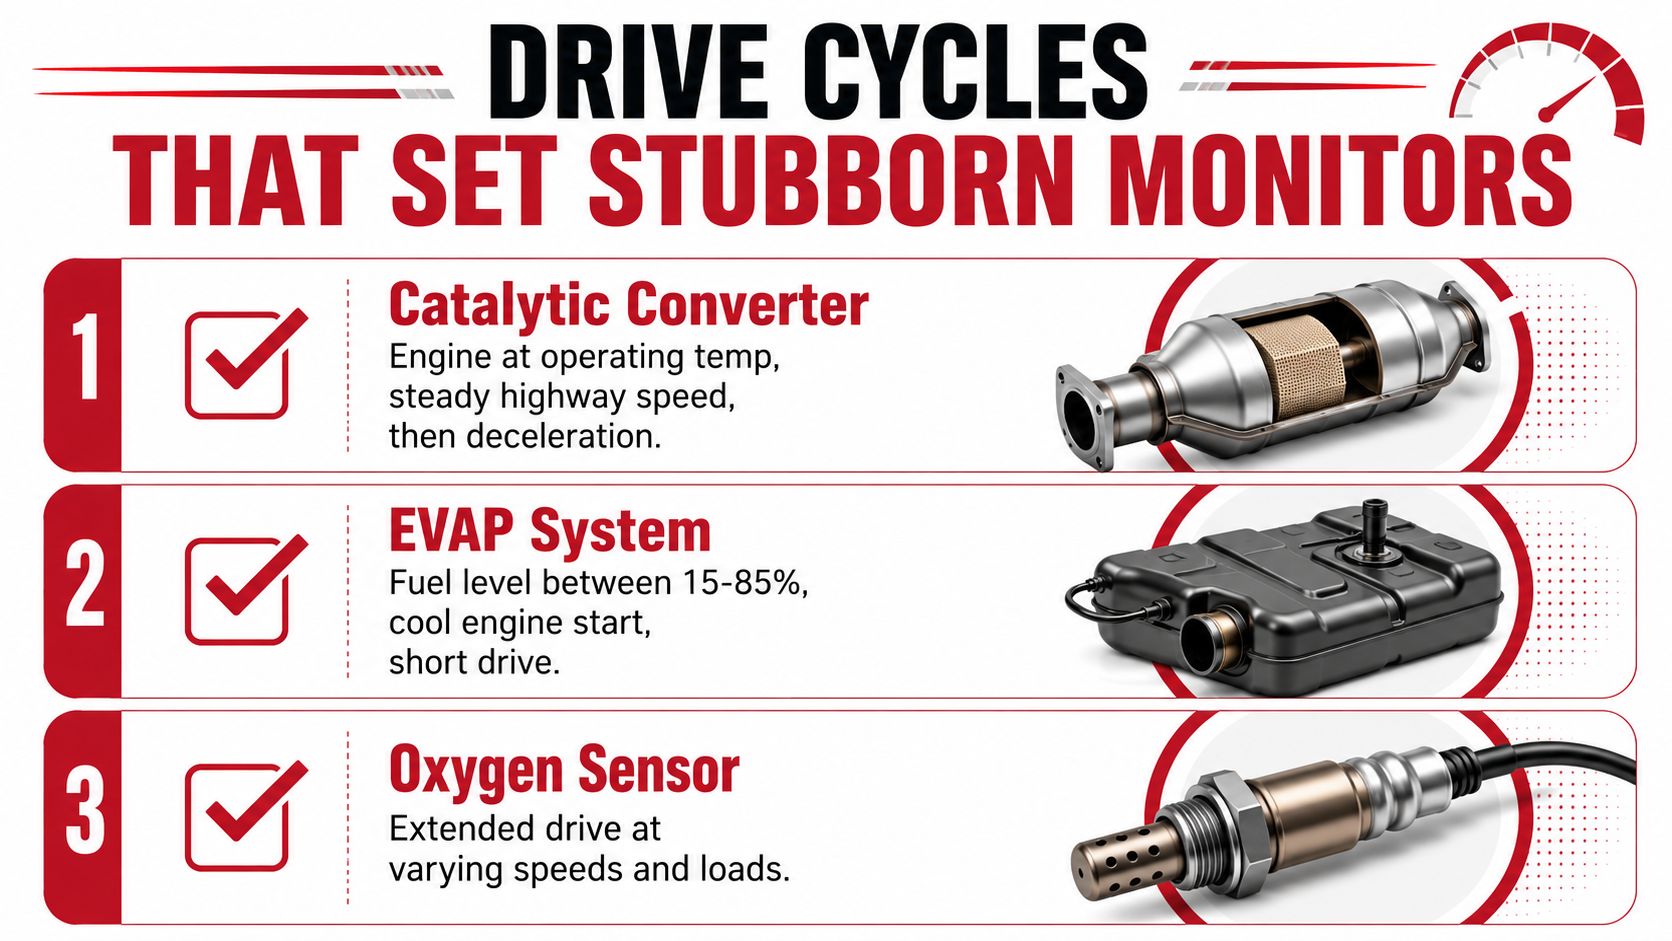
Start with the vehicle's temperature
Begin with the engine fully cold when the manufacturer's procedure calls for a cold start. Let the vehicle start normally, then drive gently through a mixture of streets and open-road conditions. Avoid aggressive acceleration, unnecessary idling, and stopping the engine before the sequence has a chance to develop.
A catalyst or oxygen-sensor test often needs the engine at operating temperature, followed by steady driving and controlled deceleration. Choose a safe route where you can maintain consistent speed without creating a traffic hazard.
Give each monitor the right opportunity
- Catalyst monitor: Use a fully warmed engine, steady open-road driving, and a controlled deceleration when traffic and safety permit. The computer compares sensor behavior while the catalyst is operating under suitable conditions.
- Oxygen-sensor monitor: Include extended driving with changing speeds and engine loads. The system needs enough operating variation to evaluate sensor response.
- EVAP monitor: Keep the fuel level within the vehicle manufacturer's specified range, then allow the car to sit undisturbed after driving if the procedure calls for a leak test. EVAP testing depends heavily on vapor conditions and temperature.
Don't try to force a test by driving recklessly or repeatedly revving the engine. A normal, safe routine is preferable, and some monitors may complete only after the vehicle has been parked and cooled.
Confirm instead of guessing
Drive normally across several separate trips, then check the scanner after each meaningful sequence. If the same monitor remains incomplete, look up the exact procedure for the vehicle's make, model, year, and engine. If a code returns, stop trying to set the monitor and diagnose the underlying issue.
Your Pre-Smog Checklist and When to Visit a STAR Station
Treat readiness as something to verify before the appointment, not something to discover at the inspection bay. Use this checklist after a repair, battery replacement, code clear, or long period of vehicle storage.
- Check the warning light: Make sure the malfunction indicator light isn't illuminated. If it has returned, diagnose the code before scheduling the test.
- Avoid resetting the computer: Don't disconnect the battery or clear codes after the repair unless a technician tells you to do so.
- Check the scanner: Confirm that every applicable monitor reads Ready, not merely that the dashboard light is off.
- Use suitable driving: Mix ordinary city driving with safe open-road operation so the computer can encounter different testing conditions.
- Review fuel conditions: Keep the fuel level within the range recommended for your vehicle's EVAP procedure.
- Scan again before leaving: A final check can show whether a monitor is still incomplete and save you a wasted trip.
A STAR-certified test-only station can make sense when the vehicle has already failed, the registration requires directed testing, or the monitor pattern is difficult to interpret. Fire House Smog is a STAR-certified, test-only station in Antioch that performs smog inspections and can explain the readiness results without selling in-house repair work. You can review what a STAR-certified smog station does before choosing where to test.
Bring the failed test paperwork, repair records, and scanner results if you have them. Those details give the technician a clearer starting point than a simple statement that the car “runs fine.”
Fire House Smog offers STAR-certified test-only smog inspections, readiness-focused guidance, and California DMV registration services at its Antioch location. Check your monitor status before you arrive, then visit Fire House Smog to schedule a test or ask about your vehicle's next step.
You're due for a California registration renewal, and the check engine light came on yesterday. The car still starts, idles, and drives normally, so it's tempting to book a smog test and hope the warning disappears. Don't. At the bay, a lit malfunction indicator lamp can stop the inspection before the technician gets any farther, and switching the light off by clearing codes can leave the vehicle unable to pass for a different reason.
The practical question isn't, “Can I pass smog with the check engine light on?” In California, the answer is no. The useful question is, “What failed, and is the car ready to prove the repair?” The workflow below separates an active emissions fault from a car with an off light but incomplete monitors, so you can diagnose the problem before spending money on parts or a wasted test.
Table of Contents
- Why the Check Engine Light Matters for Smog
- How California Tests the Light
- Reading the Codes Before You Pay for Repairs
- Driving the Right Cycle to Set Readiness Monitors
- What to Do the Day Before and Day of the Test
- Retests Exemptions and When a Light Can Be Legal
- Local Logistics at Fire House Smog in Antioch
Why the Check Engine Light Matters for Smog
A car can start, idle, and drive normally while its malfunction indicator lamp, or MIL, signals an emissions problem. California treats that lamp as part of the OBD inspection. The California Bureau of Automotive Repair Smog Check manual requires it to illuminate with the key on and engine off, then turn off after the engine starts. A failed sequence can fail the OBD inspection.
The warning light is not a suggestion for the technician. It is evidence that the vehicle computer has stored a fault affecting emissions controls. Problems with fuel control, sensors, or related systems may not yet change acceleration, idle quality, or fuel economy enough for the driver to notice.
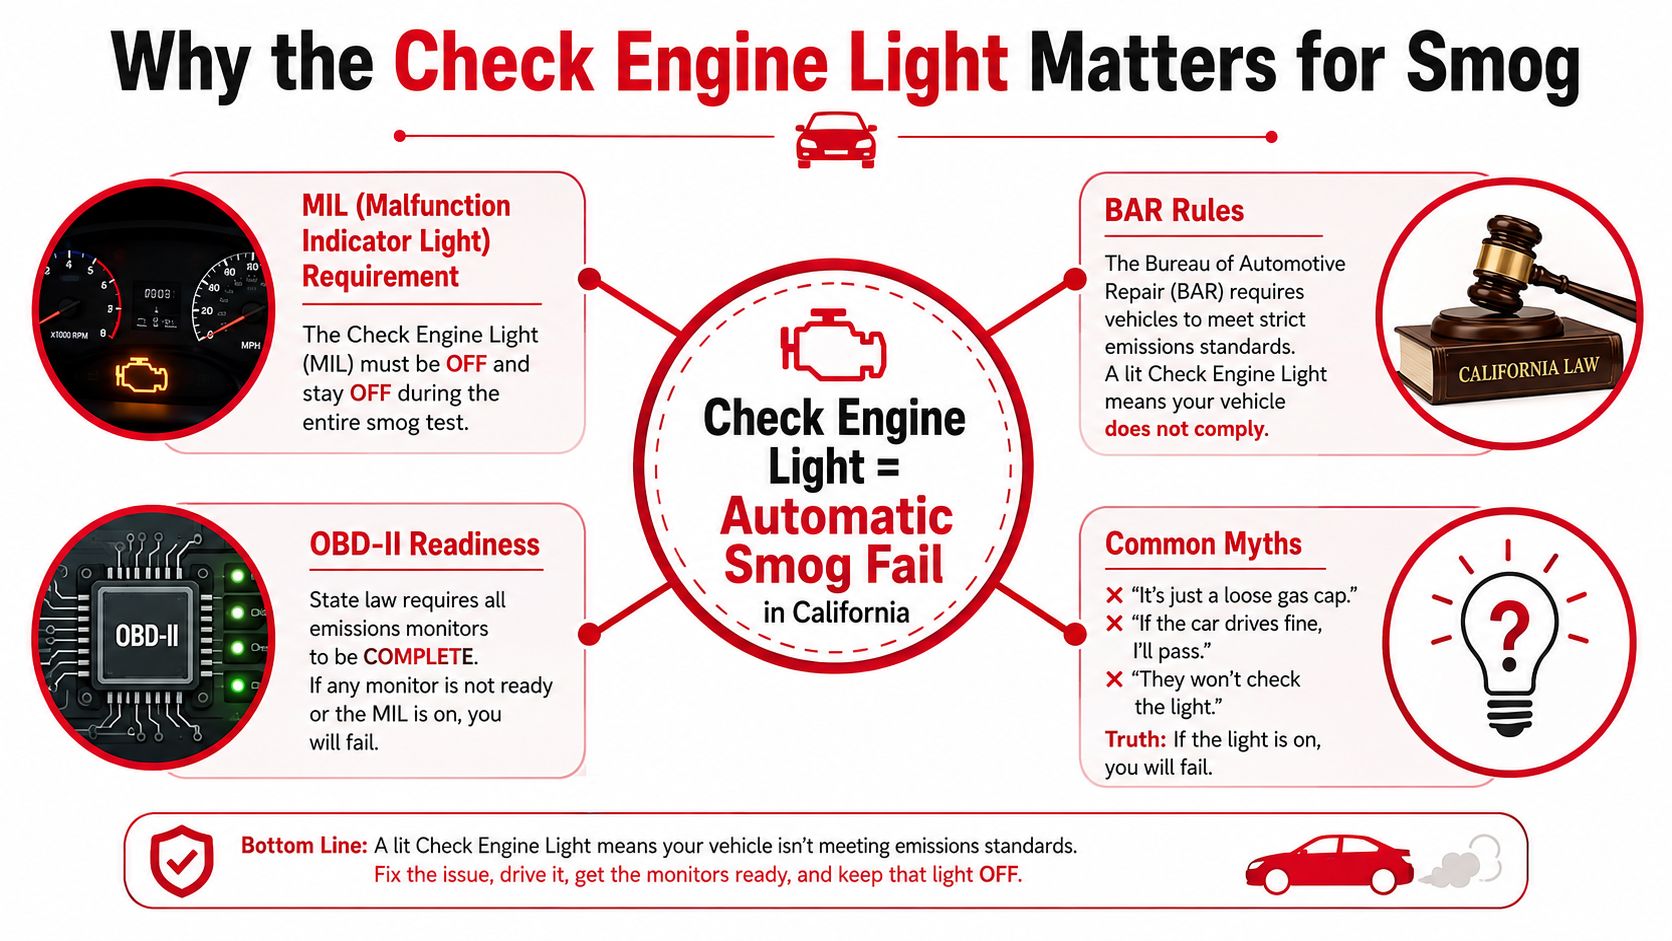
Three situations that look similar
A hard fault is a detected malfunction that keeps the MIL on while the engine runs. Treat that as an immediate smog problem. A pending code means the computer has noticed a possible fault but has not confirmed it through its testing. The lamp may remain off, but the code still gives the technician a useful diagnostic lead.
A recent code clear creates a separate problem. Clearing codes, disconnecting the battery, or completing some repairs can switch off the lamp while leaving emissions monitors incomplete. California's updated rule, effective October 1, 2025, requires all readiness monitors to be set for a vehicle to pass Smog Check. An off light does not override a “not ready” result.
Practical rule: Diagnose the fault, repair its cause, confirm the MIL sequence, and check monitor readiness before paying for the test. Clearing codes only hides the warning temporarily and can leave the vehicle unready.
For a broader review of common outcomes, read Fire House Smog's guide to smog check fail reasons. The money-saving workflow is straightforward: scan first, repair the actual cause, complete the required drive checks, and test only when the computer is ready.
How California Tests the Light
At the inspection bay, the technician follows a set sequence rather than judging whether the engine sounds healthy. California's OBD requirements control the process. The BAR OBD test reference outlines the order: first confirm the malfunction indicator lamp, then review diagnostic information and monitor status.
With the ignition on and the engine off, the check engine light should illuminate for the bulb check. After the engine starts, it should go out. A missing lamp, a lamp that never lights, or one that stays on can fail the vehicle before readiness status is reviewed.
What the connector reveals
The technician plugs inspection equipment into the vehicle's OBD-II diagnostic port. The scan checks emissions-related diagnostic trouble codes, confirms whether the MIL is reporting a fault, and reads readiness monitors. These monitors are the vehicle's self-tests for systems including fuel control, oxygen sensors, catalyst performance, and evaporative emissions.
California's inspection method depends on the vehicle's model year. For 2000 and newer gasoline vehicles, Smog Checks rely primarily on OBD-II diagnostics instead of tailpipe testing. Gasoline vehicles from 1996 through 1999 receive both an OBD inspection and tailpipe testing.
| Check Item | 1996-1999 Vehicles | 2000 and Newer Vehicles |
|---|---|---|
| MIL bulb and operation | Checked during OBD inspection | Checked during OBD inspection |
| Diagnostic codes | Read through OBD system | Read through OBD-II system |
| Readiness monitors | Must support inspection eligibility | All required monitors must be complete under the October 2025 rule |
| Tailpipe measurement | Included for gasoline vehicles | Smog checks are primarily OBD-based for gasoline vehicles |
| Visual inspection | Emissions equipment and tampering checked | Emissions equipment and tampering checked |
The October 2025 rule changes the practical pre-test decision. A light that turns off after a code clear does not prove the vehicle is ready. The scan must show completed monitors before the test, or the car can fail inspection eligibility even without an illuminated MIL.
Why the visual check still matters
The computer scan is only part of the appointment. The technician also checks for obvious emissions tampering and missing components. A vehicle can show no current warning light and still have a problem if required emissions hardware has been altered or removed.
Older vehicles outside the applicable OBD inspection framework may undergo other procedures, including tailpipe testing where required. The test mode depends on model year, fuel type, equipment, and California inspection rules. Use the scanner result as one part of the diagnosis, not as the entire eligibility decision.
Reading the Codes Before You Pay for Repairs
A diagnostic trouble code identifies a system or condition. It doesn't automatically identify the failed part. Replacing the first sensor mentioned by a scan tool is how customers turn a modest diagnosis into a parts-shopping spree.
Start with an OBD-II scanner. You can use a personal scanner, borrow one, or ask an auto parts store whether it offers a scan service. Fire House Smog also provides a relevant option for customers who need auto diagnostic and repair guidance in Antioch. The important point is to capture the codes and monitor status before anyone clears the memory.
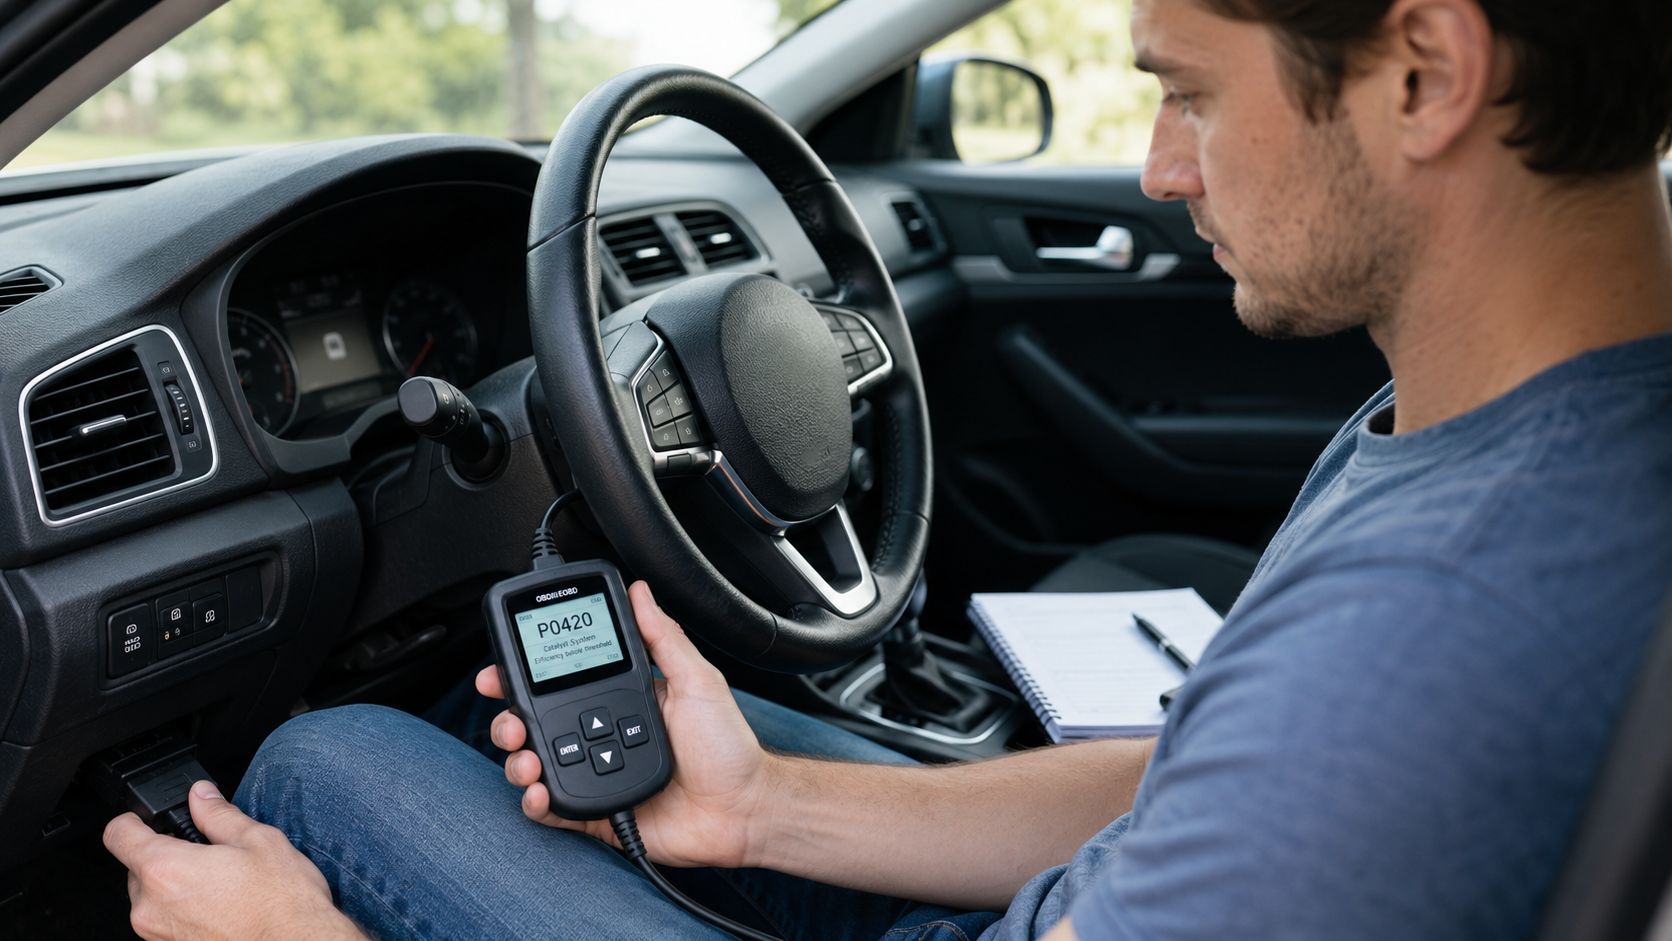
Read the scan in the right order
Look for confirmed codes, pending codes, freeze-frame information, and readiness status. A confirmed code has met the computer's criteria for storing a fault. A pending code may be an early or intermittent detection, but it can point directly toward a developing issue.
Generic P0 codes follow standardized definitions. Manufacturer-specific P1 codes require the vehicle's service information for accurate interpretation. Freeze-frame data shows the operating conditions when the computer logged the fault, such as engine load, temperature, and speed. That context can distinguish a fault that occurs during freeway operation from one that appears during cold starts or idling.
Use the code as a starting point:
- P0420 catalyst efficiency: Don't immediately buy a catalytic converter. Check for exhaust leaks, misfires, fuel-control problems, and oxygen-sensor data first. A converter can be the victim of another problem, not the original cause.
- P0171 or P0174 lean condition: Inspect vacuum hoses, intake ducting, and the mass-airflow sensor. A dirty MAF sensor or an air leak can mislead fuel-trim diagnosis, but cleaning must follow the sensor maker's instructions.
- P0300 random misfire: Treat this as a priority. Check ignition components, fuel delivery, intake leaks, and engine condition. Misfires can raise emissions and damage the catalyst.
- P0442 small EVAP leak: Start with the gas cap and inspect the seal. If the cap is sound, the system may need a smoke test.
- P0455 large EVAP leak: Look for a missing or poorly sealed cap, disconnected vapor hose, or damaged EVAP component before authorizing expensive work.
Never clear codes right before a smog test. Code clearing resets readiness monitors, so the light may be off while the vehicle reports incomplete checks.
The sensible sequence is scan, document, inspect, repair, and drive. If the light returns, rescan before replacing anything else.
Driving the Right Cycle to Set Readiness Monitors
A repaired car still needs to complete its self-tests before it is ready for inspection. Clearing codes erases stored readiness history, so the vehicle must encounter the temperatures, speeds, loads, and other conditions each monitor requires.
California's October 2025 rule makes this step more important. All readiness monitors must be set for the vehicle to pass. An illuminated dashboard light is not the only issue, and an extinguished light does not prove the checks are complete.
Build a mixed-driving routine
Manufacturers use different enable criteria, so no universal drive cycle works for every model. Start with a cold engine. Let it idle for two to three minutes, then accelerate gently toward 45 to 55 mph on a freeway on-ramp when traffic permits. Hold a steady speed for five to seven minutes, then coast down without braking when safe, giving the fuel-cutoff conditions a chance to occur.
Follow the freeway portion with ordinary surface-street driving. Use gentle acceleration, steady cruising, and complete stops. Repeat the mixed pattern instead of circling one block. Different monitors may require different engine temperatures, vehicle speeds, loads, and coast-down events.
Common checks include:
- Misfire and fuel-trim checks.
- Oxygen-sensor and oxygen-sensor-heater checks.
- Catalyst evaluation.
- EVAP testing.
- EGR and secondary-air checks where equipped.
- Diesel-specific emissions monitors where applicable.
The order varies by vehicle. A monitor can remain incomplete if the fuel level, coolant temperature, ambient conditions, or recent driving pattern did not meet its enable criteria.
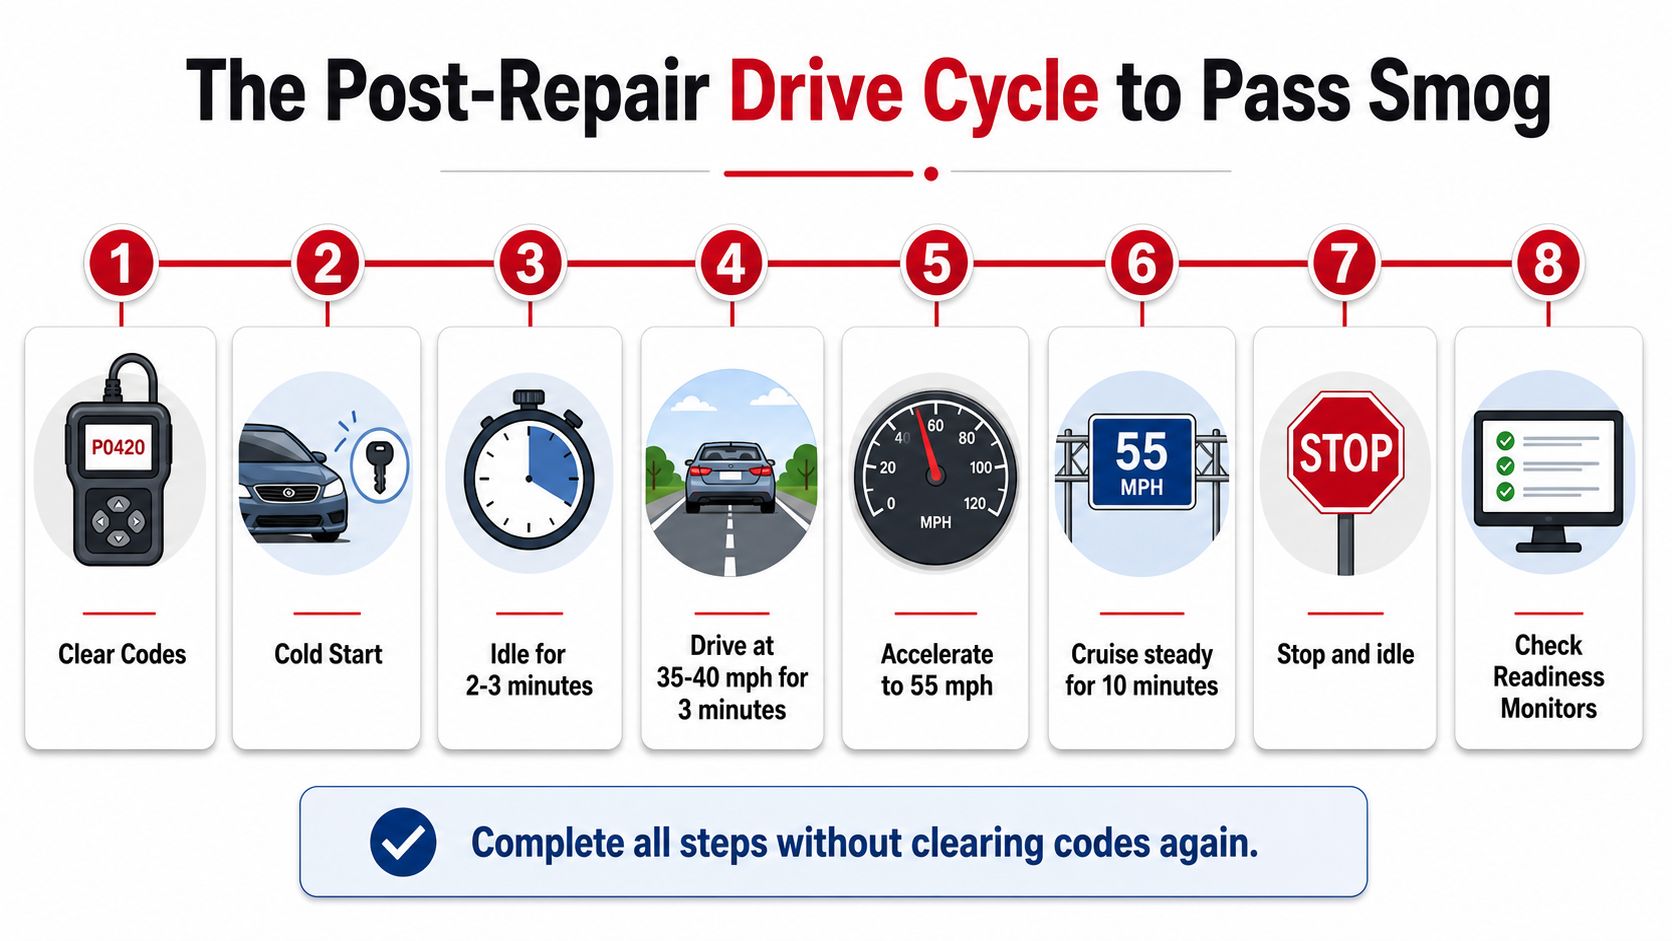
Use a scanner to check readiness instead of judging by mileage. A car that has made many short trips may still need sustained freeway operation for a stubborn monitor. RVs and heavy trucks can require longer warm-up periods and steadier grades because their weight and operating load affect test conditions.
A successful cycle generally takes 50 to 100 miles over two to three days, based on the practical guidance in this drive-cycle preparation guide. Leave the codes alone during that period. If the light returns, stop driving for readiness and diagnose the new result before scheduling the test.
What to Do the Day Before and Day of the Test
The day before the appointment is for verification, not experiments. Cycle the ignition and confirm the check engine light illuminates during the bulb check, then turns off after the engine starts. Scan the car and confirm every required readiness monitor shows complete before you leave home.
Fuel level matters to EVAP testing. Keep the tank around three-quarters full, not completely full and not close to empty. Check that the gas cap seals correctly and clicks into place. If the cap seal is cracked or the cap won't tighten, replace it before testing.
A short pre-test checklist
- Check the scan data: Confirm there are no active emissions codes and that monitors are ready.
- Inspect the gas cap: Make sure it seals and locks as designed.
- Avoid battery disconnection: Removing battery power can erase readiness information and may create anti-theft complications.
- Check tire pressure: Keep the tires evenly inflated, especially if the inspection procedure requires dynamometer operation.
- Bring paperwork: Have the vehicle registration and any recent repair documentation available.
Arrive with the engine warmed through ordinary driving, not by revving the car in the parking lot. Tell the technician about recent battery replacement, code clearing, repairs, or an intermittent light. That information helps the station choose the right pre-check and prevents confusion when the scan shows incomplete data.
The cheapest test is the one you don't take before the car is ready.
Ask for a pre-scan before the formal inspection begins. Fire House Smog's standard quick pre-check is intended to catch failed monitors before the inspection proceeds, which can save a retest trip. If the scanner says “not ready,” leave and finish the drive cycle rather than paying to document a predictable failure.
Retests Exemptions and When a Light Can Be Legal
A failed inspection needs a diagnosis based on the failure type. A hard fail means the MIL is on or the vehicle has a qualifying diagnostic fault. The repair path starts with code interpretation and physical testing. A not-ready fail means the lamp may be off and no active fault may be visible, but the computer hasn't completed its required self-tests. That path usually calls for more correct driving and another readiness scan, not immediate parts replacement.
California's Smog Check information from the Bureau of Automotive Repair confirms the central rule: a vehicle won't pass with the check engine light on. The lamp must also operate correctly during the ignition and running checks. An illuminated light isn't made legal by the fact that the car drives smoothly.
Use the failure result as a decision tool
| Scenario | What It Means | Next Action |
|---|---|---|
| Light remains on with the engine running | The computer has identified an active emissions-related fault | Diagnose and repair before testing again |
| Light doesn't illuminate during the bulb check | The MIL circuit or lamp operation has a defect | Repair the instrumentation problem |
| Light is off but monitors are incomplete | The vehicle isn't ready for certification | Follow the correct drive cycle and rescan |
| Light is off and all monitors are complete | The vehicle has cleared the basic OBD readiness gates | Proceed with the Smog Check |
| Visual emissions equipment problem | Required equipment may be missing, altered, or tampered with | Correct the equipment issue before retest |
Some vehicles follow different inspection rules because of age, fuel type, weight, or vehicle classification. Those categories should be confirmed with the station or BAR rather than assumed from the dashboard light. An exemption from one portion of testing doesn't turn an active MIL into a pass.
Repair assistance may be available through California's Consumer Assistance Program when a qualifying vehicle meets the program's requirements. A cost-based waiver is a separate state process with its own eligibility rules, documentation, and repair requirements. Ask the Bureau of Automotive Repair or a participating station for the current pathway before authorizing work.
The decision tree is straightforward. Light on means repair first. Light off but not ready means drive and rescan. No light and ready means test now. That sequence protects you from both unnecessary repairs and premature retests.
Local Logistics at Fire House Smog in Antioch
Antioch drivers should verify the appointment details before heading to a station, especially when the vehicle isn't a standard passenger car. Fire House Smog operates at 2900 Lone Tree Way in Antioch, and its test-only operation focuses on emissions inspections rather than selling repair work. Confirm the current address, posted hours, vehicle acceptance, and coupon terms before you go.
Bring the vehicle registration, the last smog receipt if you're returning after a failure, and repair paperwork if you're pursuing a directed repair or waiver. Keep the invoice. Retest eligibility depends on the station's policy and coupon terms, and the site's published information describes a free retest when applicable.
Call before bringing unusual vehicles
Call ahead for diesel trucks, RVs, and motorhomes. A diesel vehicle may require a different test procedure, while a larger motorhome may need confirmation that the bay and equipment can accommodate it. Out-of-state vehicles may also need VIN verification or a registration-related service that should be discussed before arrival.
Fire House Smog offers STAR-certified test-only inspections for passenger vehicles, SUVs, light-duty trucks, and some recreational vehicles. It also provides California DMV registration services, including renewal and related registration tasks, subject to posted service hours. Payment methods, current wait times, and vehicle-specific eligibility can change, so ask the station directly rather than relying on an old listing.
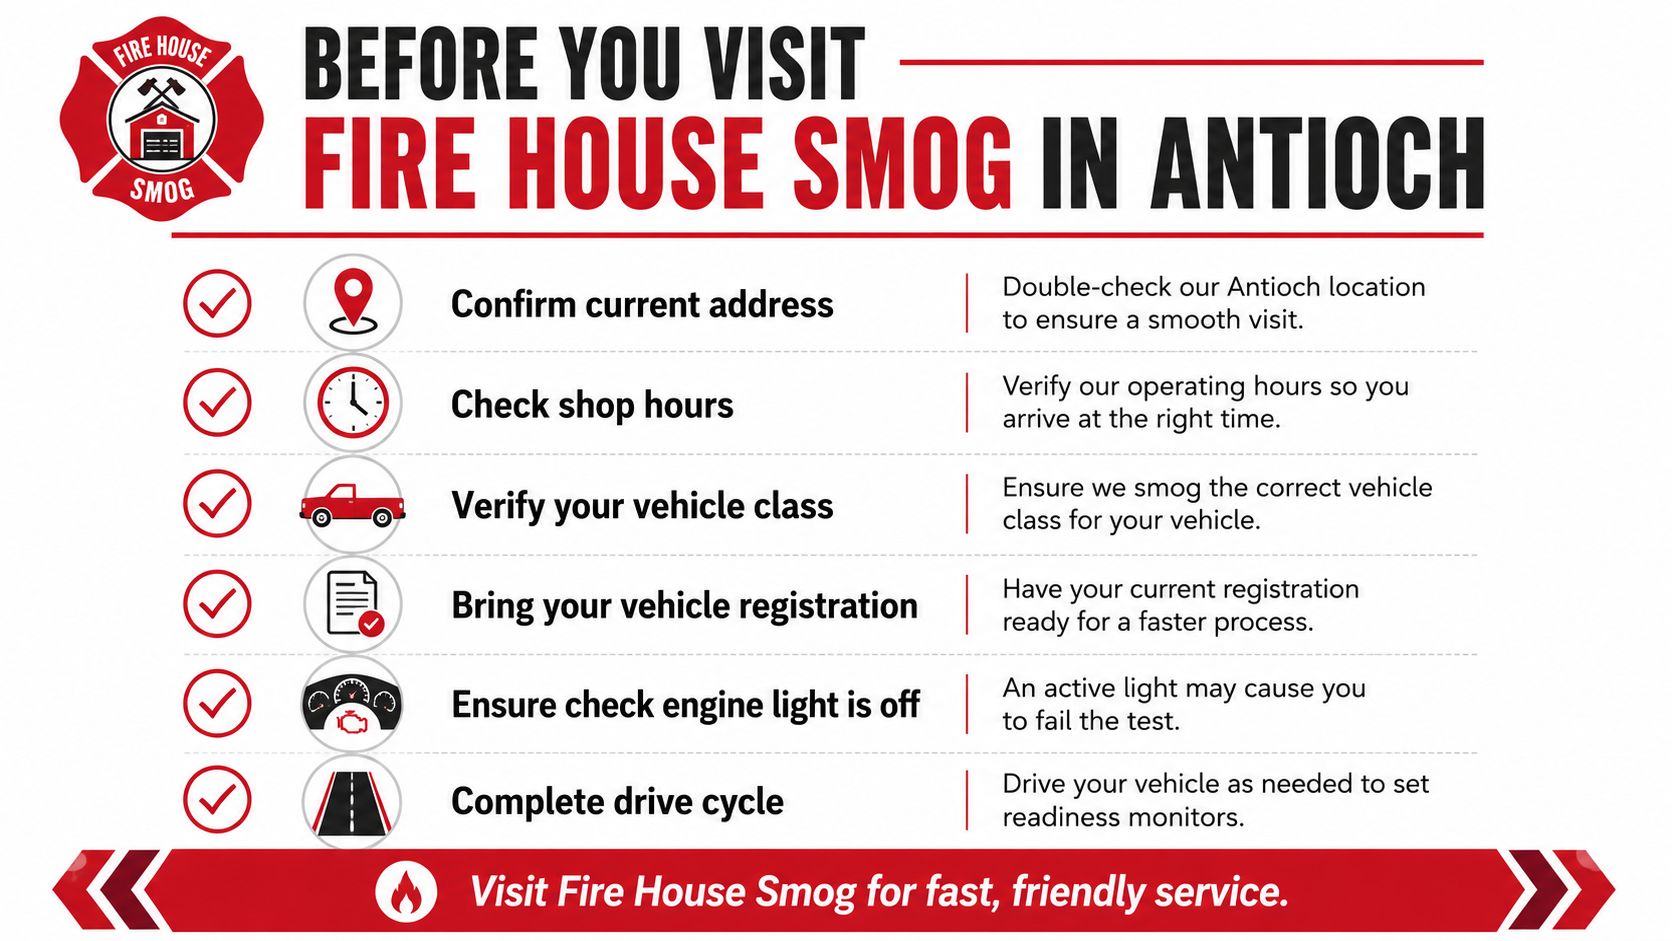
A practical visit checklist:
- Confirm the location: Verify the Lone Tree Way address before leaving.
- Check operating hours: Ask about Sunday, evening, and DMV service availability.
- Verify the vehicle class: Mention diesel trucks, RVs, motorhomes, or unusual equipment.
- Bring documents: Carry registration, prior test paperwork, and repair records.
- Check the light: The MIL must operate correctly and turn off with the engine running.
- Verify readiness: Don't arrive with incomplete monitors, even if the dashboard is dark.
- Plan the timing: An early Saturday appointment can help reduce waiting, but call first for special vehicle classes.
If the phone line is tied up during lunch, leave a voicemail with your vehicle type and reason for calling. The station's listed telephone number is 925-754-1600. A quick confirmation before driving over is better than discovering that an RV, diesel truck, or not-ready vehicle can't enter the test lane.
Fire House Smog offers STAR-certified test-only smog inspections, readiness pre-checks, retest support, and California DMV registration services in Antioch. Check your check engine light and readiness monitors before you go, then visit Fire House Smog or call 925-754-1600 to confirm the right test procedure for your vehicle.