
Smog Check What Do They Check: A Complete Guide
You've pulled into a California smog station with a registration renewal approaching, and the question is simple: smog check, what do they check? The technician won't judge the car by how smoothly it drives alone. They'll inspect visible emissions equipment, check the vehicle's warning system and computer data, and, for some older vehicles, measure pollutants directly from the exhaust.
The exact path depends mainly on the vehicle's model year, fuel type, and equipment. California's Bureau of Automotive Repair Smog Check FAQ explains that an inspection may include a visual inspection, functional inspection, OBD system check, and tailpipe test. Knowing what happens at each station step helps you spot simple problems before you pay for a retest.
Table of Contents
- The Smog Check Process: A Step-by-Step Look
- The Visual and Functional Inspection
- The OBD System Check for 2000 and Newer Vehicles
- Tailpipe and Dynamometer Testing for Older Vehicles
- How Pass and Fail Decisions Are Made
- Common Reasons Cars Fail and What to Fix First
- Choosing a STAR or Test Only Station and Preparing for Your Visit
The Smog Check Process: A Step-by-Step Look
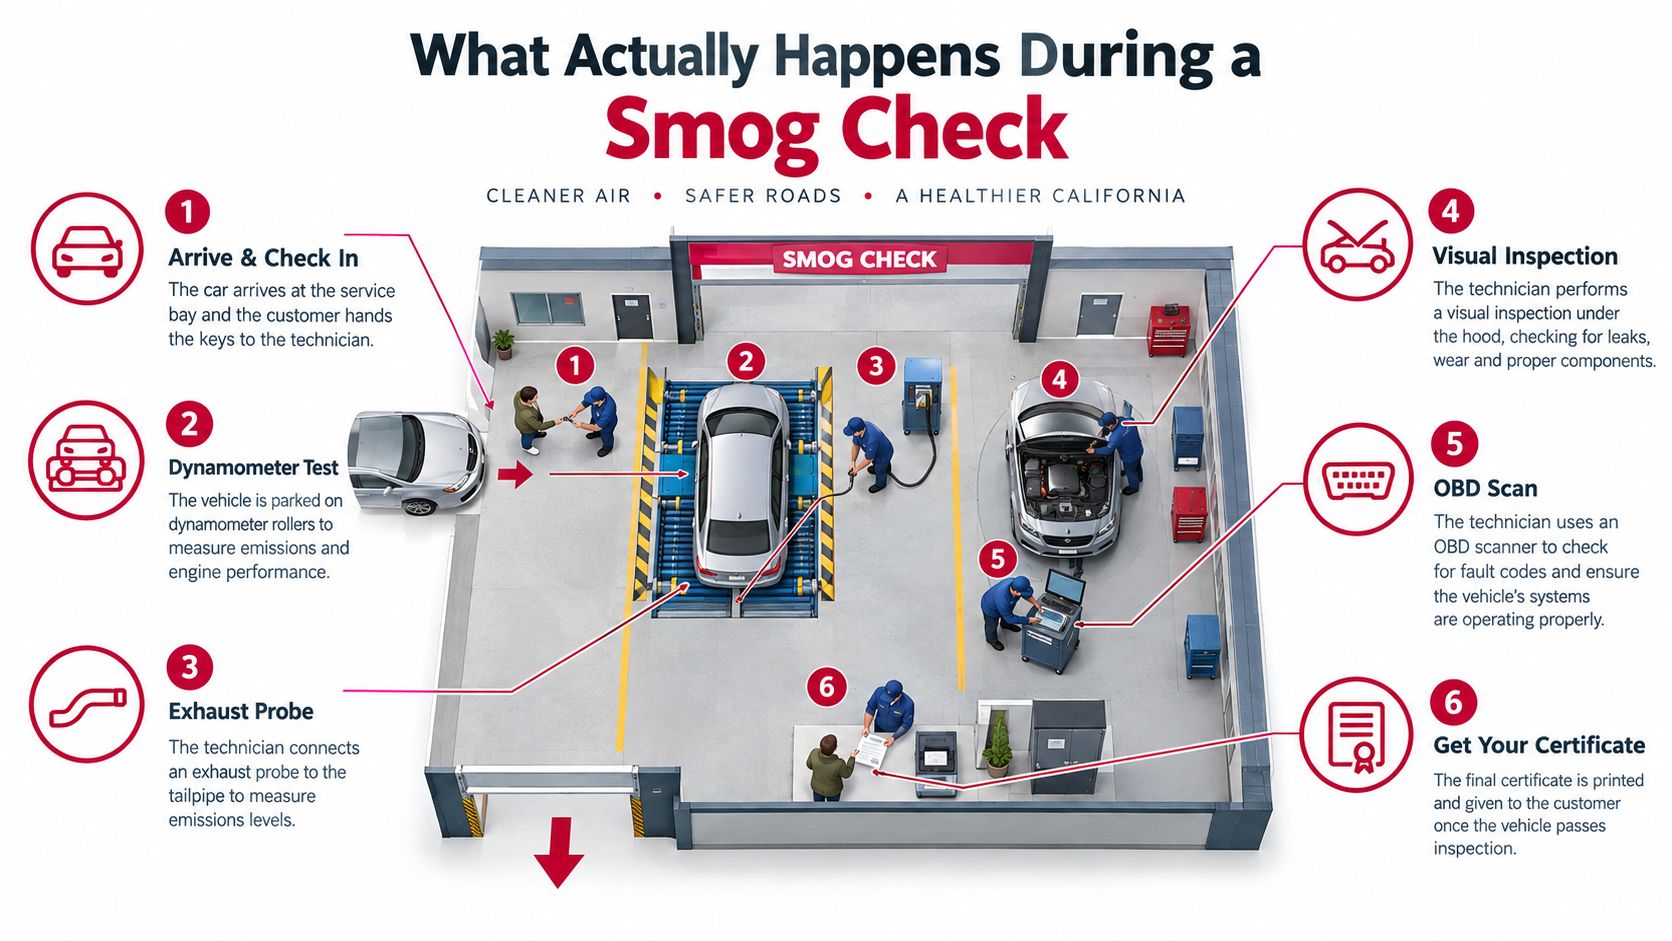
At the counter, you provide the keys and vehicle information. The technician confirms details such as the registration, vehicle identification number, and any available prior smog paperwork. This matching step matters because the vehicle's model year, fuel type, and equipment determine which inspection procedure applies.
Next, the car enters the inspection bay. The technician positions some vehicles for a visual and electronic inspection, while older vehicles may be placed on dynamometer rollers. The rollers work like a controlled road surface, allowing the station to measure emissions while the drive wheels turn. The California BAR program report identifies BAR-97 as the platform primarily used for model-year 1999 and older vehicles and BAR-OIS as the platform primarily used for model-year 2000 and newer vehicles.
The three inspection phases
A typical visit follows three connected phases:
Eyes-on inspection: The technician looks for emissions equipment that is missing, disconnected, damaged, or visibly altered. They may also check whether the malfunction indicator lamp behaves correctly when the ignition is switched on. Before visiting, confirm that warning lights are not illuminated and that nothing under the hood appears disconnected.
Computer inspection: For most 2000-and-newer vehicles, the technician connects a scan tool to the OBD system. It reads emissions-related fault information and readiness status, much like checking whether the vehicle's onboard self-test has finished. Recent battery replacement or code clearing can leave monitors incomplete, so ask about that history before testing.
Exhaust measurement: Older vehicles may receive a tailpipe test while idling or operating on dynamometer rollers. The equipment measures pollutants under the conditions assigned to that vehicle. A technician follows the procedure required for its model year, fuel type, and drivetrain.
The station then transmits the result and provides the applicable paperwork. You may receive a passing certificate, a failure report identifying the problem, or instructions to obtain repair or directed assistance before another test. The California BAR Smog Check overview describes how visual, functional, OBD, and tailpipe procedures are assigned to the vehicle being inspected. A visit often takes 30 to 45 minutes, though vehicle condition and station workload can change the timing.
The Visual and Functional Inspection
Before connecting a scanner, the technician performs a hands-on review. This is the part many owners overlook because it doesn't require a screen or an exhaust probe. The inspector opens the hood, checks accessible emissions components, looks beneath the vehicle when necessary, and watches how warning indicators behave when the ignition is switched on.
What the technician sees under the hood
The gas cap is a small part with a large job. It must seal the fuel system so gasoline vapors don't escape through the filler neck. A loose, cracked, missing, or damaged cap can create an evaporative emissions problem, so twist yours until it clicks or ratchets, then inspect the sealing ring for visible damage.
The catalytic converter also receives attention. The technician verifies that it's present, correctly located, and not obviously tampered with. California's Smog Check Manual specifically addresses catalytic converter presence, location, and visible defects because the converter helps reduce pollutants before exhaust leaves the tailpipe.
Other visible checks may include the air intake, exhaust routing, PCV system, evaporative controls, hoses, wiring, and emissions-related hardware. A disconnected vacuum hose, an obviously altered component, or a replacement part that doesn't meet the applicable requirements can create a failure before the emissions numbers are considered.
What the technician observes while the engine runs
The functional portion includes the malfunction indicator lamp, commonly called the Check Engine Light. With the key turned on before starting, the light should illuminate as part of the vehicle's normal bulb check. After the engine starts, it should go out if the system isn't reporting an active emissions fault.
The inspector may also look for visible smoke, fluid leaks, or other unsafe conditions. At home, check the ground after the car has been parked, look for dripping oil or fuel, and notice whether the exhaust produces persistent visible haze. Don't remove or cover a warning light to make the dashboard appear normal. The technician checks the system's actual behavior and may identify a tampered indicator.
Practical rule: A car can look clean and drive normally, yet still fail because an emissions component is missing, disconnected, or reporting a fault.
The OBD System Check for 2000 and Newer Vehicles
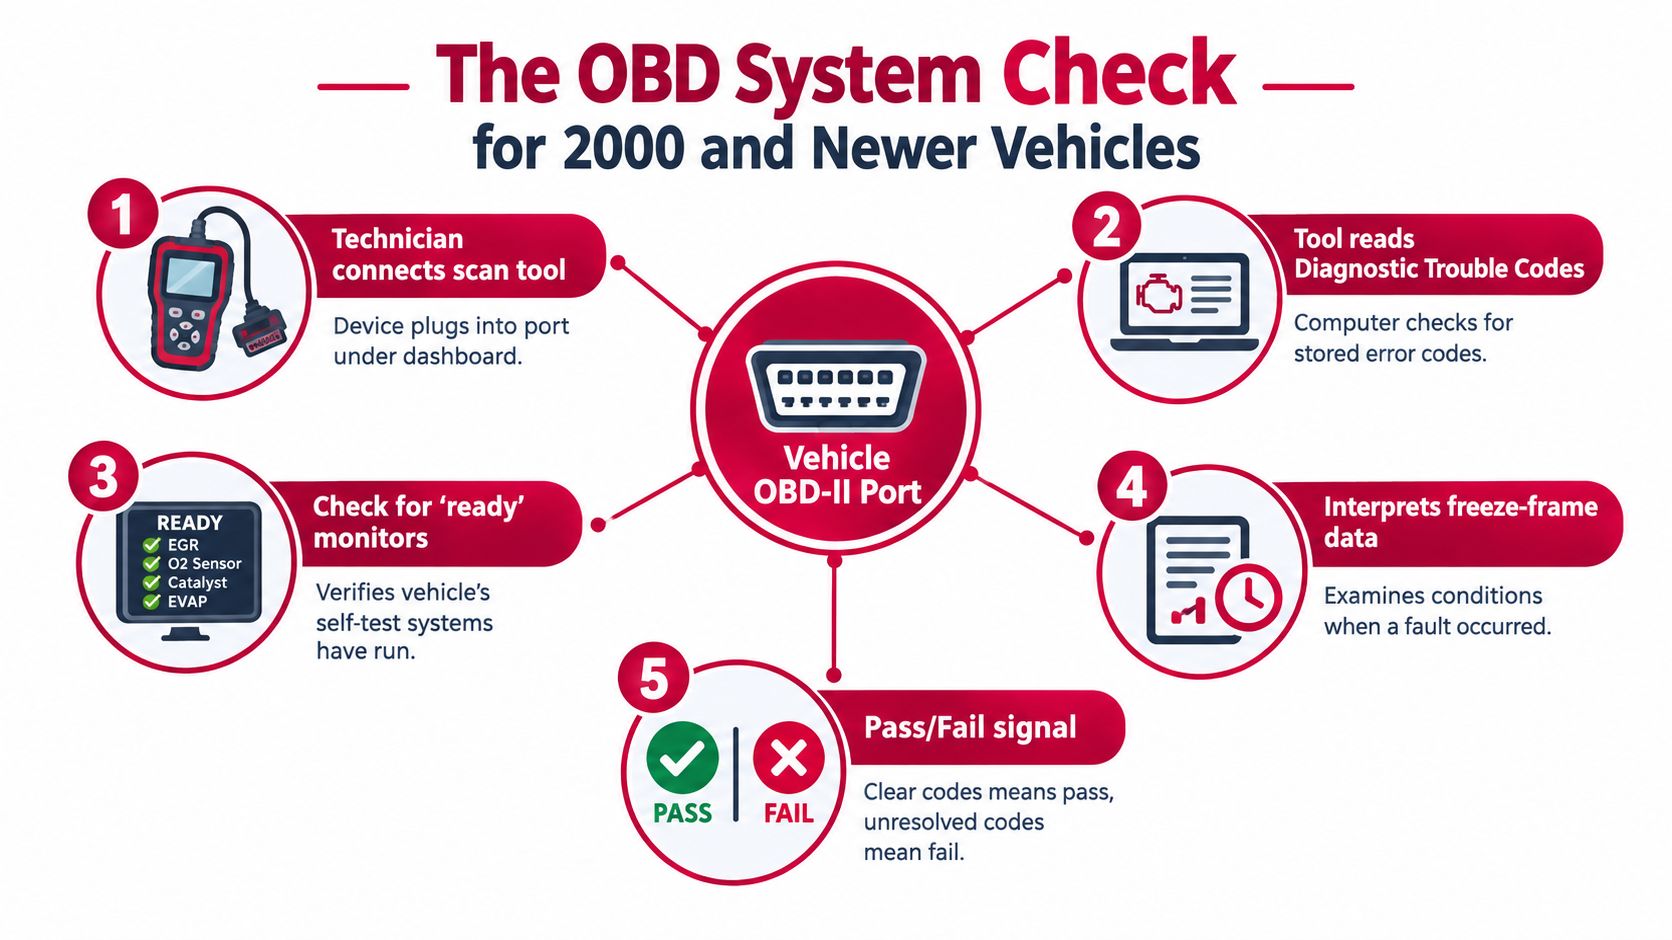
For most 2000-and-newer vehicles, the technician begins inside the cabin, under the dashboard near the steering column. A scan tool plugs into the diagnostic link connector, or DLC, and communicates with the vehicle's onboard computer. The tool checks for stored emissions faults and asks whether the vehicle has completed its built-in self-tests.
These self-tests are called readiness monitors. Each monitor examines a particular system, such as the catalytic converter, oxygen sensors, or evaporative emissions controls. The checks do not all run at once. The vehicle waits for suitable conditions, then evaluates each system during normal driving. A guide to OBD readiness monitors explains why recent repairs or battery work can affect this status.
Why a vehicle can drive well and still fail
A car may start easily, idle smoothly, and feel normal while its computer records an emissions problem. For example, code P0420 indicates that the computer has detected catalytic-converter efficiency below its threshold. The driver may notice little change because the fault concerns emissions performance rather than how the engine feels.
The technician also checks the dashboard warning-light behavior. With the key on before starting, the Check Engine Light should illuminate during the bulb check. After the engine starts, it should go out if the computer is not reporting an active emissions fault.
A steady Check Engine Light points to a fault that needs diagnosis before testing. Disconnecting the battery, clearing a code, or completing electrical work can erase stored information and reset readiness monitors. Refueling immediately before the appointment can also leave the evaporative monitor incomplete.
Before visiting the station, have a repair shop scan the vehicle and confirm that the monitors are ready. Do not clear codes to turn off the light. The technician can still see incomplete monitor status, and the vehicle may fail because the computer has not completed its required checks.
The scan tool reports what the vehicle has detected. It does not repair the problem. The technician compares the results with the applicable inspection requirements and records the outcome electronically. The OBD system check infographic illustrates the process, while the OBD-II system check infographic shows its five basic steps.
If a monitor is incomplete or an emissions code remains active, diagnosis must come before another inspection. Checking the dashboard light and monitor status beforehand can prevent an unnecessary trip to the station.
Tailpipe and Dynamometer Testing for Older Vehicles
Older vehicles take a different test path because they may not supply the electronic emissions information used in a modern OBD inspection. In California, model-year 1999 and older vehicles are primarily associated with BAR-97 tailpipe testing, while model-year 2000 and newer vehicles are primarily associated with BAR-OIS electronic testing. The assigned procedure depends on the vehicle, not customer preference.
At the station, the technician first positions the vehicle for the required procedure. For a BAR-97 inspection, a probe goes into the tailpipe while the equipment samples the exhaust leaving the engine. Depending on the test, the engine may run at idle or at different idle speeds. The machine measures gases such as hydrocarbons, carbon monoxide, nitrogen oxides, and carbon dioxide.
These readings provide clues about what is happening during combustion. High hydrocarbons can point to fuel that did not burn completely. Carbon monoxide can indicate an overly rich mixture, while nitrogen oxide readings can reflect combustion and emissions-control problems. Before the appointment, have a shop check for an exhaust leak, rough running, or disconnected emissions hardware. A damaged tailpipe can also affect how the probe samples the exhaust.
Some older or enhanced-area vehicles are tested on chassis dynamometer rollers. The rollers support the driven wheels and let the technician apply a controlled, simulated driving load. As the engine works harder than it would at idle, the exhaust probe continues sampling emissions. A cooling fan moves air around the vehicle during the procedure, helping control conditions while the test runs.
| Feature | BAR-97, Two-Speed Idle | BAR-OIS, Dynamometer |
|---|---|---|
| Main vehicle group | Primarily model-year 1999 and older vehicles | Primarily model-year 2000 and newer vehicles |
| Main measurement | Direct exhaust sampling at the tailpipe | Electronic emissions-control data through OBD |
| Vehicle position | Stationary during idle-based sampling | Positioned on dynamometer rollers when the assigned procedure requires it |
| Technician's focus | Pollutant concentrations in exhaust | Fault information and readiness data from the vehicle computer |
| Owner concern | Exhaust leaks, poor combustion, and emissions hardware | Warning lights, stored codes, and incomplete monitors |
If your vehicle is older, ask the station which procedure applies before arriving. That answer tells you whether the car will remain stationary or be placed on rollers, and whether checking the exhaust system beforehand should be a priority.
How Pass and Fail Decisions Are Made
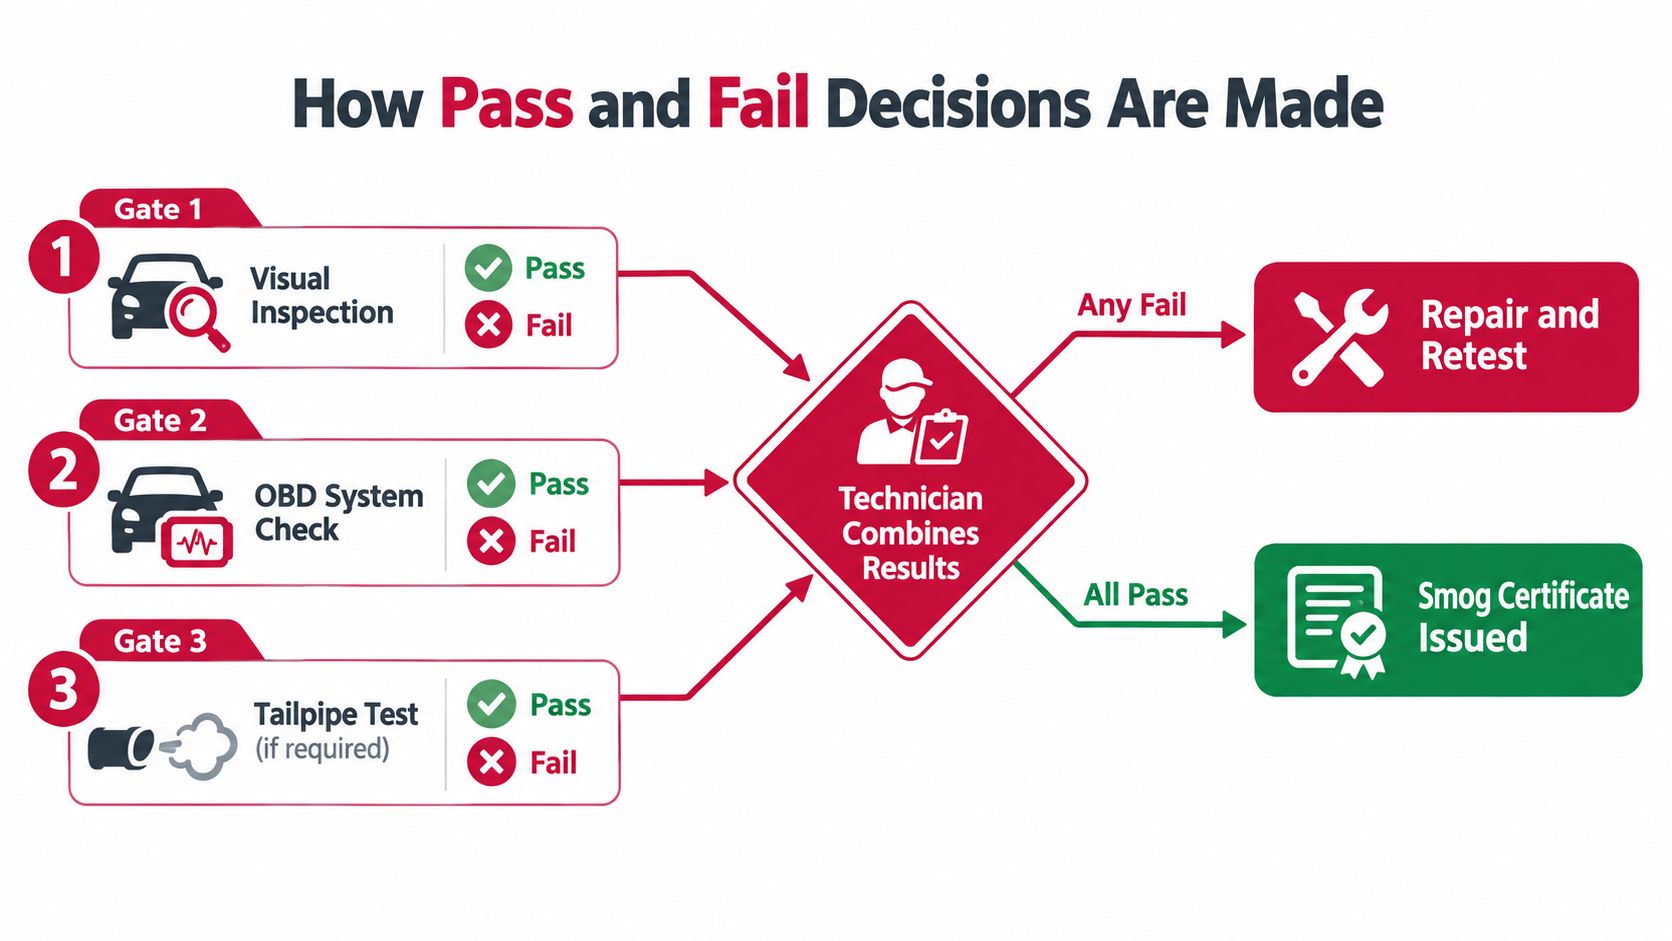
A smog check isn't a single score, like a grade on a test. It's a series of applicable pass or fail gates. The technician must complete every required part for that vehicle, and one failed item can prevent the station from issuing a complete passing certificate.
For example, a vehicle might have emissions hardware that looks intact but show an active Check Engine Light during the OBD check. The visual portion can appear acceptable, yet the electronic result can still fail. An older vehicle can pass the visual inspection and show no obvious functional problem, then fail because its measured tailpipe pollutants exceed the applicable standard.
The model-year cutoff changes the test path
The model-year distinction determines which equipment and data matter. Vehicles primarily tested through BAR-97 are evaluated by direct exhaust measurement, while vehicles primarily tested through BAR-OIS provide electronic emissions information through the onboard diagnostic system. The assigned path isn't a customer preference. The station follows the state procedure that matches the vehicle.
A technician may also stop or refuse a test if the vehicle presents an unsafe condition. An active oil or fuel leak, for example, can create a hazard in an inspection bay. Safety comes before completing a measurement.
What happens after a failure
A failure report identifies the area that needs attention. The correct next step is diagnosis, not automatically replacing expensive parts. A scan code may point toward a system, but the technician or repair professional still needs to determine whether the cause is a sensor, wiring, vacuum leak, catalyst, or another component.
Retesting follows the station's policy and the applicable program rules. Fees can vary, and a station that performs testing only won't complete repairs on site. There isn't a partial pass for a vehicle that passed some gates and failed another. The certificate is issued only when all required portions produce an acceptable result.
Remember: Passing the visual inspection doesn't offset an OBD failure, and a clean dashboard doesn't offset excessive tailpipe emissions.
Common Reasons Cars Fail and What to Fix First
Many failures begin with a small item, but the right repair depends on the actual test result. Start with checks that are visible and inexpensive before authorizing major engine work.
- Gas cap: Tighten it until it clicks or ratchets. Replace it if the seal is cracked, missing, or visibly damaged.
- Check Engine Light: Don't hide or clear it. Have the code read and diagnose the underlying emissions fault.
- Battery or code reset: A recent battery disconnect, jump start, or cleared code can leave monitors incomplete. Ask a qualified shop to verify readiness before testing.
- Vacuum and PCV components: Look for a disconnected hose or damaged PCV valve. Don't pull apart unfamiliar emissions plumbing, but report anything obviously loose.
- Oxygen sensors and EGR equipment: A failed oxygen sensor or sticking exhaust gas recirculation component can affect combustion and emissions. These parts need testing rather than blind replacement.
- Catalytic converter: Confirm that the converter is physically present and correctly installed. An aftermarket part may not meet the vehicle's applicable requirements, so use a qualified repair professional for compliance questions.
The common smog check failure reasons can help you interpret a failure report, but a code alone isn't a complete diagnosis. For instance, a catalyst-related code might result from the converter, an exhaust leak, a sensor problem, or another condition that affects the computer's comparison.
Before the appointment, drive long enough to bring the engine and emissions equipment to normal operating temperature. Check tire inflation against the vehicle manufacturer's specification, especially if the assigned procedure uses dynamometer rollers. If a repair shop gives you a specific drive cycle, follow those instructions and avoid disconnecting the battery afterward.
Recent refueling can also affect evaporative-system monitor completion. If you've just repaired the vehicle or cleared a fault, ask the shop whether the monitors show ready before paying for the official inspection.
Choosing a STAR or Test Only Station and Preparing for Your Visit
California stations don't all operate under the same business model. A regular licensed station can test and repair vehicles. A Test Only station performs the inspection but doesn't carry out the repair work on the same visit. A STAR station meets additional certification and oversight requirements and can inspect vehicles directed to STAR by the DMV or the program.
That distinction matters after a previous failure or a notice directing you to a specific station type. If your paperwork requires STAR testing, you must use a STAR station. If the state hasn't directed you, you can generally choose a station based on convenience, services, and whether you want testing separated from repair work.
What to do before arriving
Use this short preparation list:
- Confirm the station: Check that the business is licensed for the type of inspection your vehicle needs.
- Review your renewal information: Bring the DMV renewal notice or previous smog certificate if you have it.
- Warm the vehicle: Drive for 10 to 15 minutes before the appointment, based on practical preparation guidance from the smog check background guide.
- Check the tires: Inflate them to the manufacturer's recommended pressure if a dynamometer procedure may apply.
- Leave warning lights visible: Never cover, remove, or manipulate a dashboard indicator.
- Ask about vehicle fit: Large trucks, motorhomes, and some recreational vehicles may require a station with suitable equipment.
A Test Only visit can be useful when you want an independent inspection result without repair sales at the same business. Fire House Smog is a STAR-certified test-only station in Antioch that performs inspections for cars, trucks, and some recreational vehicles subject to equipment limits, and it also provides California DMV registration services. You can review its STAR-certified smog station services before deciding where to go.
Bring the vehicle in a condition the technician can inspect safely. If the Check Engine Light is on, monitors are incomplete, or you see a fuel or fluid leak, address that issue first instead of treating the inspection as a guess.
Fire House Smog can perform a STAR-certified test-only inspection and help with California DMV registration services, including on-site renewal processing during posted service hours. Visit Fire House Smog in Antioch to arrange your smog check and confirm whether your vehicle or RV fits the available equipment.
1 comment
[…] can read a straightforward explanation of the inspection process in this guide to what a smog check examines. The key distinction is simple: fresh oil may influence combustion conditions, but it doesn't […]
Does Oil Change Affect Emissions Test Results said: