
You're staring at a California registration renewal notice, and the check engine light is glowing on your 2013 Camry. The car starts, drives normally, and doesn't seem to be making unusual noise. That doesn't matter at the smog station. In California, the check engine light, formally called the malfunction indicator lamp, is a regulatory trigger tied directly to the vehicle's emissions inspection.
The right move isn't to gamble on a quick test or erase the warning before you arrive. Diagnose the fault, repair the cause, let the vehicle complete its required self-tests, and only then book the inspection. That sequence prevents the wasted inspection fee and the second trip that follows a predictable failure.
Table of Contents
- What the Check Engine Light Means for Your California Smog Test
- How California Treats an Illuminated MIL During Inspection
- What Happens During the OBD-II Portion of the Smog Check
- Quick Pre-Test Checks You Can Do Before Booking
- Temporary Fixes Versus Professional Diagnostics
- Retest Options and Fire House Smog Policies
- Your Pre-Smog Checklist Before You Drive In
What the Check Engine Light Means for Your California Smog Test
California's Bureau of Automotive Repair treats the MIL as part of the OBD-II inspection, not as a suggestion for the driver. If the lamp is illuminated while the engine is running, the vehicle fails the applicable inspection under the California Smog Check Program. The vehicle can run smoothly, accelerate normally, and still fail because the computerized emissions system has reported a malfunction.
The lamp also has to behave correctly during the dashboard check. With the key on and the engine off, the MIL should illuminate. After the engine starts, it should turn off. That sequence confirms the warning circuit is present and responding rather than removed, disabled, or malfunctioning.
Vehicle age changes the inspection path
OBD-II applies to 1996 and newer gasoline-powered passenger vehicles and light-duty trucks, and to 1998 and newer diesel vehicles, according to BAR's OBD test reference. Newer vehicles receive an OBD-based evaluation, while older vehicles can follow different inspection procedures depending on their model year and equipment.
That means a driver shouldn't apply advice for an older car to a modern vehicle. The exact inspection path depends on the vehicle's fuel type, model year, and applicable Smog Check requirements.
Your decision path is straightforward:
- The light is on while running. Don't book the test yet. Get the fault diagnosed.
- The light was recently cleared. Don't assume the car is ready. Check the readiness monitors.
- The light is off and monitors are ready. A pre-test scan can confirm whether booking makes sense.
- The vehicle fails. Keep the Vehicle Inspection Report, complete the listed repairs, and ask the station about retest eligibility.
Practical rule: A smooth-driving car with an illuminated MIL is still a likely smog failure. The lamp's status matters before the inspector evaluates anything else.
How California Treats an Illuminated MIL During Inspection
The inspection begins with a functional question: does the MIL display the required behavior? California's OBD procedure treats the lamp status as a pass/fail item for applicable OBD-II vehicles. BAR states that a vehicle won't pass Smog Check with the check engine light on, so an inspector can't overlook the warning because the vehicle feels fine on the road.
A normal bulb check isn't a failure. With the key on and the engine off, the MIL should light with the other dashboard indicators. Once the engine starts, it should go out. A steady light while the engine is running indicates that the vehicle's system has commanded the lamp on, and that status produces a failure.
A flashing light deserves immediate attention. It commonly signals an active misfire that can damage the catalytic converter, so driving around hoping it disappears is a poor decision. Whether steady or flashing, an illuminated MIL does not become acceptable because the car passes a quick visual glance.
The cleared-code trap
Clearing trouble codes or disconnecting the battery can turn the dashboard light off temporarily, but it also resets readiness monitors. After emissions repairs, the vehicle must complete the relevant self-tests through normal driving or a manufacturer-specified drive cycle. The BAR explanation of the updated readiness rules makes the key point clear: a cleared lamp alone doesn't prove that the emissions system has verified the repair.
As of October 1, 2025, California requires all applicable readiness monitors to be set for a vehicle to pass, subject to limited fuel-type and model-year allowances described by BAR in its OBD test reference. A recently cleared code can therefore create a separate readiness failure even when the MIL is currently dark.
| MIL Status | Inspector Interpretation | Smog Outcome |
|---|---|---|
| Illuminated with engine running | The OBD system has commanded the lamp on | Fail |
| Illuminated during key-on, engine-off, then off after starting | Normal bulb-check sequence | Continue with the inspection |
| Does not illuminate during key-on, engine-off | Lamp circuit or required display behavior is not verified | Fail |
| Flashing while engine is running | Active fault condition requires prompt diagnosis | Do not test before diagnosis |
| Recently cleared and lamp off | Lamp status may look normal, but monitors may be incomplete | Possible readiness failure |
What Happens During the OBD-II Portion of the Smog Check
At an OBD-equipped station, the technician connects the inspection equipment to the vehicle's diagnostic link connector, commonly called the DLC. The equipment communicates with the vehicle's computer and retrieves the information needed for the official inspection record.
The scan evaluates more than the dashboard lamp. It can capture the vehicle identification information, MIL command status, whether the MIL has been on since the last code clear, stored diagnostic trouble codes, and readiness monitor results. These data points show whether the vehicle's emissions controls have completed their required self-checks and whether the computer has detected a reportable malfunction.
Ready and incomplete monitors
A readiness monitor marked ready has completed its applicable self-test. An incomplete or not-ready monitor hasn't finished the conditions needed for the system to evaluate that emissions component. Battery disconnection and code clearing can return monitors to an incomplete state, which is why arriving immediately after either event is risky.
Under California's current framework, the allowable monitor status depends on fuel type and model year. BAR's guidance describes limited allowances for certain vehicle groups, while the readiness rules effective October 1, 2025 require applicable monitors to be set, with exceptions handled according to the state's criteria.
You can learn more about how these self-tests work in this guide to OBD readiness monitors. The important practical point is that a scan tool reading isn't a repair. It only reports what the vehicle computer currently knows.
The technician then records the inspection results through the BAR inspection system. If the vehicle identification information raises an eVIN issue, the inspection may require an additional visual verification. A damaged, missing, or unreachable diagnostic connector can also prevent the required electronic inspection from being completed.
At the end, the station provides the BAR-OIS printout, which serves as the official record of the inspection. If the vehicle fails, keep that document. It identifies the failed items and gives the repair shop a starting point instead of leaving everyone to guess.
Quick Pre-Test Checks You Can Do Before Booking
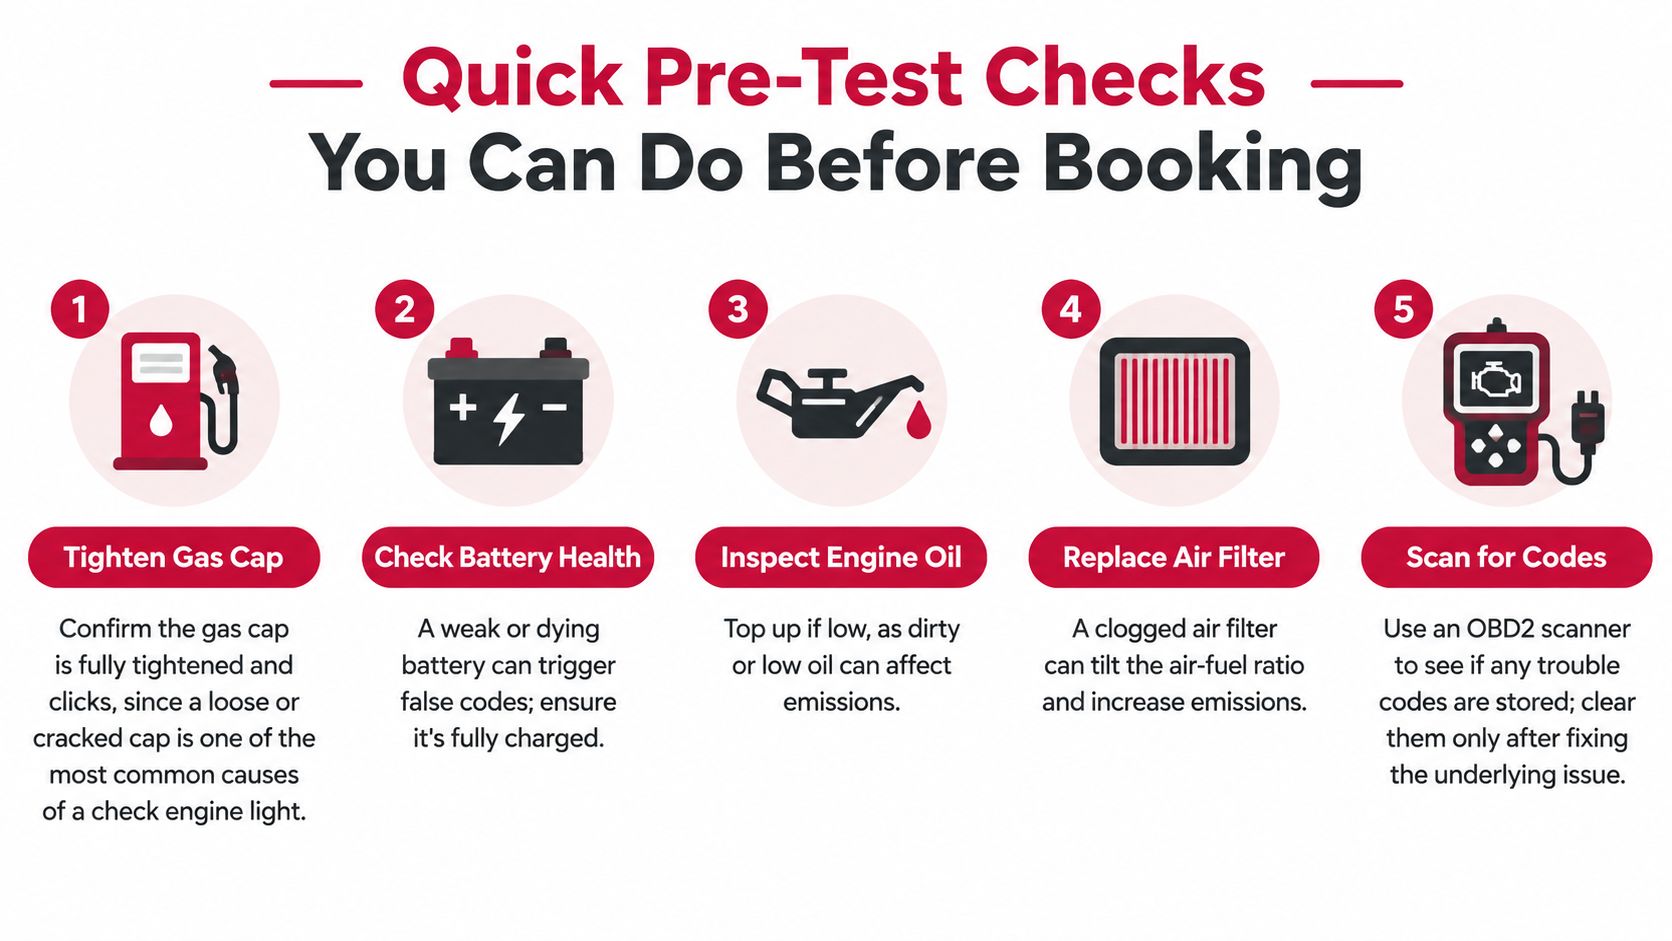
A few checks at home can keep you from paying for an inspection your vehicle was never ready to pass. Start with the gas cap. Remove it, inspect the seal for visible damage, reinstall it, and tighten it until it clicks. A loose or damaged cap can trigger an evaporative-emissions fault, and it's one of the easiest possibilities to rule out.
Then review what happened before the warning appeared. If the battery was disconnected or a code was cleared, the vehicle needs normal driving so its emissions monitors can rerun. A mixture of stop-and-go and highway driving gives the system varied operating conditions, but the manufacturer's drive-cycle instructions may be necessary for monitors that are difficult to set.
Use the dashboard and scanner together
Before starting the engine, look at the instrument cluster. Confirm that the MIL illuminates during the key-on check and then turns off after startup. A dim, intermittent, or missing lamp isn't something to ignore, because the inspection checks the lamp's commanded behavior.
If you have access to an inexpensive OBD-II scanner, read the stored codes and monitor status without erasing anything. You want the scanner to show no active MIL command and the applicable monitors in a ready state. A parts store scan can identify a code, but it usually isn't a full diagnosis.
What not to do
Don't clear the codes just before the appointment. The light may disappear, but the monitors can revert to not ready, creating a different reason for failure. If the MIL returns after you've driven normally, stop treating the problem as a cosmetic dashboard issue and arrange proper diagnostics.
Temporary Fixes Versus Professional Diagnostics
The shortcuts are familiar. Someone disconnects the battery, erases codes with a reader, installs a sensor borrowed from another vehicle, or pours in an additive advertised as an emissions fix. These actions may change what the dashboard shows, but they don't establish that the failed emissions component works.
A professional diagnostic process starts with the code and the conditions under which it appeared. A technician reviews freeze-frame information, tests the system with a capable scan tool, checks wiring and connectors, and isolates the actual cause. Depending on the fault, the repair could involve an oxygen sensor, catalytic converter, ignition component, fuel-control problem, or an EVAP leak.
Compare the choices honestly
| Approach | Typical Cost | Time | Smog Test Outcome Risk |
|---|---|---|---|
| Clear codes or disconnect the battery | Tool or battery-service cost may apply | Immediate dashboard change | High, because monitors can become not ready and the fault may return |
| Replace a part based only on a code | Varies by component and vehicle | Repair time plus monitor drive time | High if the code identifies a system rather than the failed part |
| Use an additive product | Product purchase and application time | Short-term | High, because it doesn't verify the underlying repair |
| Professional diagnosis and repair | Depends on the fault and labor required | Diagnosis, repair, then monitor completion | Lower, because the cause is tested and the vehicle can verify the repair |
Use a code reader as a screening tool, not as permission to erase the evidence. If the light returns, the vehicle runs roughly, or a monitor stays incomplete, pay for diagnosis before paying for another inspection. The common reasons for a smog failure can help you understand the report, but they can't replace vehicle-specific testing.
Fire House Smog operates as a test-only station, so it performs the inspection rather than selling in-house repairs. That separation can be useful when you want an inspection result and a clear failure report before choosing where to repair the vehicle.
Retest Options and Fire House Smog Policies
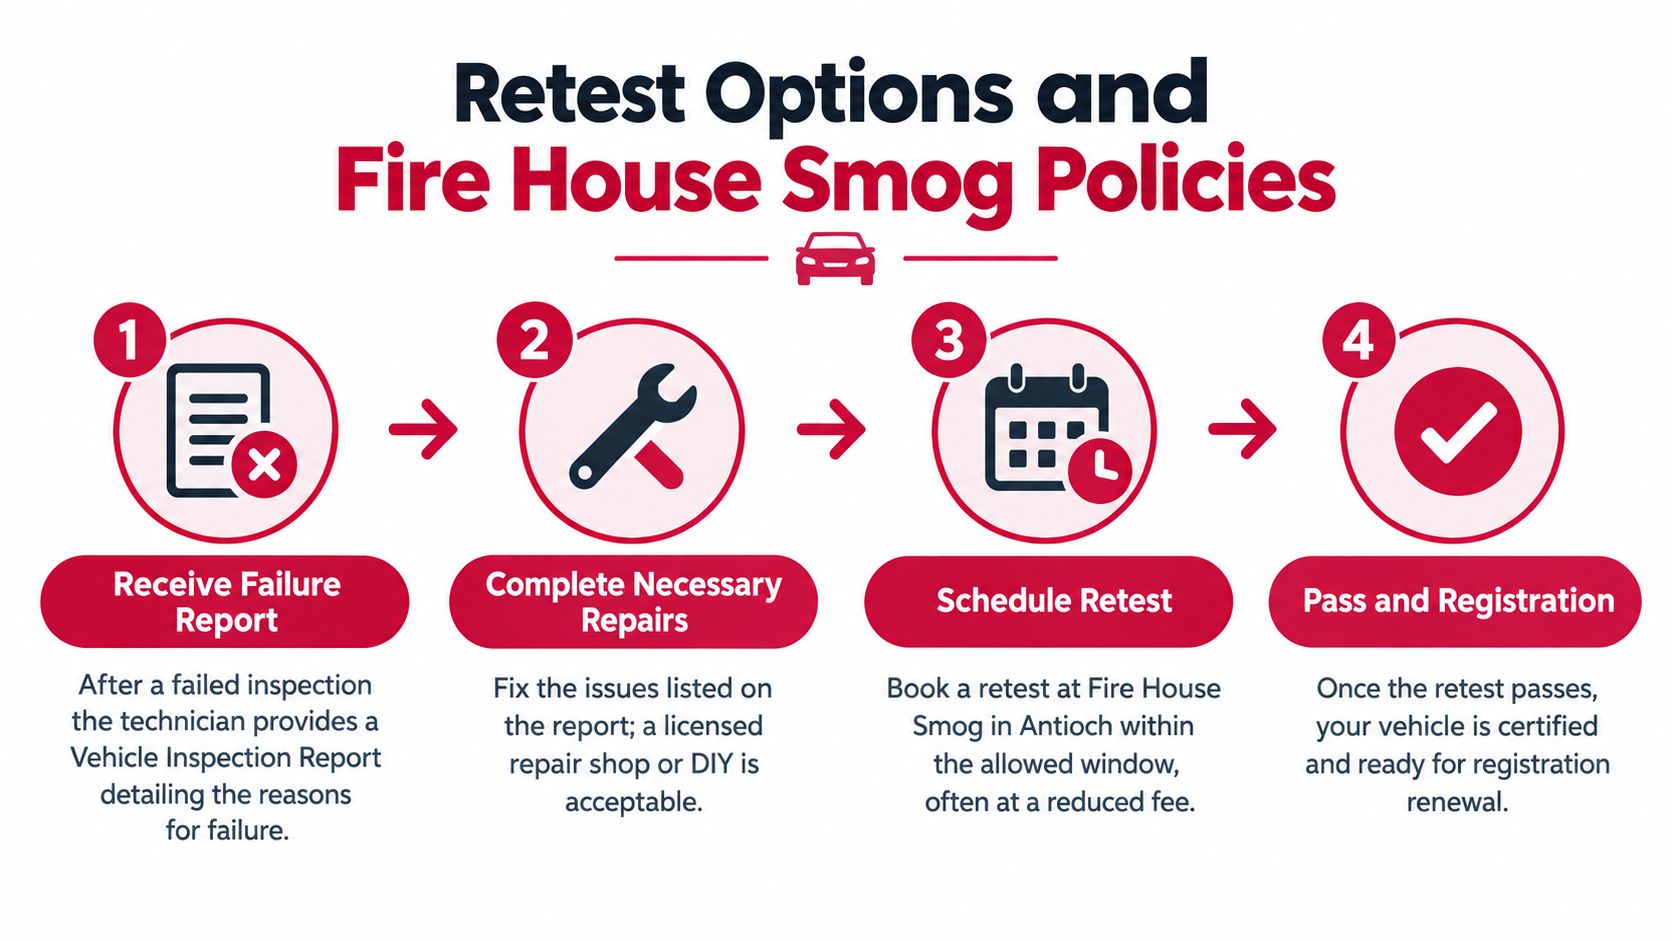
A failed inspection isn't the end of the registration process, but it is a document-driven process from that point forward. The technician provides a Vehicle Inspection Report, or VIR, showing the items that caused the failure. Read that report before authorizing repairs, because the listed failure may concern MIL status, readiness, trouble codes, or another inspection requirement.
The repair location depends on the vehicle's inspection category and the instructions on the report. Some vehicles may need a state-registered repair facility, and STAR, directed-repair, gross-polluter, or hardship situations can involve additional requirements. Don't assume any repair shop can handle every category.
Follow this order after a failure
- Keep the paperwork. Save the VIR and any printed diagnostic information.
- Repair the listed condition. Give the technician the exact failure details, not just “the car needs smog.”
- Allow verification time. After repairs, the vehicle must complete applicable self-tests and return to a ready state.
- Ask about retest eligibility. Fire House Smog's Antioch station offers a free or discounted retest within its defined policy window when the original inspection and qualifying repair work are completed at the same location, subject to site terms and coupon conditions.
- Bring documentation back. Take the prior VIR, repair invoices, identification, and any documents specified by the station.
Call before returning. The station can confirm whether your vehicle qualifies for the applicable retest policy, what repair documentation is needed, and whether a directed or STAR-related requirement changes the process. That short call is more useful than driving back with incomplete paperwork.
The retest still evaluates the vehicle under California's inspection rules. A free or reduced retest doesn't waive the MIL requirement or readiness requirements. It only reduces the cost and inconvenience when the vehicle and documentation meet the station's policy.
For a fuller explanation of the next steps, review what happens after a failed smog test. Repair first, verify the monitors, then schedule the return inspection.
Your Pre-Smog Checklist Before You Drive In
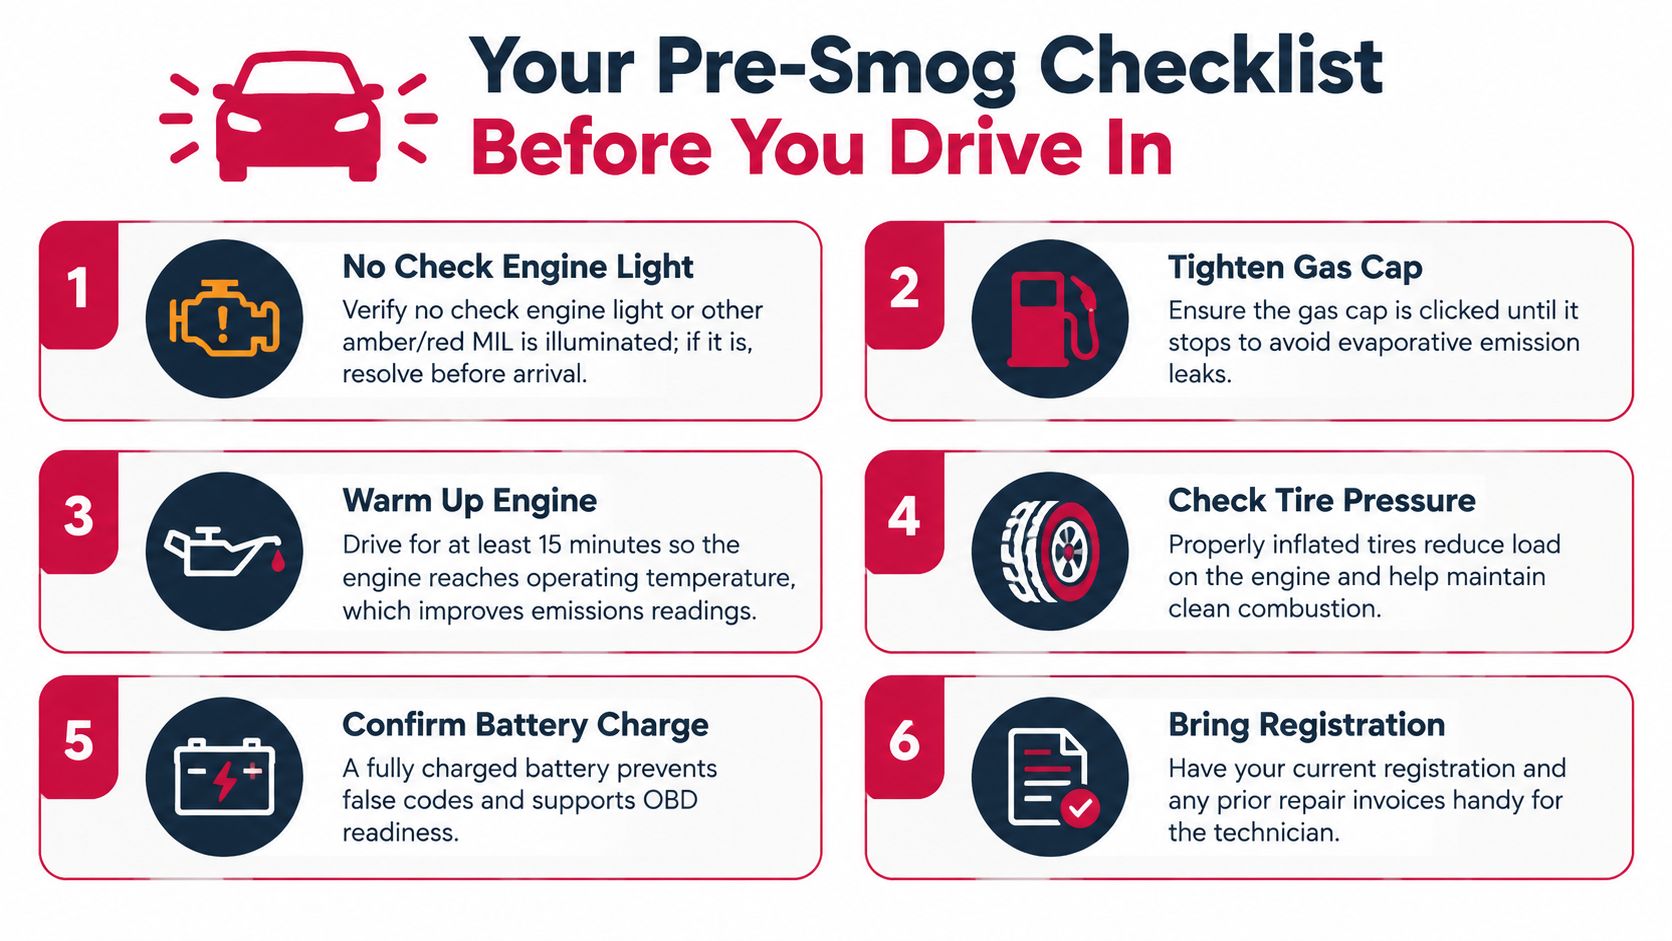
The final check should happen before you leave home, not after the technician connects the OBD equipment. Look at the dashboard with the key on and the engine off, start the vehicle, and confirm the MIL follows the normal sequence. If it stays on, stop there and arrange diagnosis.
Confirm that the battery hasn't recently been disconnected and that no one has erased codes since the last repair. A battery event can reset monitor status, so a dark dashboard light doesn't automatically mean the vehicle is ready for certification.
Run through these final decisions
- Dashboard warning light: The MIL should be off after startup. An illuminated lamp needs diagnosis before testing.
- Gas cap: Tighten it securely and inspect for obvious seal damage.
- Engine warm-up: Drive for at least 15 minutes before arrival, as specified in the preparation guidance provided for this inspection context. This helps bring the engine to operating temperature, but it doesn't replace required monitor completion.
- Fuel level: Keep the tank between one-quarter and three-quarters full when possible, unless your vehicle manufacturer or repair technician gives different instructions.
- Battery condition: Make sure the battery is charged and the vehicle starts normally.
- Documents: Bring your registration, prior VIR, repair invoices, and identification when they apply.
Fire House Smog in Antioch provides STAR-certified, test-only smog inspections and handles California DMV registration services at its Lone Tree Way location. If your vehicle has failed before or recently had emissions work, call ahead to confirm retest eligibility and required paperwork before scheduling.
The practical answer to the California smog test check engine light problem is simple: don't hide the warning, fix the cause, and verify readiness before you test. That approach gives the inspection a real chance to pass and leaves you with documentation if it doesn't.
If your check engine light is on, have the vehicle diagnosed first, then bring the repaired and monitor-ready vehicle to Fire House Smog in Antioch for a STAR-certified test-only inspection. Call ahead about retest eligibility, required documents, and the station's free or discounted retest policy before you make the trip.
You're due for a California registration renewal, and the check engine light came on yesterday. The car still starts, idles, and drives normally, so it's tempting to book a smog test and hope the warning disappears. Don't. At the bay, a lit malfunction indicator lamp can stop the inspection before the technician gets any farther, and switching the light off by clearing codes can leave the vehicle unable to pass for a different reason.
The practical question isn't, “Can I pass smog with the check engine light on?” In California, the answer is no. The useful question is, “What failed, and is the car ready to prove the repair?” The workflow below separates an active emissions fault from a car with an off light but incomplete monitors, so you can diagnose the problem before spending money on parts or a wasted test.
Table of Contents
- Why the Check Engine Light Matters for Smog
- How California Tests the Light
- Reading the Codes Before You Pay for Repairs
- Driving the Right Cycle to Set Readiness Monitors
- What to Do the Day Before and Day of the Test
- Retests Exemptions and When a Light Can Be Legal
- Local Logistics at Fire House Smog in Antioch
Why the Check Engine Light Matters for Smog
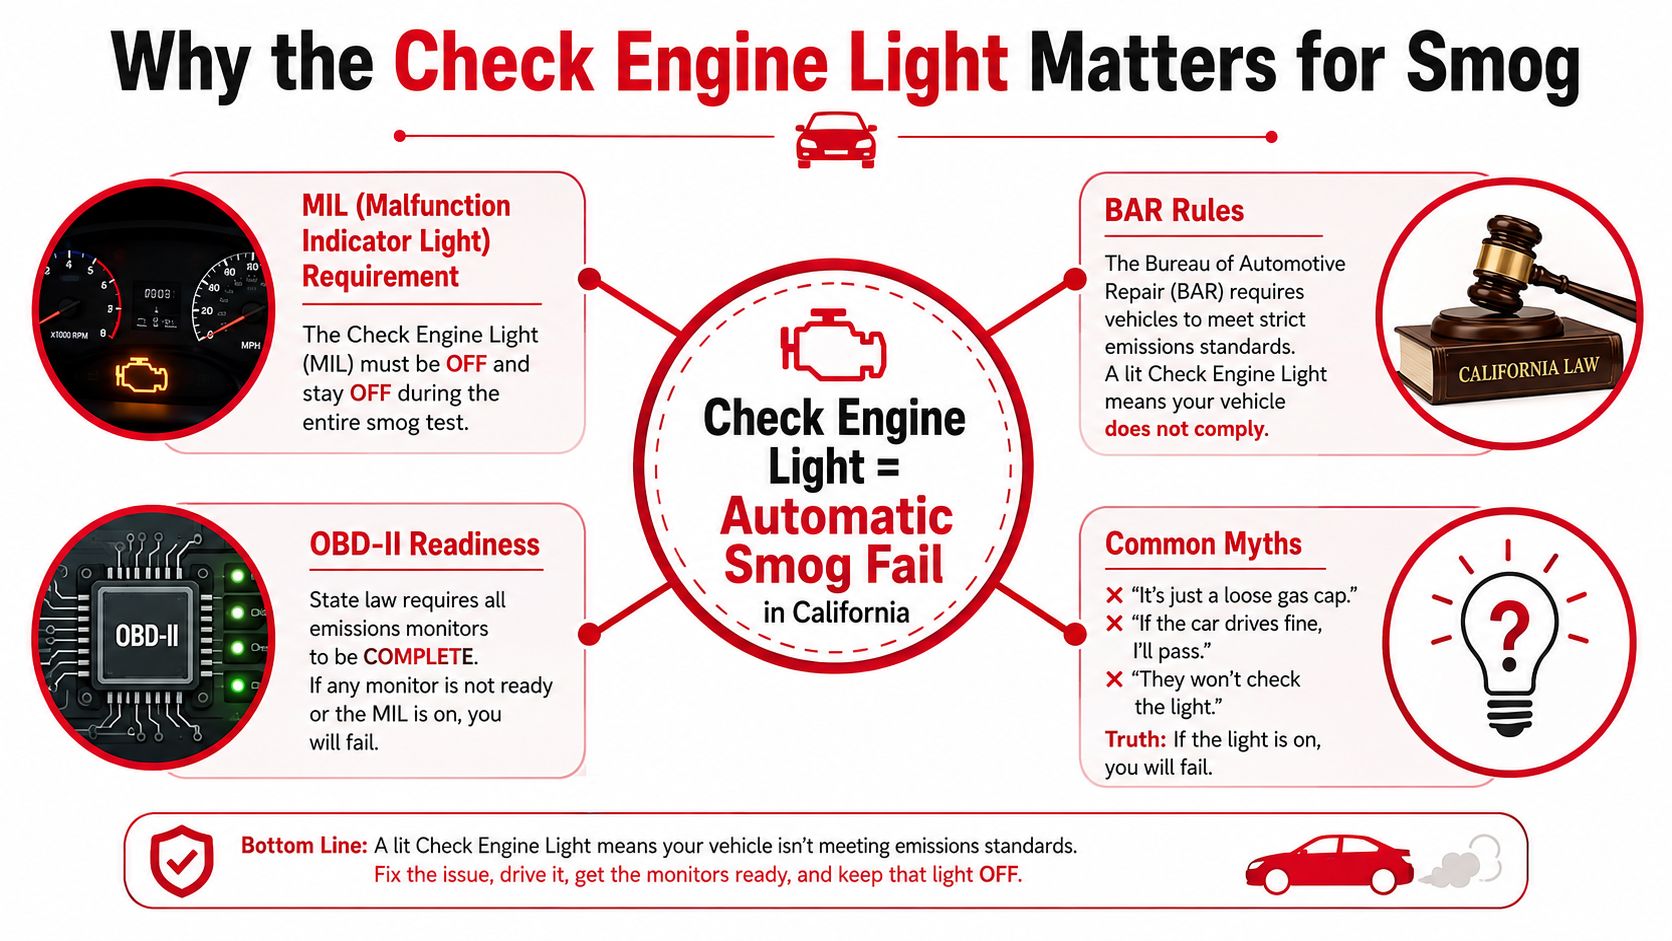
A car can start, idle, and drive normally while its malfunction indicator lamp, or MIL, signals an emissions problem. California treats that lamp as part of the OBD inspection. The California Bureau of Automotive Repair Smog Check manual requires it to illuminate with the key on and engine off, then turn off after the engine starts. A failed sequence can fail the OBD inspection.
The warning light is not a suggestion for the technician. It is evidence that the vehicle computer has stored a fault affecting emissions controls. Problems with fuel control, sensors, or related systems may not yet change acceleration, idle quality, or fuel economy enough for the driver to notice.
Three situations that look similar
A hard fault is a detected malfunction that keeps the MIL on while the engine runs. Treat that as an immediate smog problem. A pending code means the computer has noticed a possible fault but has not confirmed it through its testing. The lamp may remain off, but the code still gives the technician a useful diagnostic lead.
A recent code clear creates a separate problem. Clearing codes, disconnecting the battery, or completing some repairs can switch off the lamp while leaving emissions monitors incomplete. California's updated rule, effective October 1, 2025, requires all readiness monitors to be set for a vehicle to pass Smog Check. An off light does not override a “not ready” result.
Practical rule: Diagnose the fault, repair its cause, confirm the MIL sequence, and check monitor readiness before paying for the test. Clearing codes only hides the warning temporarily and can leave the vehicle unready.
For a broader review of common outcomes, read Fire House Smog's guide to smog check fail reasons. The money-saving workflow is straightforward: scan first, repair the actual cause, complete the required drive checks, and test only when the computer is ready.
How California Tests the Light
At the inspection bay, the technician follows a set sequence rather than judging whether the engine sounds healthy. California's OBD requirements control the process. The BAR OBD test reference outlines the order: first confirm the malfunction indicator lamp, then review diagnostic information and monitor status.
With the ignition on and the engine off, the check engine light should illuminate for the bulb check. After the engine starts, it should go out. A missing lamp, a lamp that never lights, or one that stays on can fail the vehicle before readiness status is reviewed.
What the connector reveals
The technician plugs inspection equipment into the vehicle's OBD-II diagnostic port. The scan checks emissions-related diagnostic trouble codes, confirms whether the MIL is reporting a fault, and reads readiness monitors. These monitors are the vehicle's self-tests for systems including fuel control, oxygen sensors, catalyst performance, and evaporative emissions.
California's inspection method depends on the vehicle's model year. For 2000 and newer gasoline vehicles, Smog Checks rely primarily on OBD-II diagnostics instead of tailpipe testing. Gasoline vehicles from 1996 through 1999 receive both an OBD inspection and tailpipe testing.
| Check Item | 1996-1999 Vehicles | 2000 and Newer Vehicles |
|---|---|---|
| MIL bulb and operation | Checked during OBD inspection | Checked during OBD inspection |
| Diagnostic codes | Read through OBD system | Read through OBD-II system |
| Readiness monitors | Must support inspection eligibility | All required monitors must be complete under the October 2025 rule |
| Tailpipe measurement | Included for gasoline vehicles | Smog checks are primarily OBD-based for gasoline vehicles |
| Visual inspection | Emissions equipment and tampering checked | Emissions equipment and tampering checked |
The October 2025 rule changes the practical pre-test decision. A light that turns off after a code clear does not prove the vehicle is ready. The scan must show completed monitors before the test, or the car can fail inspection eligibility even without an illuminated MIL.
Why the visual check still matters
The computer scan is only part of the appointment. The technician also checks for obvious emissions tampering and missing components. A vehicle can show no current warning light and still have a problem if required emissions hardware has been altered or removed.
Older vehicles outside the applicable OBD inspection framework may undergo other procedures, including tailpipe testing where required. The test mode depends on model year, fuel type, equipment, and California inspection rules. Use the scanner result as one part of the diagnosis, not as the entire eligibility decision.
Reading the Codes Before You Pay for Repairs
A diagnostic trouble code identifies a system or condition. It doesn't automatically identify the failed part. Replacing the first sensor mentioned by a scan tool is how customers turn a modest diagnosis into a parts-shopping spree.
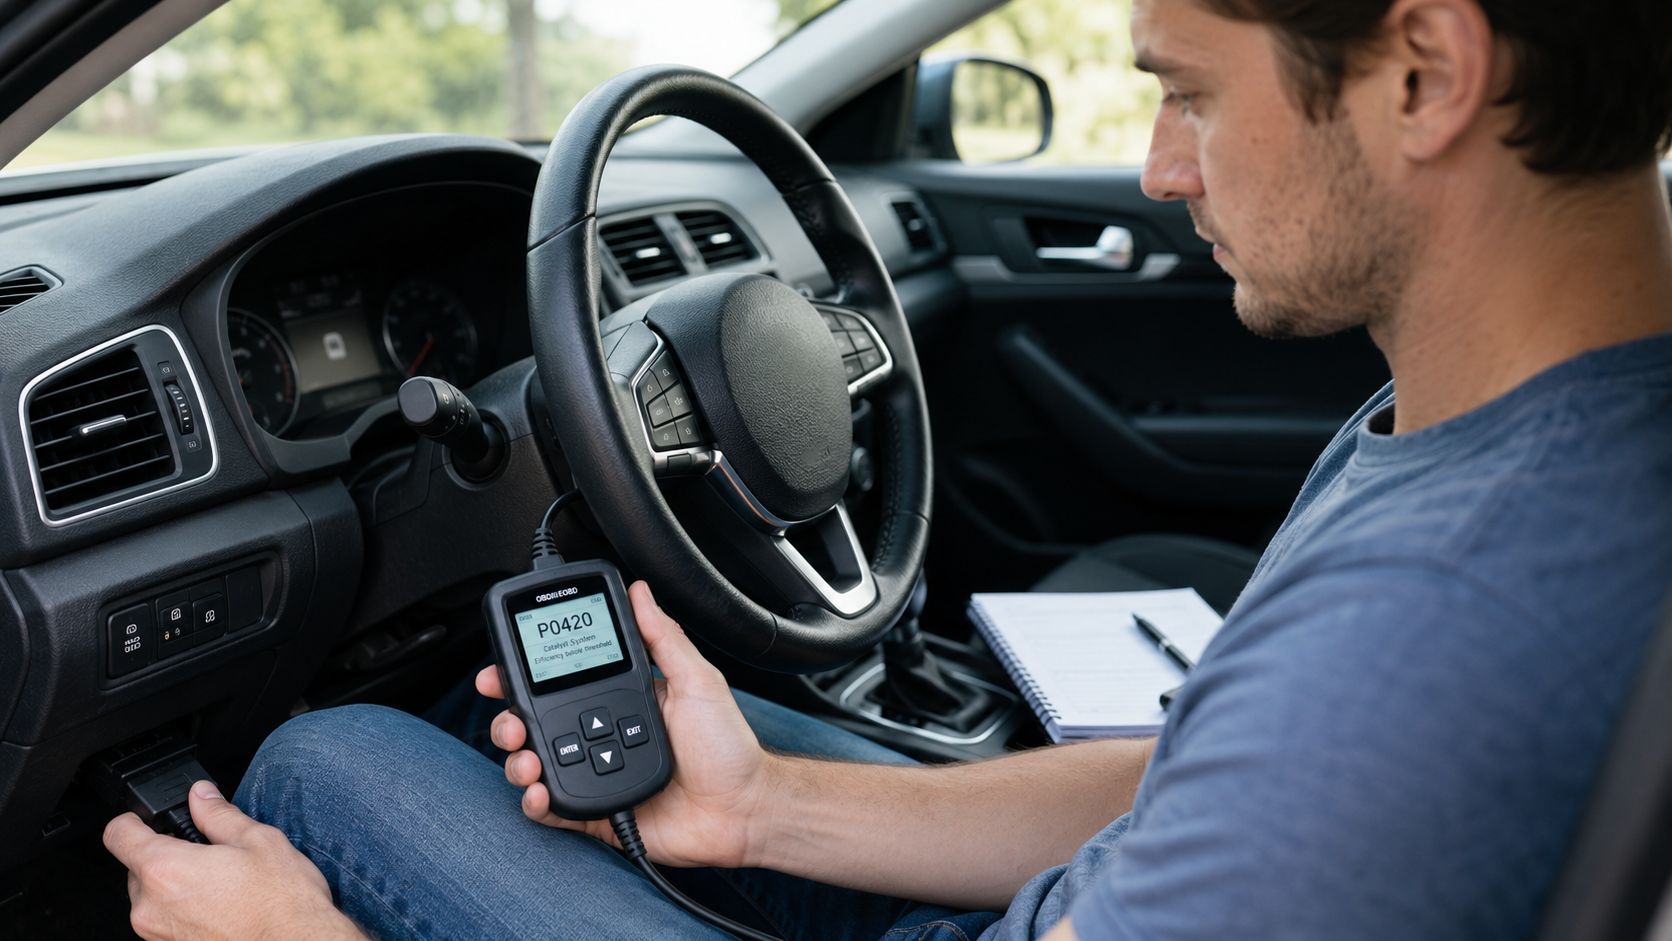
Start with an OBD-II scanner. You can use a personal scanner, borrow one, or ask an auto parts store whether it offers a scan service. Fire House Smog also provides a relevant option for customers who need auto diagnostic and repair guidance in Antioch. The important point is to capture the codes and monitor status before anyone clears the memory.
Read the scan in the right order
Look for confirmed codes, pending codes, freeze-frame information, and readiness status. A confirmed code has met the computer's criteria for storing a fault. A pending code may be an early or intermittent detection, but it can point directly toward a developing issue.
Generic P0 codes follow standardized definitions. Manufacturer-specific P1 codes require the vehicle's service information for accurate interpretation. Freeze-frame data shows the operating conditions when the computer logged the fault, such as engine load, temperature, and speed. That context can distinguish a fault that occurs during freeway operation from one that appears during cold starts or idling.
Use the code as a starting point:
- P0420 catalyst efficiency: Don't immediately buy a catalytic converter. Check for exhaust leaks, misfires, fuel-control problems, and oxygen-sensor data first. A converter can be the victim of another problem, not the original cause.
- P0171 or P0174 lean condition: Inspect vacuum hoses, intake ducting, and the mass-airflow sensor. A dirty MAF sensor or an air leak can mislead fuel-trim diagnosis, but cleaning must follow the sensor maker's instructions.
- P0300 random misfire: Treat this as a priority. Check ignition components, fuel delivery, intake leaks, and engine condition. Misfires can raise emissions and damage the catalyst.
- P0442 small EVAP leak: Start with the gas cap and inspect the seal. If the cap is sound, the system may need a smoke test.
- P0455 large EVAP leak: Look for a missing or poorly sealed cap, disconnected vapor hose, or damaged EVAP component before authorizing expensive work.
Never clear codes right before a smog test. Code clearing resets readiness monitors, so the light may be off while the vehicle reports incomplete checks.
The sensible sequence is scan, document, inspect, repair, and drive. If the light returns, rescan before replacing anything else.
Driving the Right Cycle to Set Readiness Monitors
A repaired car still needs to complete its self-tests before it is ready for inspection. Clearing codes erases stored readiness history, so the vehicle must encounter the temperatures, speeds, loads, and other conditions each monitor requires.
California's October 2025 rule makes this step more important. All readiness monitors must be set for the vehicle to pass. An illuminated dashboard light is not the only issue, and an extinguished light does not prove the checks are complete.
Build a mixed-driving routine
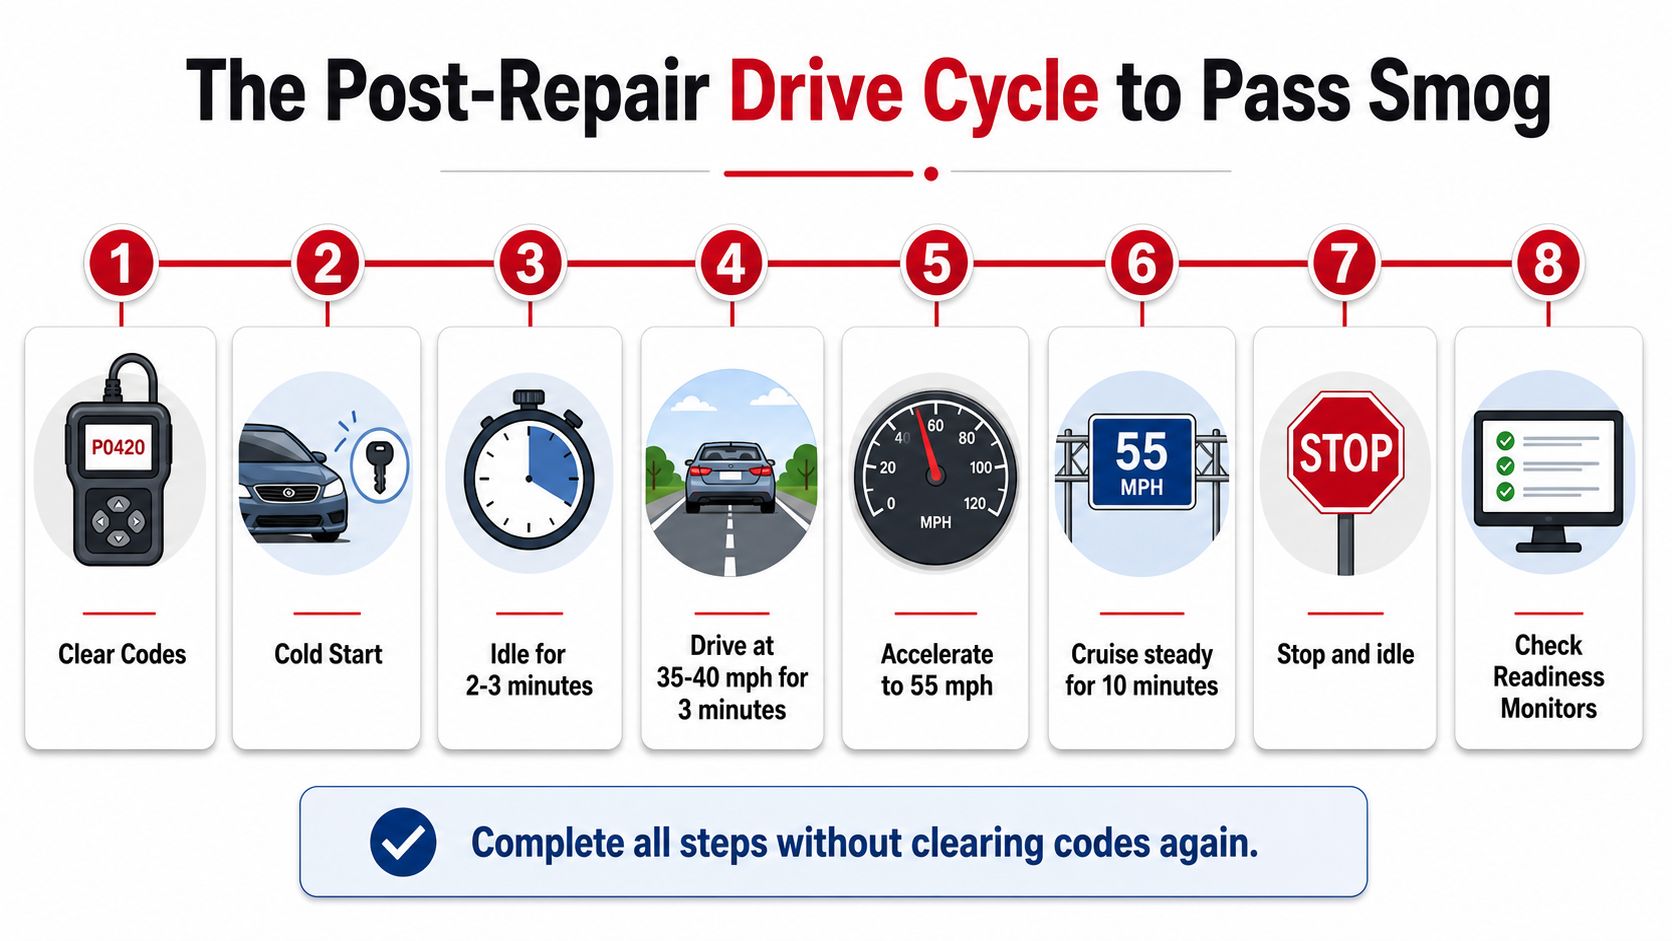
Manufacturers use different enable criteria, so no universal drive cycle works for every model. Start with a cold engine. Let it idle for two to three minutes, then accelerate gently toward 45 to 55 mph on a freeway on-ramp when traffic permits. Hold a steady speed for five to seven minutes, then coast down without braking when safe, giving the fuel-cutoff conditions a chance to occur.
Follow the freeway portion with ordinary surface-street driving. Use gentle acceleration, steady cruising, and complete stops. Repeat the mixed pattern instead of circling one block. Different monitors may require different engine temperatures, vehicle speeds, loads, and coast-down events.
Common checks include:
- Misfire and fuel-trim checks.
- Oxygen-sensor and oxygen-sensor-heater checks.
- Catalyst evaluation.
- EVAP testing.
- EGR and secondary-air checks where equipped.
- Diesel-specific emissions monitors where applicable.
The order varies by vehicle. A monitor can remain incomplete if the fuel level, coolant temperature, ambient conditions, or recent driving pattern did not meet its enable criteria.
Use a scanner to check readiness instead of judging by mileage. A car that has made many short trips may still need sustained freeway operation for a stubborn monitor. RVs and heavy trucks can require longer warm-up periods and steadier grades because their weight and operating load affect test conditions.
A successful cycle generally takes 50 to 100 miles over two to three days, based on the practical guidance in this drive-cycle preparation guide. Leave the codes alone during that period. If the light returns, stop driving for readiness and diagnose the new result before scheduling the test.
What to Do the Day Before and Day of the Test
The day before the appointment is for verification, not experiments. Cycle the ignition and confirm the check engine light illuminates during the bulb check, then turns off after the engine starts. Scan the car and confirm every required readiness monitor shows complete before you leave home.
Fuel level matters to EVAP testing. Keep the tank around three-quarters full, not completely full and not close to empty. Check that the gas cap seals correctly and clicks into place. If the cap seal is cracked or the cap won't tighten, replace it before testing.
A short pre-test checklist
- Check the scan data: Confirm there are no active emissions codes and that monitors are ready.
- Inspect the gas cap: Make sure it seals and locks as designed.
- Avoid battery disconnection: Removing battery power can erase readiness information and may create anti-theft complications.
- Check tire pressure: Keep the tires evenly inflated, especially if the inspection procedure requires dynamometer operation.
- Bring paperwork: Have the vehicle registration and any recent repair documentation available.
Arrive with the engine warmed through ordinary driving, not by revving the car in the parking lot. Tell the technician about recent battery replacement, code clearing, repairs, or an intermittent light. That information helps the station choose the right pre-check and prevents confusion when the scan shows incomplete data.
The cheapest test is the one you don't take before the car is ready.
Ask for a pre-scan before the formal inspection begins. Fire House Smog's standard quick pre-check is intended to catch failed monitors before the inspection proceeds, which can save a retest trip. If the scanner says “not ready,” leave and finish the drive cycle rather than paying to document a predictable failure.
Retests Exemptions and When a Light Can Be Legal
A failed inspection needs a diagnosis based on the failure type. A hard fail means the MIL is on or the vehicle has a qualifying diagnostic fault. The repair path starts with code interpretation and physical testing. A not-ready fail means the lamp may be off and no active fault may be visible, but the computer hasn't completed its required self-tests. That path usually calls for more correct driving and another readiness scan, not immediate parts replacement.
California's Smog Check information from the Bureau of Automotive Repair confirms the central rule: a vehicle won't pass with the check engine light on. The lamp must also operate correctly during the ignition and running checks. An illuminated light isn't made legal by the fact that the car drives smoothly.
Use the failure result as a decision tool
| Scenario | What It Means | Next Action |
|---|---|---|
| Light remains on with the engine running | The computer has identified an active emissions-related fault | Diagnose and repair before testing again |
| Light doesn't illuminate during the bulb check | The MIL circuit or lamp operation has a defect | Repair the instrumentation problem |
| Light is off but monitors are incomplete | The vehicle isn't ready for certification | Follow the correct drive cycle and rescan |
| Light is off and all monitors are complete | The vehicle has cleared the basic OBD readiness gates | Proceed with the Smog Check |
| Visual emissions equipment problem | Required equipment may be missing, altered, or tampered with | Correct the equipment issue before retest |
Some vehicles follow different inspection rules because of age, fuel type, weight, or vehicle classification. Those categories should be confirmed with the station or BAR rather than assumed from the dashboard light. An exemption from one portion of testing doesn't turn an active MIL into a pass.
Repair assistance may be available through California's Consumer Assistance Program when a qualifying vehicle meets the program's requirements. A cost-based waiver is a separate state process with its own eligibility rules, documentation, and repair requirements. Ask the Bureau of Automotive Repair or a participating station for the current pathway before authorizing work.
The decision tree is straightforward. Light on means repair first. Light off but not ready means drive and rescan. No light and ready means test now. That sequence protects you from both unnecessary repairs and premature retests.
Local Logistics at Fire House Smog in Antioch
Antioch drivers should verify the appointment details before heading to a station, especially when the vehicle isn't a standard passenger car. Fire House Smog operates at 2900 Lone Tree Way in Antioch, and its test-only operation focuses on emissions inspections rather than selling repair work. Confirm the current address, posted hours, vehicle acceptance, and coupon terms before you go.
Bring the vehicle registration, the last smog receipt if you're returning after a failure, and repair paperwork if you're pursuing a directed repair or waiver. Keep the invoice. Retest eligibility depends on the station's policy and coupon terms, and the site's published information describes a free retest when applicable.
Call before bringing unusual vehicles
Call ahead for diesel trucks, RVs, and motorhomes. A diesel vehicle may require a different test procedure, while a larger motorhome may need confirmation that the bay and equipment can accommodate it. Out-of-state vehicles may also need VIN verification or a registration-related service that should be discussed before arrival.
Fire House Smog offers STAR-certified test-only inspections for passenger vehicles, SUVs, light-duty trucks, and some recreational vehicles. It also provides California DMV registration services, including renewal and related registration tasks, subject to posted service hours. Payment methods, current wait times, and vehicle-specific eligibility can change, so ask the station directly rather than relying on an old listing.
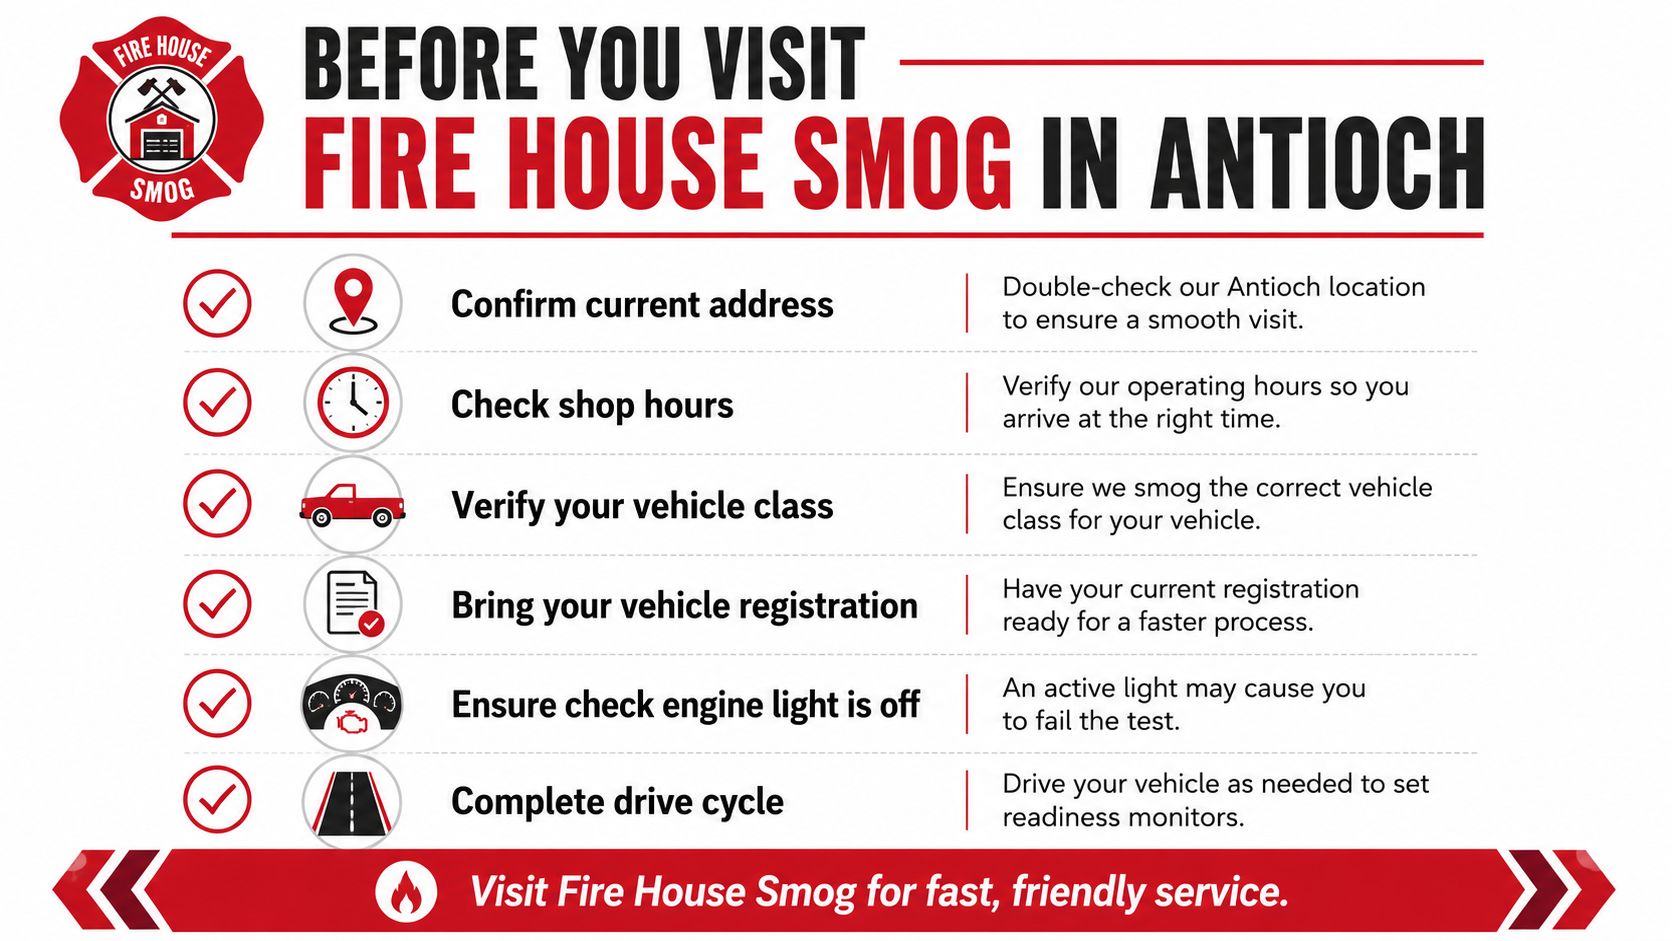
A practical visit checklist:
- Confirm the location: Verify the Lone Tree Way address before leaving.
- Check operating hours: Ask about Sunday, evening, and DMV service availability.
- Verify the vehicle class: Mention diesel trucks, RVs, motorhomes, or unusual equipment.
- Bring documents: Carry registration, prior test paperwork, and repair records.
- Check the light: The MIL must operate correctly and turn off with the engine running.
- Verify readiness: Don't arrive with incomplete monitors, even if the dashboard is dark.
- Plan the timing: An early Saturday appointment can help reduce waiting, but call first for special vehicle classes.
If the phone line is tied up during lunch, leave a voicemail with your vehicle type and reason for calling. The station's listed telephone number is 925-754-1600. A quick confirmation before driving over is better than discovering that an RV, diesel truck, or not-ready vehicle can't enter the test lane.
Fire House Smog offers STAR-certified test-only smog inspections, readiness pre-checks, retest support, and California DMV registration services in Antioch. Check your check engine light and readiness monitors before you go, then visit Fire House Smog or call 925-754-1600 to confirm the right test procedure for your vehicle.